Photo Corners headlinesarchivemikepasini.com
![]()
A S C R A P B O O K O F S O L U T I O N S F O R T H E P H O T O G R A P H E R
![]()
Reviews of photography products that enhance the enjoyment of taking pictures. Published frequently but irregularly.
Shooting Rivera's Murals


26 February 2013
Last week we took an unusual tour of San Francisco when our nephew and his bride came for a visit. She teaches high school Spanish in upstate New York and wanted to tour the Diego Rivera murals in the city. We'd never seen them.
These were the first commissioned murals he painted outside Mexico but they aren't well known. In fact, ask a native about them and you'll most likely hear them guess you're talking about the murals at Coit Tower. Maybe even Rincon Annex.
Those are Works Projects Administration murals from the Depression but they aren't by Rivera. Anton Refregier did the Rincon Annex murals. Twenty-five (or so) artists contributed to the murals in Coit Tower but not Rivera.
All of the murals share a social consciousness that does not represent a romantic view of life during the Depression. Their social realism, palette and drawing style were all inspired by Rivera's earlier works. But his brush never touched them.
THREE MURALS
There are three Rivera murals in San Francisco, which Rivera painted as frescos using a technique he learned in Italy and perfected in Mexico. All of them are open to the public at no charge. They're also located a healthy distance from each other, making it easy to include them in one or another excursion.
- The Allegory of California, completed in 1931, overlooks the landing of a rather grand staircase on the tenth floor of the City Club of San Francisco at 155 Sansome in downtown San Francisco behind the old Stock Exchange building (which, fittingly, is now a gym). While the official tour is only available for something like two hours one day a month, be nice to the desk clerk (mention how much you enjoyed your trip to Italy) and he'll make a call to get you up there, assuming the Club isn't hosting something. Best to call ahead, in fact.
Corrected 'Fresco'. Mouseover to see the original capture.
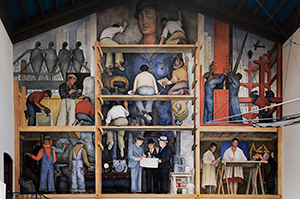
- The Making of a Fresco Showing the Building of a City is on the north wall of an exhibition space at the San Francisco Art Institute at 800 Chestnut St. in North Beach just a few steps from Fisherman's Wharf. The room is to the left as you enter off Chestnut but it's polite to request permission at reception direction across the patio from the front door. They're very happy to know you're interested.
- Pan American Unity from 1940 hugs the round back wall of the lobby of the Diego Rivera Theater on the campus of City College of San Francisco at 50 Phelan Ave. in the sunny southern part of the city. The building is open from 10 a.m. to 4 p.m. but sometimes closed for lunch during the week and always on holidays.
They are all located in very difficult-to-park locations but easily reached by public transportation.
San Francisco City Guides offers free tours of the murals by reservation only.
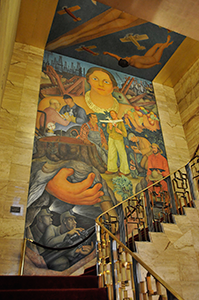
'Allegory' Angles. Mouseover to see the view from up the stairs.
ANGLES
They all share another trait, too, which is why we're writing about them. They are all bears to photograph.
The problem is simply that you can't get a very good angle on any of them. Even at the City Club, where you can shoot the main wall straight on, the ceiling section is not so cooperative.
The best shot is probably at the Art Institute, although when we were there an art installation in the middle of the room made it impossible to get a good angle.
And forget about City College. That curved wall is a monster and it's only a lobby, so you're tucked in so tight you can only crane your neck to make out the scenes. Unless, that is, you discover the staircase behind you that leads to an observation deck and gives you a better if still not distortion-free view. You can, however, get a very nice brochure in the lobby that illustrates the mural.
STRATEGY
Having left not only our tripod but also our portable scaffolding at home, we were reduced to two techniques to shoot the murals.
The first is the obvious one. Don't fight it. Take the ambient shot. What it looks like to be there. The room. With the mural in it.
Make no pretension that you are capturing the work of art itself. Don't feel bad if one corner is too dark and another bleached with glare. Just get the map not the satellite view.
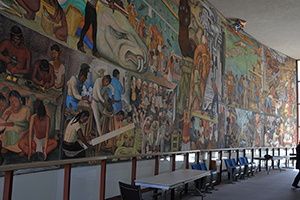
'Pan' Overall Shot. It's what it really looks like anyway. Call it an 'establishing shot.'
The second is to shoot the mural in smaller sections. This is a two-parter.
The murals are all a bit like those Advent calendars with a scene behind each window except the whole front wall has been removed so you see each room without obstruction.
So part one is to photograph groups of "rooms" or scenes so you can see how they relate to each other. This is often chronological.
But the fun part is part two in which you photograph individual scenes. You can't get every scene distortion free, but you can move around quite a bit to minimize the problem. And if you can use DxO's ViewPoint to correct geometric distortion, you might take a few shots with a lot of room to crop.
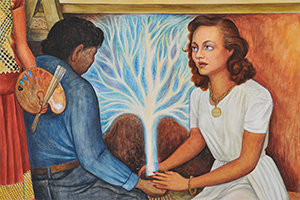
'Pan' Detail Shot. But go for the detail, too.
It's also worth while to get some close detail shots. It isn't easy to find a fresco these days and the brush work and color is of interest in itself. The paint is actually applied to the wet plaster of the wall, becoming part of it.
Lighting is a problem with works as large as these. It won't be even. And while we were never actually prohibited from using flash, we didn't use it either. It's not a nice thing to do to a work of art. So crank your ISO up and let your breath out slowly as you depress the shutter or lift your finger off your smartphone shutter.
But do evaluate your results. You may find you are capturing the images with too much saturation. And overexposure is a constant risk, too. They are painted with a vibrant palette but not every color is vibrant.
EDITS
You can greatly improve your images back at the keyboard. Here are a few things we did:
- Uneven Lighting. To even out the lighting, we created new layers and applied a gradient to them, which we mollified by reducing the opacity (sometimes to as little as nine percent). The effect can be changed by setting the Blend mode.
- Distortion. We used both DxO Optics Pro and DxO ViewPoint to correct distortion on both overall shots and detail shots. Optics Pro directs you to draw a rectangle on the image and then drag the four corner points to the corners of your subject (not the image). You then have the process the image, of course. But ViewPoint can run as a Photoshop plug-in. It draws the rectangle for you and you drag the corner points to the corners of your subject. We looked for guidelines in the image (like the ceiling beam and the sides of the mural) to help us align the points.
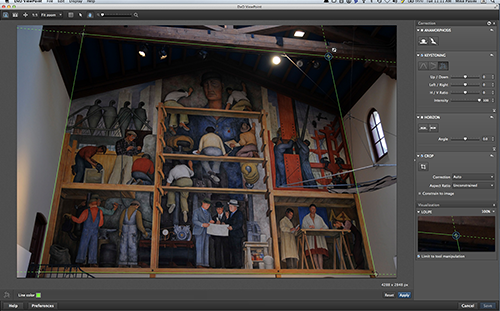
DxO ViewPoint. As a Photoshop plug-in, ViewPoint makes it easy to make a quick if dramatic geometric correction. We set the four corners of the green outline to correct the image (as seen above).
- Saturation. We had to knock saturation down a bit on the captures to more accurately reflect what we saw. You know when you go too far. Moving the slider back and forth a bit helps hone in on reality.
- Tonality. Curves is helpful in brightening the shadows and bringing some color back into the highlights.
CONCLUSION
Tracking down the Rivera murals in San Francisco was a lot of fun. And being able to photograph them was more rewarding than a bag full of souvenirs. Although you'll still have room for that too, no matter how many photos you take.