Photo Corners headlinesarchivemikepasini.com
![]()
A S C R A P B O O K O F S O L U T I O N S F O R T H E P H O T O G R A P H E R
![]()
Reviews of photography products that enhance the enjoyment of taking pictures. Published frequently but irregularly.
OpticFilm 120 Review Update


27 February 2013
When we last discussed our adventure with the Plustek OpticFilm 120, we were preparing to scan our first actual image. We'd profiled the scanner with the included 6x7cm IT8 target without any serious trouble, so we set aside an afternoon to do some scanning.
That was yesterday. And, as you may have noticed, we haven't continued the review.
For our first real-world image scans, we thought we'd try some Kodak Gold Max 400 color negatives. Sure, everyone wants to know what 120 film looks like from the scanner (and we'll get there) but this pup does it all and we have a lot of Gold Max, so let's start there, we thought.
We loaded the 35mm film strip holder with two strips, launched SilverFast 8 and with the scanner powered up, inserted the holder.
Two days later we still haven't got a scan to show you.
But it's not for lack of trying. We just haven't been able to get SilverFast 8 to see what's in the holder.
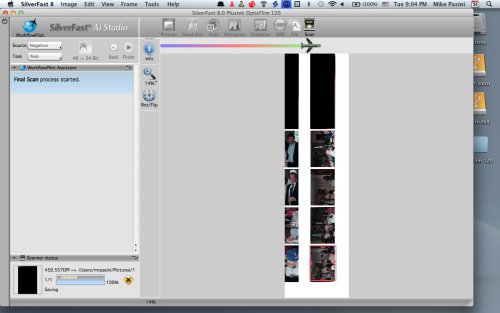
Trouble. SilverFast 8 can't find the frames on this 35mm film strip holder.
PROGRESS REPORT | Back to Contents
We're working with LaserSoft Imaging to isolate the problem, but we've learned a few things in two days that we're happy to pass along in the meantime.
- The holder is (sometimes) ejected from the rear of the scanner. During scans it will often protrude about four inches out the back but to fully remove it, you do need the full 14-inch clearance. The scanner disengages from the holder so it can't pull it back in once it's poking it's tail out the rear, so to speak. (A recent software update seems to have fixed this problem.)
- Oddly enough, other times, the scanner maintains its grip on the holder, even ejecting it out the front slot when you quit SilverFast 8. Go figure.
- The OS X version of SilverFast continues to frustrate us. Frequently (more often than not) the application simply stopped responding, requiring a Force Quit. Almost always the Frame command was disabled and the frame indicator itself misaligned. The software never accurately found the frames on any film strips we scanned. (After uninstalling and reinstalling the latest update, we've had just one hang.)
- Alignment of 120 film in the holder may be an issue. We have some 120 film strips with a good healthy gap between frames. The holders assume a rather narrow (and standard) gap.
- How you maintain the scanner isn't divulged. What do you do if dust gets in there? We're encouraged by the requirement to load the holders emulsion down (right reading), implying the optics are above the film (and not a landing spot for dust) with the light source below (where dust can fry).
A BRIGHT IDEA | Back to Contents
We were able to profile the scanner with a lovely scan of the IT8 target, so we had some hope that scanning a single piece of 120 film would be possible.
We loaded a 6x7mm film strip and did a preview scan.
Same problem, though. The preview scan showed part of the first slide and part of the second with the frame happily spanning both.
We have the hardware configured as recommended by Lasersoft Imaging. A direct USB connection (no hub). The scanner itself does respond as we would expect (loading and unloading the holder, scanning when prompted). And don't forget that It8 target scan was successful.
So we seem to be suffering a software issue at this point. And no, the current version of VueScan does not support the OpticFilm 120.
Comments | Back to Contents
See that you have some issues with finding the correct frames. When I started for the first time with the 120 I had the same issue.
Then I discovered that frames could be found in the following way:
1) Make sure that under Transparancy you choose the right holder. I first thought that transparancy ment a positive film (slide) but then found out that it means that the light shines through the material.
2) Choose the right filmmaterial, Positive (slide), Kodachrome or Negative.
3) Next the bit-depth, usually 48->24
4) On the Vertical Tool Bar there is a knob called "Overview" When this knob is not visible you have to click the down arrow at the bottom of that Bar. Click on Overview and there opens a pop-up dialog. Click there on Get/Refresh Thumbnails.
Now the scanner will start searching the Holder and fills all the available Thumbnails. Next select the Thumbnail(s) you want to scan. When you click OK the scanner will make a PreScan of the first selected Thumbnail.
BTW, I did not use the ScanPilot.
-- Hans Kerensky
(Ah ha! Thanks, Hans. It was Step 4 that helped (I had the first three right). Odd that you have to manually scan an overview (isn't that what Preview is all about?) but it worked. The buttons were disabled but as soon as I opened the dialog box, the scanner rescanned the holder and I saw my 120 image in the frame at last. Worked with the 35mm film strips, too. (Both of them.) And I see there's also an update for SilverFast 8 today, too. -- Mike)
I saw your review and wanted to comment on your frame issues.
This is really a Silverfast bug. On the start screen, you have the option somewhere to reset Silverfast, this gets rid of the frame alignment issue.
But it is of course always vital to 1) select the correct frame size in SilverFast and to 2) do an overview scan :)
-- Bernhard Fuhry
Thanks, Berny. That Reset option is on the Services Dialog box, which you access from the startup screen. There are two, one to reset serialization (not what you want to do) and one to reset preferences (that's the one). In our case, just doing the Overview resolved the framing issue. -- Mike