Photo Corners headlinesarchivemikepasini.com
![]()
A S C R A P B O O K O F S O L U T I O N S F O R T H E P H O T O G R A P H E R
![]()
Reviews of photography products that enhance the enjoyment of taking pictures. Published frequently but irregularly.
OpticFilm 120 Scanning


12 March 2013
Getting our first scans from the OpticFilm 120 has taken a lot longer than we expected.
With a little help from a couple of readers, we were able to resolve our framing issue but we continue to have issues with SilverFast 8. And we haven't had a crash since uninstalling SilverFast 8 and reinstalling the latest update.
There are still a few minor issues to resolve (as we explain below) but we've been able to get through our suite of scans and will post samples with comparison scans from other recent scanners shortly.
Meanwhile, here's a report cover some issues we've encountered scanning with the OpticFilm 120 and SilverFast 8.
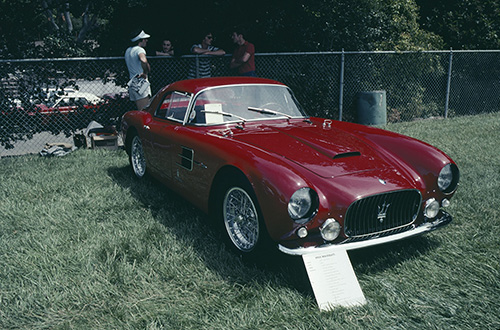
1955 Maserati. Speaking of speed, we couldn't wait for this OpticFilm 120 scan of the May 1981 Kodachrome.
ABOUT FRAMES | Back to Contents
We previously reported our problems scanning the full frame holder with SilverFast 8.
We resolved the issue after Hans Kerensky suggested we try the Overview option to preview all the frames in the holder. Bernhard Fuhry suggested resetting the SilverFast preferences from the Services Dialog in the startup window as an alternate solution.
Overview resolved the issue for us, scanning the full holder and identifying the frames.
But that isn't the end of the frames story.
SilverFast 8 still can't accurately find the frames in any of the holders. LaserSoft Imaging explained why:
This is due to the fact that unfortunately we don't position the holders in the software. We asked Plustek engineers to be able to trigger exact position coordinates to the scanner but we can only call a position index to which the scanner will drive the holder. Different story for example with the Nikon LS9000 in which we can position the frames exactly because we can give exact coordinates where we want the scanner to position the holder. We have issued a feature request with Plustek regarding this and have been told that they will consider this for implementation with the next hardware review cycle.
So SilverFast can tell the scanner, "Go to frame 3," but it can't say, "Go to Position X,Y on the holder." And apparently that would require a firmware update from Plustek.
The workaround is to draw your own frames and save the frameset in SilverFast. That's worked for us.
Overview and JobManager also get a little confused about frames. We'd select a frame in Job Manage and click on the Delete icon to remove it from the queue. But the one above it was removed.
Then we'd add that one back in from Overview but a different frame was added. When we scanned, the right images were processed, so it looks like the screen just isn't update correctly. But it can drive you crazy.
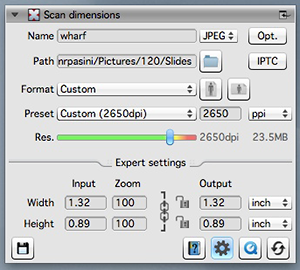
Setting Scan Resolution. The green Res. bar goes red at 10,800.
FILE SIZES | Back to Contents
Full optical scan resolution on the OpticFilm 120 is 10,600 dpi. While you can set any resolution you like, SilverFast 8 helpfully slips to both half and quarter optical resolutions. Those are 5,300 dpi and 2,650 dpi.
So how do those play out scanning 35mm and 120mm film?
For a reference point, consider a typical 12-Mp digital camera capture of anywhere between 4288x2848 (for a dSLR) and 4000x3000 (for a digicam). These expand to 35-MB 8-bit image files, approximately.
Scanning a 35mm frame on the OpticFilm 120 at 2560 dpi (quarter optical resolution) yields an equivalent image of about 3710x2500 (depending on how you draw the frame, of course) and a 27-MB 8-bit image.
So consider that quarter optical will get you roughly what a camera would.
Then ask yourself what your printer requires for a high resolution print. Here's our chart showing the possibilities:
Original Desc Scanner DPI Printer DPI Output H Output W 35mm frame Inkjet (min) 1,200 150 8.00 12.00 35mm frame Inkjet (min) 2,650 150 17.67 26.50 35mm frame Dye sub 10,600 300 35.33 53.00 35mm frame Inkjet (full) 10,600 450 23.56 35.33 35mm frame Inkjet (half) 5,300 450 11.78 17.67 35mm frame Inkjet (quarter) 2,650 450 5.89 8.83 35mm frame Lightroom max 10,600 722 14.68 22.02 At 120 sizes, it's a different world. Here, a full optical scan of a 6x7 frame yields a 3.64-GB 8-bit image. At half optical, it's 838.8-MB. And at quarter optical it's 241.1-MB.
The 120 image size at full optical resolution is approximately (depending on you framing) 27,945 x 23,270 pixel, at half it's 13,973 x 11,635 pixels and at a quarter it's 6,987 x 5,821 pixels.
Ektachrome Restored. An old Ektachrome restored with iSRD defect removal. Note the Bell & Howell 16mm movie camera in the foreground.
SPEED | Back to Contents
How long a scan takes depends on several factors. Enabling Multi-Exposure (which requires a second scan) or defect removal (which requires an infrared scan) certainly increase scan time.
We found a basic 2,650-dpi scan of a 35mm frame without those features enabled, took a little over two minutes. With Multi-Exposure enabled, the scan time went up to over three minutes, nearly four.
Because the holder transport is motorized, you can set the scan options, give the Scan command and leave the OpticFilm 120 to itself to complete up to five 35mm slides or two strips of 35mm film or three frames of 120 film at a time.