Photo Corners headlinesarchivemikepasini.com
![]()
A S C R A P B O O K O F S O L U T I O N S F O R T H E P H O T O G R A P H E R
![]()
Reviews of photography products that enhance the enjoyment of taking pictures. Published frequently but irregularly.
Exposure 5 Ups The Ante


18 June 2013

With the release last week of Alien Skin's Exposure 5, the competition has heated up in the film-look and preset game. Exposure 5 joins DxO's FilmPack 4 and Digital Film Tools' Film Stocks in providing special effects plug-ins based on an emulsion emulation.
COMPARISONS
All three products provide hundreds of straight film emulations, both currently available emulsions and historical ones from a variety of manufacturers. Effects extend into a variety of photographic processes as well, like cyanotypes and push processing, although not every product offers them all.
In fact, it's a little hard to compare them. Exposure 5 had Panatomic-X (a favorite film of ours) but not the others. It has push processing, but not the others. It doesn't, though, have T-Max 400 and the others do. It does have T-Max 100 and 3200 with over- and under-exposed treatments, as well as a Holga 120 preset.
Of the three, we find Film Stocks to be less interested in film grain emulation than the other two, preferring a cleaner digital look. Exposure and FilmPack are closer to the traditional photographic experience, adding print borders, scratches and light leaks to the effects.
WHAT IT DOES | Back to Contents
While all of these products emulate films, what they're really about is creating a style. And while Exposure and FilmPack have image editing tools, you don't really want to make your initial tone and color adjustments in these tools. They're more for tweaking the look you develop.
So these tools aren't about optimizing an image. Crop (especially if you intend to use the frame or border tools), optimize the tone and adjust the color in your image editor first.
Then, if you want to apply a certain style or look to the image or set of images, perhaps for some event or a publication or just a brochure, these tools are where you go. They're great at quickly taking your image places you can't otherwise easily go.
ENTER EXPOSURE | Back to Contents
And, as far as that goes, we've found Exposure to take you the furthest. FilmPack provides excellent film emulations and has been expanded to include more effects. As we said in our review, it's a lot of fun.
But Exposure, with many more options, promises even more fun.
In our Dec. 27, 2012 story Exposure To The Rescue, we describe how we used Exposure 4 to make a layer adjustment to an old photo we had retouched. We used Glamour Shot | Low filter and then added a Daguerrotype | Sepia layer. Those are looks just not otherwise available.
So let's take a closer look at Exposure.
SYSTEM REQUIREMENTS | Back to Contents
You can use Exposure 5 as a standalone program. That's a first for Alien Skin, but they plan to take this approach with all their products.
You can also use it as a plug-in with one of the following applications:
- Adobe Photoshop CS5, CS6 or CC
- Adobe Photoshop Elements 10 or newer
- Adobe Photoshop Lightroom 4 or newer
- Apple Aperture 3 or newer
Windows users need Windows 7 or newer. Macintosh users need Mac OS X 10.7 or newer.
An Intel Core 2 processor or compatible is required. A monitor with 1280x768 resolution or greater is required.
We tested the Mac version under OS 10.7.
INTERFACE | Back to Contents
The new design of the Exposure interface is inspired by Lightroom and similar to Photoshop. But unlike Lightroom, the font sizes are large enough to read easily.
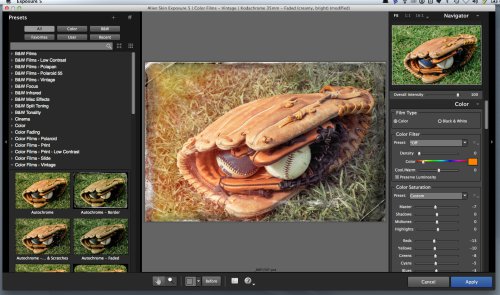
New Interface. Presets pane, Preview pane, Controls pane sit above the Toolbar.
There are four panes in the Exposure window, whether you launch it as a plug-in or use it standalone. When you work on more than one image in standalone mode, a filmstrip opens in a fifth pane to show you the set of images you are working on.
You can load a set of images by dragging them onto the application icon in the dock. Dragging them onto the application did not work.

Tools. Just a few.
Just above the filmstrip (which does not appear when working on a single image in plug-in mode), is the toolbar. It's refreshingly simple:
- You have a Move or Zoom tool active.
- You can click and hold a Before button to see what you started with in the Preview pane above or select a split-screen view (there's not paired view of complete Before/After images).

Preferences. Performance was spry at this setting.
- You can see how many new messages there are on the Alien Skin site (a feature you can turn off in the Preferences).
- You can get Help, Deactivate this instance (so you an activate the application on another machine) and access Preferences.
The Online Help option takes you to a set of tutorials by Jimmy Beech that are efficient and clear. They're more than enough to get you up to speed with Exposure 5.
In addition to showing you how the application works, it's helpful to watch Beech use it, collapsing panes and accessing features. There's a flow to using Exposure that Beech illustrates very nicely.
At the far right of the tool, there are a few more options:
- Cancel (plug-in) or Quit (application)
- Apply
In the application those are split by arrows to navigate the filmstrip and a button to select or deselect them aAll
On either side of the Preview pane above the toolbar are collapsible panes. On the left are the Presets and on the right the Controls. A click on the arrow associated with them makes them disappear until you hover the mouse over the small arrow. Another click and the pane stays open.
That's really a nice way to work. You can expand the image in the Preview pane to take advantage of as much screen space as possible without losing access to the Presets or the Controls. And if you need either to stay open, you can do that with a click.
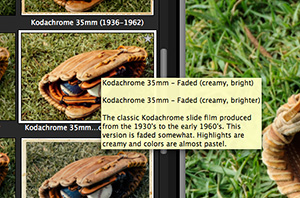
A Little Help. Get the Preset's full name and description when you hover over it.
One of the problems with any of these applications is listing the names of the presets, particularly when they are as long as the ones in Exposure. If it's just a film emulsion, it will fit under the thumbnail. But when it includes exposure information or some additional effect, you usually have to hover over the thumbnail to read the whole name.
But by just resizing the pane after closing the Controls pane, say, you can see many more full names. So don't be shy about configuring the workspace more comfortably for what you're doing. It was designed for just that.
PRESETS | Back to Contents
There are a lot of presets in Exposure. In his review, Tyson Robichaud counted 346, including 180 Black and White and 266 Color.
Having a lot of presets can be confusing, but they are nicely organized in Exposure so you can hone in on something pretty quickly. There are six buttons at the top: All, Color, B&W, Favorites, User and Recent to filter the list, which expands when you pick a category. A search bar helps narrow things down as well.
Two buttons next to the search bar display the list or thumbnail view in two or three columns. A Home button on top of the pane returns you to the view you had opened. And a Plus button lets you add the current effect as a custom preset.
CONTROLS | Back to Contents
The Controls pane has a wealth of options but, oddly, no histogram. We always find a histogram helpful, so we're a bit disappointed by that.
Controls. A few of the panels.
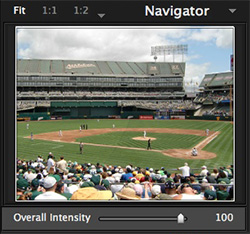
At the top, there are a few Enlargement options, very efficient ones: Fit the image in the pane, show it at 100 percent or pick from a list of options that run from 1:16 to 16:1. The option you select becomes your third option, so if you like seeing things half-sized, you can just click 1:2 and it will remain on the toolbar.
A Navigator window below that can be collapsed.
An Overall Intensity slider varies the strength of the effect
After that come sections which each provide a preset whose options are reflected in the Preview pane as you scroll through them. But the preset parameters are also available for adjustment. And if you create a custom one you want to keep, you can add it to the presets.
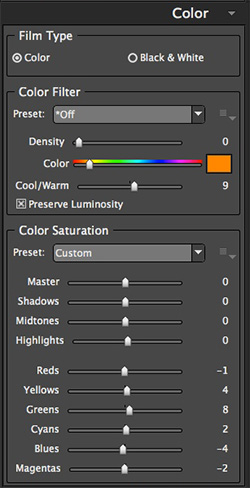
In the Color section of the Controls pane, everything depends on which Film Type you (or your preset) have set, Color or Black & White.
For both a Color Filter option starts things off with the usual optical color filter set to pick from but with Density, Color and Cool/Warm sliders tossed it to create your own, which can be saved as a new preset. A Preserve Luminosity checkbox is also provided.
For Color film types, Color Saturation follows with presets to boost or fade parts of the curve. You can also shift shadows, midtones and highlights with sliders or adjust individual colors (reds, yellows, greens, cyans, blues, magentas) with sliders.
For Black and White film types, Color Sensitivity provides presets based on color and the same sliders for individual colors.
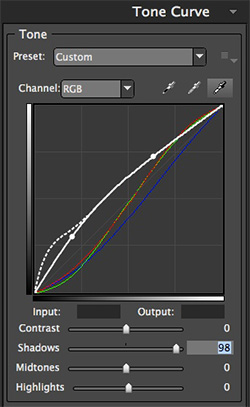
The Tone Curve section follows with presets for effects like Crush Blacks, Shadow Recovery and Ultra Contrast, to name a few. A curve can be manipulated directly on any channel or all of them with sliders for Contrast, Shadows, Midtones and Highlights.
Split Toning also provides a set of presets. But you can select either color and adjust its hue and strength with sliders to refine the approach.
The Focus section also provides a set of presets you can add to using the Sharpen and Blur settings. Sharpen provides the familiar Amount, Radius and Threshold sliders with a Sharpen Brightness Only checkbox. Blur adds Opacity, Radius and Lens Warp sliders.
In the Grain section, you can select a preset or create your own using the Amount, Type and Size options, each of which have their own sliders. You can also adjust the overall strength of the grain with a slider. And you can save the result as a preset.
Like DxO, Alien Skin did extensive analysis of film grain. For films that are still available, Alien Skin shot new film, studying the grain of the developed film with photomicrographs. For discontinued films, they used photo archives and "the professionals who created the. The anthropology of learning from film photographers was as important as the chemistry and math," the company said.
The IR section simulates infrared sensitivity. Presets adjust glow, fog and the Wood effect with sliders to affect color contrast, halation opacity and halation spread.
The Vignette section offers a variety of shapes with both soft and hard edges. You can roll your own with sliders for amount, size, roundness, softness, distortion and lump size. You can also set the vignette location center or use a Random seed generator to do it.
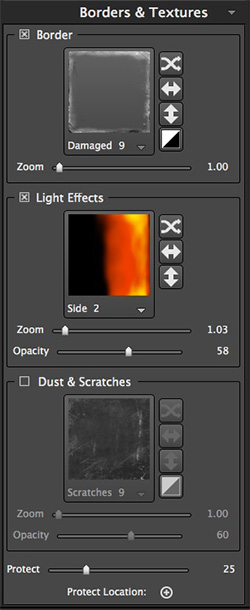
Borders & Textures provides some of the more dramatic effects in the package and has been expanded in this version of Exposure to include more Light Effects like Sun Flare. In addition, film scratches that had been built using mathematical algorithms now use scans of actual scratches.
There three sub-panels in Border & Textures: Border, Light Effects and Dust & Scratches (which also includes paper surfaces). All of them have a checkbox to activate or deactivate them. Presets are displayed when you click the titled thumbnail. To the right of the thumbnail are several buttons: Randomize the selected preset, flip horizontally, flip vertically and invert brightness (not for Light Effects). A Zoom and Opacity slider is also available (no Opacity slider for Borders, though). You can also protect part of the image, setting the center of the location and using a slider to extend the protection.
There's a lot to play with in the Controls section. The new interface makes it easy to see what you can do and experiment.
USING EXPOSURE | Back to Contents
So let's do some work -- or have some fun -- with Exposure 5.
It just so happened that Harald Johnson at PhoozL asked us to judge a photo contest next week whose theme is summer. Did we have a suitable image for the contest?
San Francisco (where we are) is notorious for it's chilly summer fog. And our neighborhood is especially afflicted. There have been summers here where we didn't see sunshine from May to September.
We have to escape every now and then to get our Vitamin D. And one year we managed to escape to Santa Barbara where a couple of nephews were learning the game of baseball.
We found a shot of a baseball glove on the grass that we liked. The big glove was actually cradling a little glove, which was holding two balls. We liked the generational aspect of the image.
But we'd grabbed the shot in passing and it wasn't very well framed. A crop might have helped but Harald uses a 4:3 crop and that crop wouldn't have worked.
And, like every digital image it seems, the shot looked new. Like it was taken yesterday. And we wanted it to evoke another time.
Perfect problem for Exposure 5 to solve.
First we optimized the tone and color by opening the JPEG in Camera Raw in Photoshop CS6. When we'd done that, we sent it to the Exposure 5 plug-in.
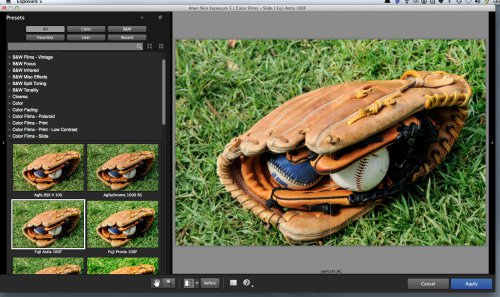
Picking a Preset. Control pane is collapsed.
Once in the plug-in, we spit the image preview into right and left halves before we collapsed the Controls pane so we could focus on the image and the Presets options. There are 26 categories of options. Where to begin?
Well, color or black and white? Color. And while we're at it Vintage.
We settled on Kodachrome 35mm - Faded (creamy, bright), which Exposure describes as "The classic Kodachrome slide film produced from the 1930s to the early 1960s. This version is faded somewhat. Highlights are creamy and colors are almost pastel."
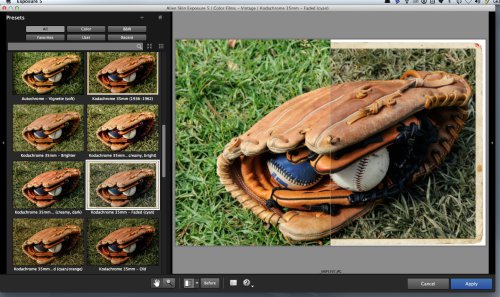
Split Image. The Preview shows Before on the left, After on the left.
That was just the right era for us and the creamy colors enhanced both the gloves and the balls.
We were just getting started.
We collapsed the Presets pane and opened the Controls pane, turning off the side-by-side preview so we could see the overall effect of our tweaks.
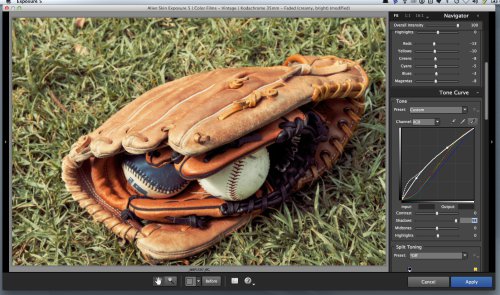
Curves Adjustment. We wanted to save the shadow detail.
We left the Overall Intensity at 100 and didn't apply a color filter. But the dark shadows of the small glove were plugged up so we opened them with the Shadows slider in the Tone pane.
We did add a little sharpening in the Focus section to bring out the cracks in the leather of the old glove. We did add a little vignette, a rounded soft one that we lightened to an Amount of 38 from 75. And because our subject was off center (we should have cropped it in Camera Raw!), we moved the center of the vignette down a bit.
Then it was time for some fun stuff.
We knew we wanted a border, but which one? The categories for our options were Brushed Paper, Damaged, Grunge,Plain Polaroid 55, Print or Vintage. We displayed all of them at once and just moused over each option watching the preview change to something we liked. Damage 9 looked good but we thought it was even better when we reversed the brightness.

Focus. Sharpened the cracks in the leather.
That left the image a little too bright on the left side, so we thought we'd add a little light leak. We wanted it from the side, so we looked at the Side light leaks, picking the second one and cranking it back halfway.
Finally, we added some scratches. The balls had scratches, so why not the old image?
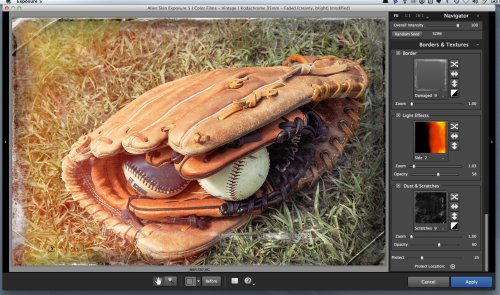
Border, Light Leak. Just to finish the effect.
EXPORT | Back to Contents
We liked our conversion so much we thought we'd save it as a custom Preset. And then we thought we'd Export it. The XML file was 8K, easily shared.

Preset Icon. Just double-click to install.
But we'll have to tell you how because there's no manual to explain it. Just double-click on the exported preset. Alien Skin Settings Router will launch and put the file in the right place (which was not in any of the places we looked).
In our case, it warned us we already had it installed and asked if we wanted to replace it. Smart little thing.
DESIGN | Back to Contents
Sometimes a "new interface" is just a new skin. Maybe the fashionable new dark scheme, say. But sometimes a new interface is a more efficient way to use the tools.

Final Image. Painless.
It's a real pleasure to use software that gives you this much power over an image without getting in the way. We might have forgiven it if it had made us work hard to preview the lists of options but it only required us to mouse over them. Not a click, not another run at the list, just mouse over.
And where we thought a border or effect would have been better reversed or on another corner, it let us move it with a mouse click. Instead of disappointment, creativity.
PRICE & AVAILABILITY | Back to Contents
Exposure 5 is now available directly from Alien Skin for $199. Owners of any version of Exposure may upgrade for $99.
Free upgrades will be automatically sent to everyone who purchased Exposure 4 directly from Alien Skin Software after February.
You can also download a limited-time trial version from the Alien Skin Web site.
CONCLUSION | Back to Contents
We're a softie when it comes to film effects. We kind of like the idea of returning from a hike in the hills and applying a Tri-X 400 look to all of our images as if it were 40 years ago. Exposure 5 makes that easy.
But we also spent enough years as a graphic artist to appreciate developing a graphic style for a publication or piece. And Exposure 5 makes that pretty easy too -- and fun.
If Film Tools is the more digital filter generator with FilmPack and Exposure the more analog inspired, Exposure distinguishes itself with more effects. And with the new interface, that library of effects is now easy to appreciate and tweak.
We were pretty happy playing around in FilmPack. But Exposure 5 has upped the ante.