Photo Corners headlinesarchivemikepasini.com
![]()
A S C R A P B O O K O F S O L U T I O N S F O R T H E P H O T O G R A P H E R
![]()
Reviews of photography products that enhance the enjoyment of taking pictures. Published frequently but irregularly.
On Assignment: Shooting The Wedding


3 July 2013
The day of the wedding we awoke to freshly charged batteries and clean media that had been battle tested during the rehearsal or earlier. With a late afternoon wedding, we had all day to get ready.
We could always have used more time with the camcorder, but our clips from the rehearsal had looked good. So, after a quick mid-day tour of the venue to get some shots of the decorations, we concerned ourselves with the physical setup of all our gear, putting it all together for the first time.
We just had to set up the tripod and the quick release plate.
QUICK RELEASE | Back to Contents
So what's a quick release plate and why would you want one? This is just another one of the things that separates the pro from the amateur, but like all of the things that do, it's big.
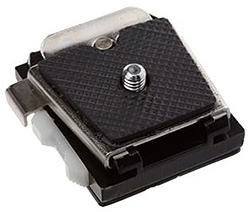
Quick Release. Nearly identical modern equivalent to the indispensable one we used.
If you screw the tripod into the tripod socket on your camera, the camera is staying on the tripod. It takes a couple of minutes to free the camera from the tripod. So you won't do it in the heat of the action.
But if you screw a quick release plate to the camera, you can slide the plate into (and off) its mate, which is screwed onto the tripod screw (where it won't go anywhere).
This isn't something you do while the camcorder is running, but it is something you do when you quickly want to go handheld or just as quickly want to stabilize the camera for a long take.
The trick to it is that there's a small locking mechanism of some kind that keeps the camera secure when the plate slides all the way into its matching mount. You can carry the tripod to a new location without worrying that the plate will slide out of its cradle.
It was no problem to screw in the plate to the camcorder or the mount to the tripod. We could have used a second plate for the still camera, frankly, but when you're borrowing equipment, you can't be choosy.
The particular quick release plate we use was an antique but closely resembles the Adorama B-184 Tripod Quick Release Shoe, which only sets you back $12.95. You can pay upwards of $100 for these things. But this did the job just fine.
TRIPOD WOES | Back to Contents
Before mounting the quick release on the tripod, we had first pulled out the Star-D Professional tripod (whose modern equivalent would be a Tiltall TE01B), extending its legs to see how tall it would go.
If we could extend the camera overhead on the tripod, we could get some overhead shots, we thought. That might come in handy at the reception.
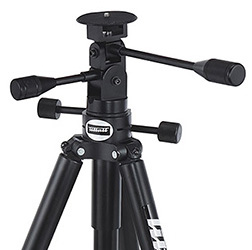
Tripod Head. Note the four lever locks. We only had two.
While the three-segment legs extended without a problem and brought the camcorder to eye-level, we immediately noticed a problem with the tripod head. There were four locks and only two keys.
The two keys were on the swivel and height locks. The two tilt locks (side-to-side and front-to-back) were bare. The side-to-side lock happened to be locked, though. We'd need to straighten it a bit, and perhaps adjust it from time to time, but it was snug enough for the light camera and some fidgeting.
But the front-to-back lock was loose. The quick release plate would just flipped all the way down or all the way up.
There were a couple of Philips screws on the adjustment and we hoped tightening them up would solve the problem, much like the side-to-side lock. But we didn't bring any screw drivers in our luggage. So we went down to the hotel's maintenance truck and borrowed one.
We tightened the screws and even took them out, trying to adjust the lock, but it made no difference. We'd have to be a little clever about our use of the locks.
The locks were just knobs that screwed into the keys and then let you release or tighten the key. Unscrewing the lock from the key let it roam free, usually.
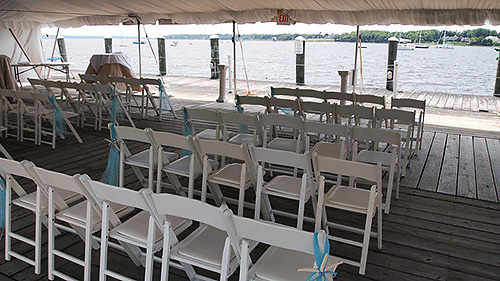
Venue Setup. The chairs facing a nice view of the harbor.
It turned out that we could let the height lock run free. The center column just sat on the tripod collar. We couldn't raise it and lock it and then remove the lock from the key, so we just left it down and free. And promised not to carry the tripod upside down.
The side-to-side lock was stiff, so we left that one alone, too.
We used the two keys to lock the panning motion and the front-to-back motion. Which meant we spent some time locking and unlocking keys and having some less-than-smooth panning. This Star-D tripod was designed for stills not video.
What would a pro use? A fluid head. No locking to worry about, just wish the camera into position and it smoothly goes there.
There is a software solution to stabilize unwanted camera movement, we hasten to note. We'd certainly be relying on that.
AUDIO | Back to Contents
Our Plan B audio setup was no problem at all. We installed fresh batteries and made sure we had hours of recording time available.
We didn't want the groom to worry about stopping and starting the recorder. Just turn it on, slip it in his pocket and forget about it until we come to retrieve it.
And, distracted by his beautiful bride, that's exactly how that worked out.
CAMCORDER SETUP | Back to Contents
We went over the camcorder settings. You might think setting everything on Auto would cover the bases, but it often locks you into just the wrong thing.
We made sure we were recording at the highest quality and lowest compression. We checked the backlight function. We confirmed we would be writing to the hard disk.
Our audio at the rehearsal was inaudible so we looked for a solution in the manual. Zoom Mic would make the microphone follow the lens's zoom position. We enabled that.
But the real solution would be our digital recorder and the amplified audio (which had not been installed prior to the rehearsal).
Manuals are no substitute for experience, unfortunately. But it's all we had, so we went through it several times, using the search function of our PDF reader to quickly find topics we wanted to learn about.
We wish we could say the manual answered all our questions but it didn't. Camcorders work about the same as they always did but their features can be quite obscure.
STILL SETUP | Back to Contents
Because we were shooting 16:9 HD video, we set the Olympus E-PL1 to a 16:9 aspect ratio and vowed to only shoot in landscape (not portrait) orientation.
We had no intention of shooting stills but we thought the occasional still shot in the right format might be helpful in the video. Sort of a band-aid to cover up an unsightly pan or break in the action.
We also had the foresight to set the E-PL1's video format to HD. So we had the same aspect ratio on both video rigs.
THE BAG | Back to Contents
Once we had our gear ready, we had to make it convenient to move around. We expected to have to move quickly from one to another location during the ceremony. And we'd still have to make it to the reception upstairs in a nearby building.
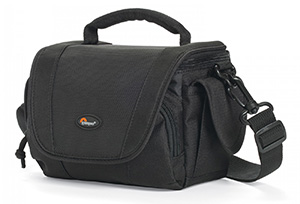
Camcorder Bag. Small but really an ideal size for this event.
We left the tripod legs extended. No sense unlocking and sliding and locking all three of them over and over. That gave us nine less things to do.
We had the camcorder mounted in the quick release which, itself, was locked into its cradle on the tripod. That was all set.
We put the still camera in the Lowepro bag along with a microfiber cleaning cloth and some spare SD cards, which fit in the Lowepro's side pockets. And we tucked the digital audio recorder in the Lowepro's front pocket.
The shoulder strap on the Edit bag was short enough to hang from one of the tripod locks and functioned, to our happy surprise, like a basket or shelf for the still camera. That gave us a mobile, flexible platform to work from, sort of like an oil derrick out at sea.
With our setup checked out, we gathered the tripod legs, tossed the bag over our shoulder and headed over to the tent.
STILL PHOTOGRAPHER | Back to Contents
The crowd had already begun to gather. A great time to get a few candids. But first we had to pick our initial position.
The groomsmen would already be at the front, lined up so there would be no point in positioning ourselves on the right to catch them quickly marching into position. Instead, we set up on the left so we could capture the bridesmaids turn from the aisle to their positions. We'd get their faces in the best light.
And we'd also be in the right spot a moment later to catch the father of the bride giving her away. We'd only need to shift the tripod a foot or two to get all the faces in the shot.
The chairs had finally been set up as well as the central spot for the ceremony, so we set the tripod in the best spot to catch all that and then pulled the camcorder off the tripod to catch a few strains of the harp player and wander through the assembling crowd.
As we took our supplemental video, we noticed one of the still photographers at work, Melissa Lacouture, who with Marisa Betterncourt runs M Studios. We approached her, introduced ourselves and asked if the tripod would be in her way. We also told her that we planned to move it to the back during the ceremony. No problem, she confirmed, and thanked us for asking.
So right off the bat we were working on the same side. We've been to weddings where the still photographer asks for everyone's attention and forbids anyone from stepping on his shots. And others where it's no problem. The range is a wide one so it makes sense to get on the same page early.
A DELIVERY | Back to Contents
In all the excitement, we'd forgotten to deliver the digital audio recorder to the groom. But there was still time and we knew where he and the groomsmen were hiding. We left the tent with the recorder and thought to bring along the still camera.
Good move. One of the funnier shots of the day was the groom pretending to be trapped in the room with a groomsman pleading to be let out with him. And in the glare of a corner of the window you can see our reflection taking the shot as well.
We gave the groom the recorder and the simplest instructions possible. The controls are all on the side. Slide to power on, press the red button to start recording, slip it into your pocket with the microphone end up -- and have fun.
SOME STILLS | Back to Contents
Then the guys mugged for a couple of shots. The light was marvelous and there was no still photographer in sight.
[center th-P6221140.JPG 500 282 "Groomsmen" "We grabbed a couple of these, some even less serious (imagine)"]
We didn't dare visit the women but we did catch the mother of the groom on her way to the tent and got a couple of nice shots of her. Then we approached the affable father of the bride, sitting in the shade waiting for the ladies. He looked so elegant we had to ask if we could take his photo.
Oh, he said, sure but he never looks good. We gave it a shot and looked surprised. "Hey, this one is pretty good. Take a look," we invited him.
He looked surprised himself. "That is a good one," he smiled.
ACTION! | Back to Contents
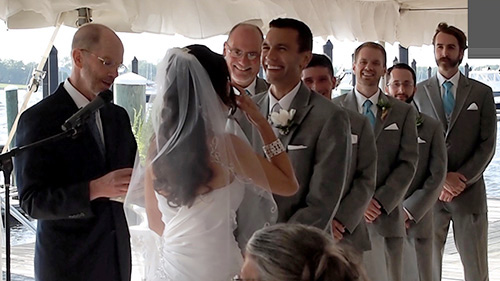
Meanwhile the procession was starting, so we quickly returned to our spot and got the camcorder rolling, panning along with the bridesmaids. To catch the bride's procession with her father, which had to cross a parking lot, we took the camcorder off the tripod with the quick release and dashed over to the entrance to the tent.
Then, just as quickly, we returned the camcorder to the tripod, slid it over a foot and framed the father of the bride giving his daughter away. All the faces are visible. Amazing luck.
Did we mention this was work?
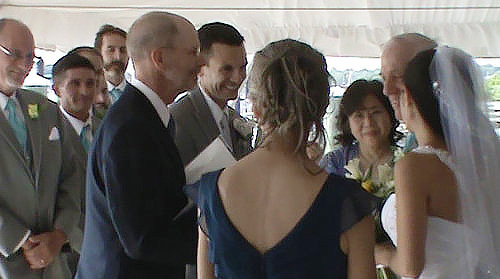
Who Gives This Bride?. 'We all do!' said her father.
The bride and groom turned to face each other, rather than the celebrant, so we quickly moved the tripod to the back of the seating area.
Fortunately there was still a little space between guests and the last row of chairs.

Tripod Setup. Detail from a video frame showing the tripod with the camcorder at the back of the seating area.
But that might have been an issue. You really don't want to ruin someone's enjoyment of the ceremony by sticking a camera in from of them. Even a small one like the Sony camcorder.
INSPIRATION STRIKES | Back to Contents
With the bride, groom and celebrant tightly framed, backlighting on and, we hoped, the voice recorder on duty, we had an inspired thought. Leave the camcorder and use the m4/3 camera to shoot handheld. Video and stills. Different angles to intercut with the otherwise long shots of the couple.
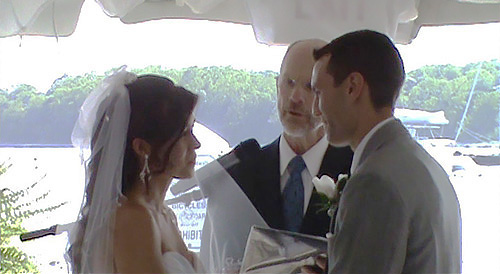
Camcorder Angle. The Sony captured the ceremony from this tight angle.

Roving Angle. But the Olympus got the long shot as well as some side shots.
Watch how often the scene changes on your TV sometime. No matter what you're watching (except perhaps for golf and baseball), you'll find it hard to count to three before there's a scene change.
We get bored easily, apparently.
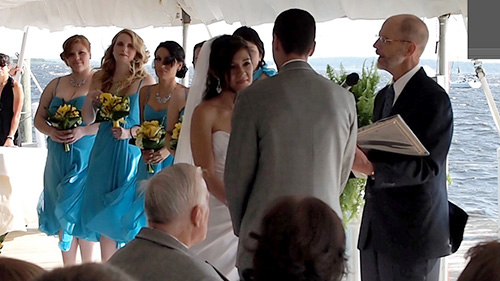
View of the Bride. We ran up the side aisle for a few of these.
So you want to have a different (but simultaneous) angle on the action. That's impossible to do hand-holding a camcorder. Or babysitting one. But with the camcorder happily perched on the tripod, we could leave it to get another view of the action.
View of the Groom. And up the other side aisle for this angle.
Readings, speeches, vows, rings and a kiss. Before we knew it, it was over. The newly weds came down the aisle as the camcorder's power zoom opened up to wide angle.
COCKTAILS | Back to Contents
While the wedding party was getting stills taken, the guests stayed in the tent to mingle during a cocktail hour.
We shot a "fly-over" of cocktail hour, walking around the tent with the camcorder up high, making a point of getting everyone and everything in the shots. We had a chat or two just to catch our breath, shot a few stills and more video, the last of which was the parade to the reception in the nearby building.
So far so good.
(Editor's Note: This is the second of a four-part series on shooting a wedding video. Links to the other stories are in the main table of contents at the top right of each story.)
Comments
Wonderful series.... I agree with your advice to never ever volunteer (or get volunteered) for wedding photos. I even went so far as to plan a trip so I wouldn't be available -- the trip was much more fun than any wedding!
-- Joyce Stein
Thanks, Joyce! The clever rascal held his wedding in our hotel so even a trip didn't save us. We're going to have to think up some sort of unknown but contagious illness next time. -- Mike