Photo Corners headlinesarchivemikepasini.com
![]()
A S C R A P B O O K O F S O L U T I O N S F O R T H E P H O T O G R A P H E R
![]()
Reviews of photography products that enhance the enjoyment of taking pictures. Published frequently but irregularly.
Video Editing: The DVD


20 September 2013
The movie was finished. But the show had not yet begun. Nobody was going to launch Premiere Pro CC to see our production. We had to encode it for at least one output medium.
Our choice was a DVD. It would have been simpler to simply encode for the Web or an iPhone or some other format that only required an MP4, AVI or WMV file. But a DVD with an MPEG-2 movie, a menu system and chapters would play on a computer or a DVD player and add some simple navigation to revisit favorite scenes.
This, naturally, turned out to be the hardest part of the project.
TWO ISSUES | Back to Contents
One problem is that encoding can take a very long time. Slapping clips together, pruning them, syncing audio, tossing in some titles, all that can happen just about as quickly as you can conceive it.
But encoding takes hours. So any mistake you make isn't immediately apparent and represents serious delays.
The other problem is that chapter markers are not, ahem, universally recognized. That was a real headache. Because you only find this out after you've encoded the movie in one format or another (that supports Premiere Pro CC's chapter markers).
CHAPTER MARKERS | Back to Contents
The markers (more than a dozen) we dutifully put into our Premiere Pro CC production were only recognized by Adobe Encore CS6 (there is no CC version of Encore), the Adobe DVD menuing software.

Premiere Chapter Marker. Give it a name and check the Chapter Marker option.
We did give Encore a whirl (it's included in our Creative Cloud subscription) but it only took two sessions before it crashed. We didn't need that.
Besides, we didn't want a bare bones theme for our DVD menu system. One thing we appreciate about iDVD is the choice of themes. And we had a lovely one for this project (as we show you below). So we stuck with iDVD.
But Encore and iDVD seem to be suffering the same fate. In the era of YouTube video, both Adobe and Apple consider their DVD authoring applications mature. Which, as a major studio, makes us a little nervous. How, after all, are we going to get our product out? Just stream it? What about the Director's Cut? What about all the Extras? What about chapter markers?
But back to our story.
We hit a hitch switching back to iDVD because it doesn't recognize Premiere Pro CC's chapter marks.
But it will automatically generate its own. Only they're generated not at scene boundaries but at regular intervals. Every five minutes, say. You get to say how often, but it's just an interval.
When was the last time you bought a commercial DVD that had chapter markers at timed intervals instead of scene boundaries? Ugh.
A DETOUR | Back to Contents
So the problem became how to get chapter markers at our scene boundaries that iDVD would recognize. And, as you might expect, there's a way. A roundabout way.
You encode your movie from Premiere as a MOV QuickTime movie, import that into iMovie, create your chapters in iMovie (after enabling Advanced Tools in iMovie's preferences because by default it's off) and then just....

iMovie. We imported the Premiere export into iMovie to add iDVD-compatible chapter markers.
Well, wait a second.
You can just share the chaptered iMovie project with iDVD but you'll get better quality if you export it using QuickTime (to keep those chapter markings) and import that export into iDVD. Apparently iMovie's export for iDVD is tailored for speed rather than quality.
We tried it both ways, preferring the export method. It looked better.
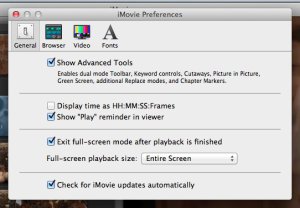
Show Advanced Tools. You can't add chapter markers until you show the tool for them.
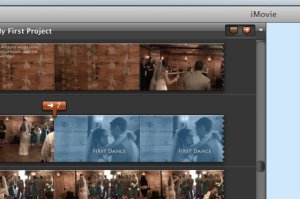
Chapter Marker. Number 7 is set on the First Dance scene.
The best clues for managing that process we found in an article titled Achieve Best Results from iMovie to iDVD on the ProGravix blog.
We also have to applaud the blog's idea of providing a higher-quality HD digital copy on disc, apart from the DVD.
To create a DVD playable in any DVD player, you encode a 720x480 MPEG-2 movie. Our source was 720x480, so that was fine with us, but if you've shot HD video at 1920x1080, you can encode that size and just put it on another disc as a higher resolution version. Assuming it fits on a DVD. But then, there's always Blu-ray.
We still had a quality problem, though.
It took a little while before we realized what the problem was. We had been previewing the final encoding on a 720 HDTV. So our 480 video had to be upsized from 480 to 720 horizontal lines. And it wasn't being upsized well.
Reviewing the final video on our computer, everything looked fine so it was frustrating to see the production poorly upsized. Until we found a better DVD player that did manage to upsize the DVD from 480 to 720 without noticeable artifacts.
AUTHORING A DVD | Back to Contents
So we finally did have a QuickTime export from iMovie with sufficient quality to import into iDVD with chapter markers on the scenes.
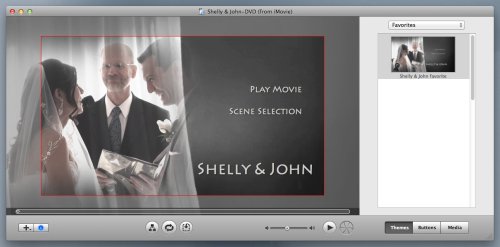
Our DVD Theme. The curtains wave softly in the breeze.
The next trick was to work on the chapter menu pages. There were three of them.
We changed a lot of things on the default theme, switching to Lithos, which is the typeface the movie used, and a lovely blue the bride picked for everything. So we had to apply those changes with the Inspector to all of the objects. A simple Select All before making the changes in the Inspector sped that process up quite a bit.
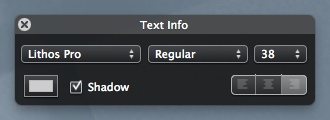
Text Info. We used the same typeface in the menus as in the movie.
Even then we had to do a little fancy footwork on the layout to fit five or so scenes with a title on a screen. And we had to switch from the theme's default animated poster image (which plays the scene in the small preview) to a still. All our scenes, remember, were cyan monochromes with titles -- and we wanted to keep it that way. That made it a lot easier to know what each scene was about.
Of course, we didn't realize we had all these settings to finagle until we'd burned a DVD or two. And even then, we forgot to do on one screen what we'd done on another. So it took a while to actually accomplish what we planned.
One efficiency we relied on, though, was writing the DVD production to a disc image instead of to a real disc. This let us test drive it on the computer to make sure it was right before burning a disc, which required only copying the disc image.
Another trick you should know before you write the disc image, though, is that there's an iDVD Preference for Best Performance/Higher Quality/Pro Quality you'll want to set to Pro Quality. Like iMovie, iDVD prefers to do things quickly rather than at the best quality.
BEWARE | Back to Contents
As we stepped through each of these hurdles, we learned a few other lessons worth pointing out.
Moving a 4-GB production from one application to another actually duplicates it. So as we moved from Premiere to iMove to iDVD, we quickly ate up disk space. Not only are there temporary files involved but each application has its own project file and if you do multiple encodings (even smaller ones) you're eating up gigabytes.
We used roughly 62 gigabytes for everything. Premiere took 46 gigabytes, iMovie 12 gigabytes and iDVD 4 gigabytes. We had some cleaning up to do.
But we were a little alarmed when our cleaning up didn't free any disk space. What was going on? Disk Utility reported errors and we rebooted from the Recovery Partition to fix them, but we still didn't get our space back.
It turns out that Time Machine uses an on-disk cache that causes the problem. James Pond has a clear explanation of this in The Storage Display. About This Mac actually shows you what space is devoted to the backup cache.
DVD PACKAGING | Back to Contents
With our master burned to a DVD and another disc with some extras, including a slightly better H.264 encoding of the original movie, we were ready to package our production.
We repurposed an old DVD cover, the long kind with two spindles. That took a cover image that spanned the back cover, spine and cover, all of which fit on a letter-sized page, which we trimmed a bit to fit.
We kept the design pretty simple.
Just a cover image from the wedding and a back cover image of the invitation. On the front, we put the couple's names in Lithos Pro and the date and location of the wedding in the lighter Lithos Pro Regular. Same with the spine, although we moved the name into the middle, surrounded by the date and location.
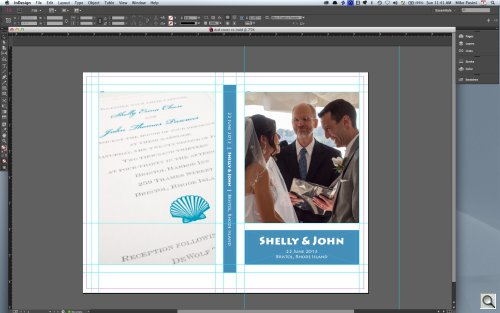
InDesign DVD Cover. Back cover, spine and cover.
We put this together pretty quickly using InDesign CC. We've used InDesign for our ebooks and other work normally requiring a word processor, so we knew what we were doing without resorting to any online tutorials.
Page layout is also something we enjoy, so we played around with it a bit, adding a few images to the back cover and then removing them when we didn't think they added anything to the design.
Spines, it should be noted, read down rather than up. This has the advantage of being right-side up when the box is laid flat with the cover up. Ah, the mistakes we made just so you won't have to.
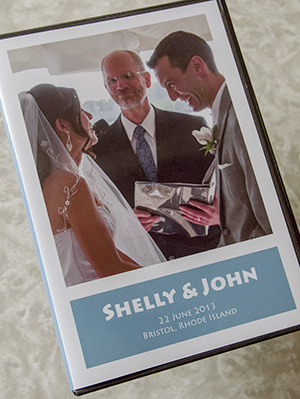
The DVD. All's well that ends well.
We printed the image on a sheet of swellable luster paper, trimmed it and slipped it into the cover. Done.
THE REVIEWS | Back to Contents
One thing we found very helpful was showing the work in progress to various visitors.
That started with the rough cut. Our audience's reaction rejuggled our priorities so that we included a lot more of the dancing than we were at first inclined to use. And it continued with the first full cut through the final DVD production.
The only opinion that counts, of course, is that of the bride and groom.
They received the DVD on a Friday and the next week promised to name their first born ... uh, no, that's another story. But they did appreciate our two pans over the crowd at the ceremony so they could see everyone who attended (we did a fly-over at the cocktail hour and in the dining area, too), the unabridged toasts (you haven't heard them until you hear them the second time) and the dance floor reality show.
But what they really appreciated was reliving the best day of their lives.
(Editor's Note: This is the fourth of a five-part series on editing a wedding video. Links to the other stories are in the main table of contents at the top right of each story.)