Photo Corners headlinesarchivemikepasini.com
![]()
A S C R A P B O O K O F S O L U T I O N S F O R T H E P H O T O G R A P H E R
![]()
Enhancing the enjoyment of taking pictures with news that matters, features that entertain and images that delight. Published frequently.
Using A Reversing Ring


25 February 2014
Last week we caught ourselves favoring a camera body we haven't used in years over a lens we were itching to play with. We rectified that situation, boasting we could now use the lens any time we wanted. And in a subsequent edit, we even proved it by publishing a macro shot of a leaf from our apple tree.
What we didn't do was explain how we got that macro shot with an old lens not designed to shoot macro.
We did mention we had a reversing ring that fit the lens as one of the attractions of that lens. But we left a big gap between that accessory and the image we published.
A gap we intend to fill with our kind of expanding foam right here.
A REVERSING RING
Macro photography is another world. One we don't usually visit unless we are looking at it through a macro lens. But that isn't the only way to get there.
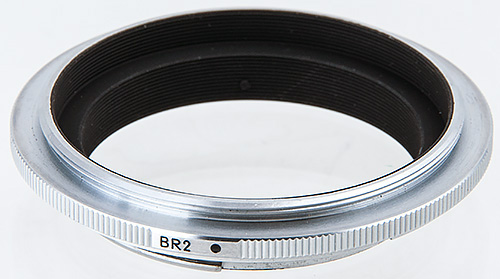
Reversing Ring. Screw it onto the front of your lens like a filter and mount it on your camera.
We could get picky about defining macro as a certain magnification (like 1:1, lifesize reproduction), but we prefer that vague notion of something you otherwise wouldn't see until you got very close to it.
Digicams are famous for including a Macro mode and a few of them automatically switch into it if you try to focus close to your subject.
But in the dSLR world, only a few lenses have a Macro mode. You have some options other than buying a macro lens, though:
- Converters screw onto the front of some lenses, adding 5x or 10x magnification, say. But you always give up a little image quality.
- Extension tubes (even a bellows) mount between your lens and camera body. But the light you lose traveling the extra distance to the sensor is inhibiting.
- A reversing ring screws onto the front of your lens like a filter but has a lens mount too, so you can put the lens on backwards.
Guess which approach is the least expensive? Right, a reversing ring.
You can get a reversing ring for less than $10, although the Nikon BR2 we have runs $39.95 these days. It was $18 when we were in the market during the last century.
There are some drawbacks (or limitations, to be more polite) to using a reversing ring:
- The front element (usually facing the sensor) is unprotected and you tend to be very close to your subject.
- There's no data connection between the camera body and the lens, so you shoot in Manual mode. If you can't physically set the aperture, you are shooting wide open.
- Like filters, you need a different size ring for lenses with different diameters. Our BR2 is a 52mm, which works with our 35mm, 50mm and 43-86mm lenses. If we had a lens with a 49mm diameter, we'd need another reversing ring.
You still get the same image quality your lens delivers when mounted normally and you don't have any more light loss than usual either. And, not surprisingly, you may even actually enjoy better image quality reversing the lens for life-size magnification (1:1) than using any other method.
WHICH LENS
You can use a reversing ring with either a prime lens or a zoom lens. You get greater magnification the wider the lens but as focal length narrows distance grows too.
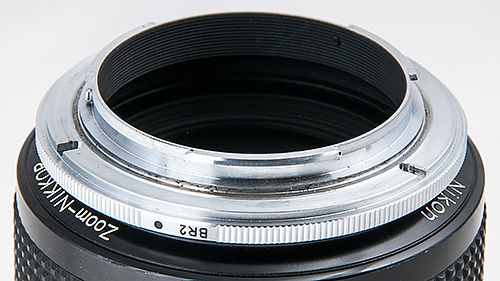
Ring Attached. Here the ring has been screwed into the front of the lens and is ready to be mounted.
The most impressive effects are from wide angle to normal, up to about a 60mm focal length.
With prime lenses you focus primarily by moving the camera in relation to the subject. With zoom lenses, you use the zoom control to focus. If you don't like the composition, you move the camera and zoom into focus again.
You can also mix and match brands, by the way. Maybe you've got a Canon dSLR you love and some old Minolta lens you have no use for. Buy a reversing ring with a Canon mount at the diameter of the Minolta lens and you can mount the Minolta on the Canon.
EXPOSURE
Depending on the lens, you may or may not be able to control the aperture. This is one case in which an old manual lens beats a modern auto-aperture lens. The modern lens will remain wide open, restricting your depth of field to its shallowest. But an old lens can be clicked down to any of its apertures manually.
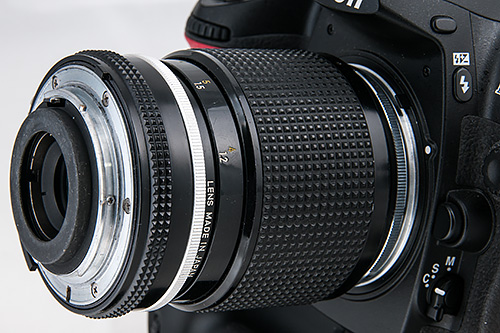
Lens Reversed. Mounted onto the camera body the rear element is unprotected.
Depth of field is the big issue with macro photography. It shrinks down to fractions of an inch. So it's a significant advantage to be able to control the aperture, stopping it down to extend depth of field.
Fortunately, you do always have control of ISO and shutter speed.
SETUP
You can shoot handheld if your shutter speed is fast enough to avoid camera shake but you'll have more success shooting from a tripod. Our succulent was shot from a tripod but our wine stopper was handheld.
Lighting is another issue. Macro is why the ring light was invented but you can do well with available light and even on-camera flash if your lens is short.
Long exposures may be subject to mirror vibration but you can avoid that by locking up the mirror before firing the shutter.

Succulent. Note the shallow depth of field, which is pretty deep for macro thanks to the sunlight.

Still Life. Composition is easier with a zoom.
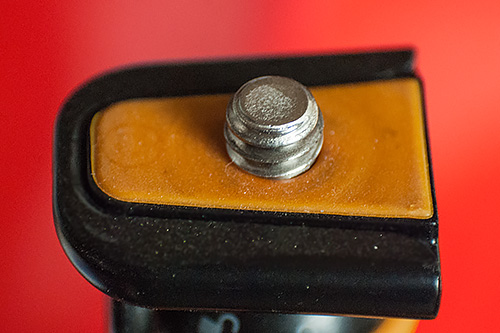
Joby GorillaPod. Handheld at f3.5, not much depth of field.
The closer you get the more you magnify problems like depth of field, lighting and camera shake. But the challenge of capturing a macro shot is part of the fun, after all.
CONCLUSION
Macro photography is the cheapest ticket to another universe we have ever purchased. And the best seat is a reversing ring. Especially if you have an old prime wide angle at your disposal. And it doesn't even have to be from the same manufacturer as you camera body.