A S C R A P B O O K O F S O L U T I O N S F O R T H E P H O T O G R A P H E R
Enhancing the enjoyment of taking pictures with news that matters, features that entertain and images that delight. Published frequently.
Working With The Flashpoint 180 Monolight
12 June 2014
We've had a Flashpoint 180 monolight on hand for several months now. And we've used it to take the product photos you see on Photo Corners all of this year. It's proven itself to be a reliable workhorse around here.
We've been using monoblocs to do product photos in the bunker for a long time now. And before that hot lights.
We have, occasionally used a speedlight or two as well. But mostly the speedlights were used on location for event photography and the monoblocs in the studio.
We have an assortment of monoblocs at our disposal but we tend to prefer the smaller units. Our stage is usually pretty compact, shooting cameras or accessories in a light tent.
What we really like about using the monoblocs is their ability to deliver a bright but soft light over a wide area with a very short recycle time. You don't have to cajole them or baby them or flatter them to get what you need. You just say something like, "Hey, let there be light!" And you've got it.
We fire them with a simple, inexpensive radio trigger or the camera's popup flash set to Manual exposure mode and powered way down (1/64 power does it). That way we can move around the subject without worrying about a tether. It's painless.
All we really have to do is physical move them into position, add whatever light modifier we want to use, aim the head and dial in the power setting. Then we set the camera to Manual mode at the highest sync speed for the shutter, pick the f-stop that gives us the depth of field we want and set the monobloc's power to deliver enough light for it.
It may seem silly but we particularly appreciate the ability to aim a monobloc downward at our subject. A speedlight head is not quite as adroit (perhaps to avoid cast a shadow from the lens when mounted on the camera) unless you mount the speedlight on a swivel.
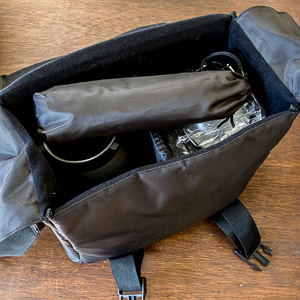
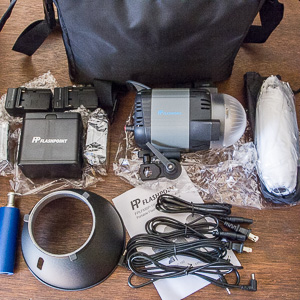
In the Bag. The bag is compact but filled with everything in the second slide.
The handle is nice -- if you have an assistant (who can function reliably as a Human Light Stand). Otherwise, you should acquire a lightweight light stand, which will set you back about $30.
The Handle. If only you could be in two places at one time. Dome diffuser covers the lamp.
The illustration of the handle, by the way, also shows the larger Photoflex Starflash 300 monobloc we usually use.
When discussing artificial light, the big question is how to compare the output of different devices. You'll hear watt-seconds and guide numbers employed for this but there's a third factor -- the size of the light -- that makes quite a difference, too.
Unfortunately, there is no simple standard we can easily apply to every device.
Watt-seconds, as a measure of capacity, don't explain why a lower-rated unit can outperform a higher-rated unit. Guide numbers help compare speedlights but can't pin down what a monobloc can do.
At the risk of adding to the confusion, we'll briefly discuss these issues.
Watt-seconds tells you how much energy the device can store, not how much it can produce. That's important for recycle times but not for selecting the right device for portraits or for auditoriums.
Nevertheless (as we like to say with a sword-flourish), watt-seconds is how monoblocs are not only rated but labeled. The Flashpoint 180 is a 180 watt-second device. The Starflash 300 is a 300 watt-second device. Apart from the manufacturer's data, there's no way to tell what the watt-second rating of a device is. So if a speedlight manufacturer doesn't disclose that, you won't know.
Actual output is another can of worms but, obviously (no?), it can be measured. Every exposure measures it. And a flash meter doesn't hurt either.
Guide numbers can be used to make helpful comparisons among speedlights but they go off the rails when it comes to comparing speedlights to monoblocs. Speedlights have built-in reflectors, so that particular light modifier (or boost in this case) is not a factor. You can't remove the reflector. You can't upgrade it. You live with it (although zooming heads can focus the beam to throw it farther or cast it wider, another factor we'll ignore for now).
But on a monobloc, you have a bare bulb whose output is rarely used naked. Instead, a reflector is added to boost output and a diffuser can be added to that, all variables that no single guide number can accommodate. You'd need a different guide number for every combination of light modifier, including umbrellas, beauty dishes, soft boxes and more, all with and without reflectors and diffusers on the bulb.
To calculate a guide number, you multiply the f-stop at ISO 100 by the distance to the properly illuminated subject. This is simpler if you have a flash meter you can set at ISO 100 and take a reading at your subject. The meter will give you the f-stop.
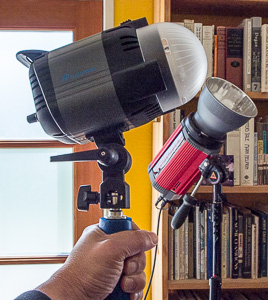
Softbox. We attached this large softbox with a Bowens speed ring to the Flashpoint 180, which held it securely.
In short, guide numbers are typically used to compare speedlights where light modifiers are not a factor (because the reflector is built in), while watt-seconds are used to compare monoblocs, eliminating the light modifier factor.
A Comparison. We found equivalent numbers for the Flashpoint 180 monobloc and Nikon SB-800 speedlight (which is what we happen to use). Let's see how they compare.
Nikon rates the SB-800 with a guide number of 125 feet (38 meters) while Adorama rates the Flashpoint 180 with its reflector at 150 feet (48 meters). Double the guide number is four times the light intensity.
In watt-seconds, the Nikon SB-800 is rated at 60 watt-seconds or about a third the capacity of the Flashpoint 180's 180 watt-seconds.
You can also dial down the Flashpoint 180 to 1/16 full power, which is more than enough range to play nicely with an SB-800.
But that isn't the whole story. There's the size of the light that determines its character. The smaller the light, the harder it is.
The housing of the SB-800 with its built-in reflector is quite small (2.25 inches across, in fact) compared to the monobloc's 6.5-inch wide reflector. So the SB-800 is going to throw a hard light at your subject. To soften the light, you diffuse it, either by adding a milky plastic dome or bouncing it off a white card or the ceiling. But when you do that, you reduce its output. You have to open up the lens aperture or get closer.
On the monobloc, you can boost the light with a larger reflector, even if you want to also diffuse it with a softbox or umbrella or your ceiling. Without penalty.
That sort of power and flexibility plus the quality of its light make a monobloc part of the solution rather than a problem. And adding battery power to a monobloc turns it into a super manual speedlight.
In fact, you can think of the Flashpoint 180 as a more powerful and flexible speedlight. With a softer, more natural light.
The technical specifications of the Flashpoint 180 are:
FLASHPOINT 180 SPECIFICATIONS
Power
180 watt-seconds:
Guide Number
48 with reflector (ISO 100/m) or 150 in feet
Triggering
10-foot sync cord included
Modeling Bulb Base
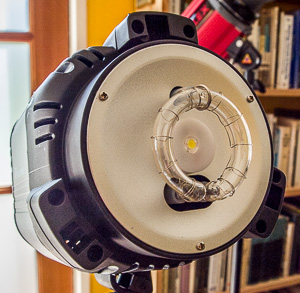
LED daylight balanced
Slave
Built-in slave
Dimensions
8-inches long
Flash-tube lifetime
25,000-30,000 variable power pops
Power Setting
Stepless dial down control, five stops-down
Reflector mount
Bowens
Reflector
8-inch reflector with silver interior
Kit Weight
Full kit 7 lbs.
Unit Weight
2.1 lbs. without batteries
Power Source
Lithium 6000mAh batteries only for 700 pops
Voltage
7.4 volts
Note that there is no AC adapter for the Flashpoint 180. It's battery-powered only using two Sony NP-F960 cells in the included housing. There is at least one report of success using a 12v, 2000mA with positive center connection.
The battery pack does not attach to the Flashpoint 180 itself except for the power cord.
Recycle time isn't specified and depends on the power setting but is typically between 1.0 and 3.6 second.
There is a modeling light but it's very dim. It appears to be a three-watt single-bulb daylight LED. The nicest thing we can say about it is that it won't drain your battery. Because you'll never use it.
For an inexpensive monobloc (or any monobloc, for that matter), the Flashpoint 180 is surprisingly attractive. Credit its understated, two-tone aluminum housing.
Its three convex bayonets at the business end make it compatible with all Bowens accessories. We used it with speed rings from Photoflex and Adorama, for example, with no problem.
Bulbs
Adorama claims you can get 25,000 to 30,000 pops from the bulb if you don't use full power all the time. And after that, the replacement cost for part number FPFTLB180 is $29.95.
The LED doesn't look like it's replaceable, but you won't miss it.
Light Modifiers
The Flashpoint 180 ships with an unusually diverse group of light modifiers. That starts with the plastic diffuser that also serves to protect the bulb. Don't mistake it for packaging.
Also included is a reflector, which is what we leave on the unit for both protection and to boost output. We aim it at our white ceiling and suddenly we have a skylight.
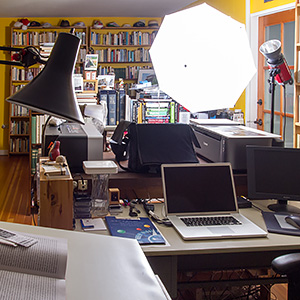
Umbrella. Mounts in housing and casts a large soft light.
Finally, Adorama has included a compact white umbrella. It isn't perfect but it's very useful either to bounce the light into or fire the light through.
It can take a bit more force than we like to open it and it isn't as securely mounted to the Flashpoint 180 as we'd like but we're quibbling. It's nice to have and we've used it to knock the light down when it was just too strong.
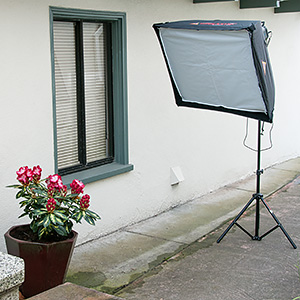
As the second slide to the left shows, though, it provides plenty of light. It was the only illumination in the room for that shot.
But with a Bowens-compatible mount, you can put just about anything in front of the lamp to modify the light. We used two different soft boxes with the Flashpoint 180, for example.
Both of them were quite large for the little monobloc but it handled them easily.
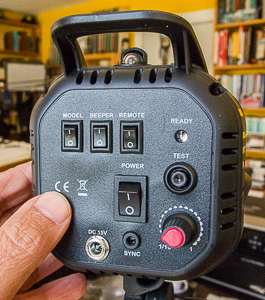
Control Panel
The back of the housing is where you'll find all the controls. Here's the list:
Photo Sensor. With a half-cover shade to shield it from light coming from the front of the unit, the photo sensor sits on top of the housing.
Photo Sensor Switch. Directly below the sensor itself, is the small toggle switch to enable it.
Beeper Switch. To the left of the Sensor switch, the small Beeper switch enables audio feedback.
Modeling Lamp Switch. And to the left of the Beeper switch, the small Modeling Lamp switch turns on the LED. You'll never use it.
Power Switch. Directly below the Sensor switch, the normal-sized Power switch sits alone in the middle of the back panel.
Sync Socket. Below the Power switch is the sync socket. We plugged in our radio receptor here. You can also simply plug a sync cord connected to your camera here. Or not (relying on the photo sensor to fire the monobloc when your on-camera flash fires in Manual mode with no pre-flash).
DC Socket. To the left of the Sync Socket is the chrome power plug. Run the power cable from the battery pack to this plug.
Charging Indicator. On the right side of the back panel are three controls, the first of which is a small Charging Indicator.
Test Button. Below the Charging Indicator is the Test Button for manually firing the unit. The Flashpoint 180 does automatically discharge the capacitor when you turn down the power.
Power Control Dial. Below the Test Button is the stepless Power Control Dial which determines the amount of light the unit outputs.
Using the Flashpoint 180 is a matter of finding the right output level with the Control Dial and that's it. You really don't ever have to even peek at the back panel.
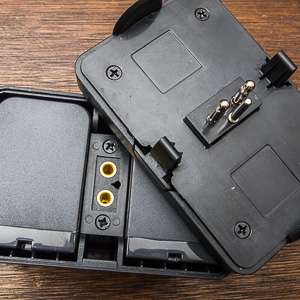
Battery System
The two camcorder-style Sony NP-F960 batteries fit into a plastic housing with a Power switch and power outlet. Adorama claims you can get 700 flashes at full power from the battery pack. We never had to recharge it mid-session. And we did skip recharging between several sessions.
Battery Pack. Two camcorder batteries in a tough plastic housing. Note the three-prong connector on the underside of top piece.
You never really know how much of a charge is left, though. There's no indicator on the battery pack.
The battery pack is connected to the Flashpoint 180 by a five-foot power cord. That's really just too short. It's too short to make it to the floor when you extend your stand high enough for the Flashpoint 180 to illuminate a table-top scene, for example.
But when did a short cord ever stop anybody?
We simply used a nylon cord to form a loop attached to our light stand about waist high and slipped the battery pack's belt hook into it. Problem solved. Gaffer tape would be even more secure.
The biggest problem we had with the battery pack was remembering to turn it off.
It does take a while to charge the batteries but Adorama supplies two chargers so you can get the job done in half the time (although nothing prevents you from powering the Flashpoint 180 with just one). The chargers are two-piece units with an adapter for the NP-F960s that slides into the charger itself.
We divulged all our secrets for using a monobloc early in this review. Just remember you're working with a manual flash. A powerful manual flash. You tap into its variable power with sync (wired or wireless) or the built-in slave. And that's about it.
As a manual flash, you really just have to adjust output to your preferred f-stop. Your shutter speed is going to be limited to a sync speed and your ISO does not have to climb into the thin air required by natural light.
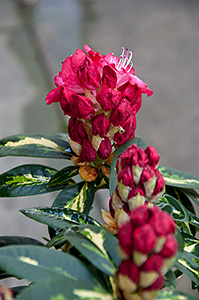
The battery makes the Flashpoint 180 more portable than the typical house-bound monobloc that needs a nearby power outlet to feed it. Adorama says the Flashpoint 180 was designed for outdoor use. And we found it perfectly capable of shooting some new flowers in a shady side of the property.
But it also functions perfectly well indoors. For several months we've been shooting our product shots with it. Here are a few examples:
Examples. Just a few of our product shots using the Flashpoint 180.
As the example shots show, the quality of the light is quite soft. The images are a little cool because we cheat that way with electronics product shots.
The Flashpoint 180 is currently available from Adorama at a $60 discount for $190 with free shipping. Purchasing from this sponsored link supports exhausting, informative and entertaining reviews like this.
The Flashpoint 180 is a small, lightweight and attractive monobloc. Because it is just 180 watt-seconds it's an affordable tool. And because it's battery powered, it's a versatile light source you can take anywhere.
Those options make it a logical step up from speedlights, adding a world of light modifiers to your artificial light photography. For less money, we might add, than many speedlights.
We've used one for six months without a problem, apart from the weak modeling light. So we're giving it four photo corners, our highest recommendation.
Just checking on whether your Flashpoint 180 moonlight is still being used. I still have a pair of them and they work just fine. I notice they have been discontinued by Adorama.
-- George Mahlum
We do still use the Flashpoint 180, George. It's compact and portable (can't beat a battery pack sometimes) with plenty of power. We shot this slide show with it, in fact.
No idea why Adorama discontinued it, but my source confirmed it is no longer available. The replacement is the Flashpoint RoveLight 600 Ws Monolight, but it's quite a bit more expensive.