Photo Corners headlinesarchivemikepasini.com
![]()
A S C R A P B O O K O F S O L U T I O N S F O R T H E P H O T O G R A P H E R
![]()
Enhancing the enjoyment of taking pictures with news that matters, features that entertain and images that delight. Published frequently.
Editing the Beach Chalet Murals


21 October 2014
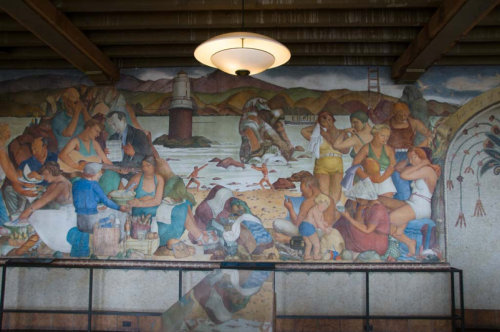
Among San Francisco's murals are Lucien Labaut's Beach Chalet murals. Beach Chalet sits at the west end of Golden Gate Park, the murals decorating the lobby downstairs with a restaurant just beyond them open to the park and another upstairs with a view of the ocean.

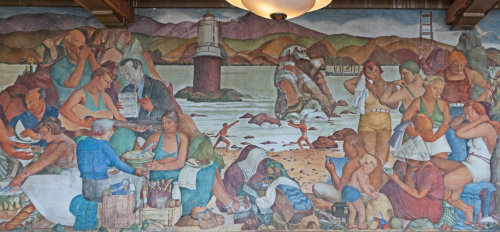
San Francisco Life. Painted in the 1930s by Lucien Labaut.
Labaudt's Works Project Administration murals, painted between 1936 and 1937 cover three of the four walls of the lobby. Titled San Francisco Life, the frescoes illustrate scenes of recreation and leisure at the beach, Golden Gate Park, Fisherman's Wharf and the Marina.
They are nearly impossible to photograph. Take a look online at the various attempts and you'll see just how difficult it is.
PROBLEMS
One problem is that, as walls, they aren't evenly lit from top to bottom. Near the ceiling they are quite a bit darker than they are at eye level. But there's also quite a bit of glare coming from the windowed doors. And getting a square view of them is difficult because the lobby is full of display cases. Finally, there are the hanging light fixtures that can't be avoided.
But don't let that stop you. You can, we've found, bring the frescoes to life with a few image edited tricks.
THE CAPTURE
We took a few shots with a Nikon D300 and 18-200mm Nikkor without a polarizer at f4.0, 1/60 second and ISO 400 with a 20mm focal length.
The Capture. Photo Mechanic's rendering of the Raw capture shows just how poorly lit this fresco is.
Closeups can work well, although you'll be casting a shadow on the ones along the long wall. To get the whole scene, we stepped back beyond the display cases. That brought a light fixture into the picture, but it couldn't be helped.
No flash, please. These are artworks. And they are massive so your flash won't cover them evenly anyway.
We shot Raw only, converting to DNG on import as we've been doing all year.
CAMERA RAW
We opened the image in Photoshop CC2014.2 using Camera Raw.
We gave it a good hit of microcontrast with the Clarity slider, opened the Shadows a bit and recovered Highlights but we also had to give it a little more Exposure.
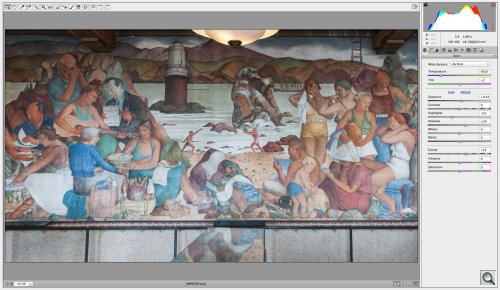
Exposure Settings. Brightening things up and adding a little microcontrast.
We weren't done with Camera Raw, though.
We had shot the image with a wide angle focal length so we wanted to correct the inevitable distortion by applying the lens profile for our Nikkor. But we also wanted to correct the skew we had introduced shooting the wall at an angle. That was only a -7 unit adjustment, fortunately.
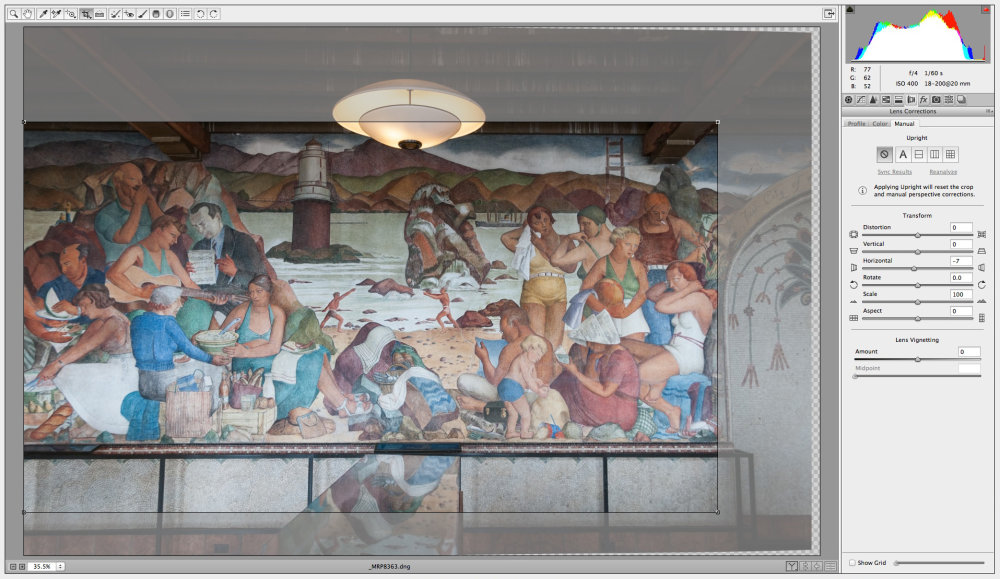
Upright Tool. Lens corrections and distortion adjustment.
It really helps to know what you can do on the computer when you are faced with a difficult shot. We didn't worry about not being perfectly square to the wall when we took the shot because we knew the Upright tool would come to our rescue.
We also didn't make the mistake of composing the image in the camera. We zoomed out to a wide view to take in the mural but it also included a lot of ceiling. So we cropped the image to what we wanted to show.
Camera Raw. After our adjustments had been made.
Then we were done with Camera Raw. We didn't do our final crop in Camera Raw, although we might have. Instead we did it in Photoshop itself.
CONTRAST MASK
We wrote about contrast masking in 2002 and have reprised that short article for you below. We long ago made it a Photoshop Action so we can create the mask and apply the effect with just one click.
Contrast Mask. Evening out the exposure.
One click later, the overall tonality had improved. But not quite enough.
DODGE & BURN
We wanted to lighten the top of the mural, especially in the corners (and therefore unevenly) and darken parts of the bottom that suffered from the glare.
Photoshop does have both a Dodge tool to lighten and a Burn tool to darken parts of the image and it's perfectly legal to use them.
Retouching the Mask. Top is from the Action, bottom shows the improved mask.
But we had that contrast mask and it's just as easy to do it there. In fact, you can duplicate the mask layer, turn it on and the original off and go wild. Or just use the History panel to go back to where you went off the trail.
We picked a nice big soft brush, set the Opacity to 33 percent, set our colors to black and white and just switched between them as necessary. So sometimes we painted white to lighten and sometimes black to darken.
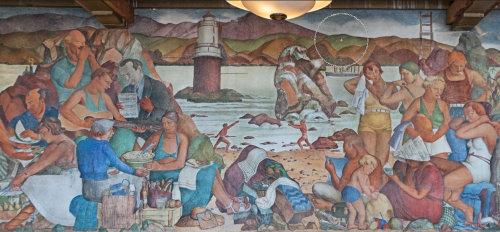
Improved Mask. You can see our brush just below and right of the light fixture.
Both our original Background layer and the mask were enabled so we could see exactly what effect we were having as we painted the mask.
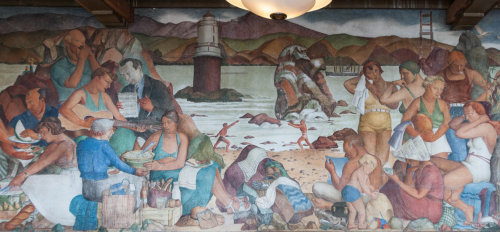
Here's the progression of edits from the Adobe Camera Raw edits to the Contrast Mask and the edited (or painted) mask:
WHEN TO STOP
We were tempted to fiddle with the saturation a bit but that would have been misleading. This fresco is not vivid. So increasing saturation would only make the soft skin tones look sun burned.
We did try a few other color adjustments but settled on the version you see above, which, if not ideal, is quite an improvement over what we captured with the our camera.
Contrast Masking
The idea that your digicam can't produce images of stunning dynamic range would make the pioneers of photographic art turn over in their graves. Laughing.
Neither could their cameras.
So they manipulated the tonality of their prints in the darkroom. Extensively. One of their tricks was the contrast mask.
A contrast mask simply alters the original luminance of an image unevenly, boosting detail in the shadows while holding back the highlights. In short, extending the dynamic range of the original image.
You can perform this miracle with one hand tied behind your back in your image editing software.
We're indebted to subscriber Frank Tagliaferro for pointing us to Michael H. Reichmann's article for the basic technique, which he modified from "Digital Contrast Masking" by Richard Pahl in the December 2000 issue of PCPhoto.
Our own contribution to this subject updates the procedure, reordering the steps to make it a bit easier to preview the results. And we expand a bit on the tricks you can use to modify the basic mask.
Here's the step-by-step procedure:
- After opening your image, Duplicate it on a New Layer. The new layer will become the contrast mask.
- To make the duplicate image into a mask, Desaturate it so it's a black and white image. Then Invert it, so it's a negative image. These commands are tucked into Photoshop's Image Adjustment menu.
- Next, change the mode of the mask layer to Overlay.
- You should see pretty flat highlights and opened up shadows but they won't be pretty. We've got too much detail in the mask. To restrict the detail to the original, apply a Guassian Blur to the mask. Reichmann recommends a value between 10 and 30. With Preview enabled, play around to see how the setting affects both the detail and tonality of your image. Just get close, we aren't done yet.
- Modify the mask's Curve to enhance the highlights and/or shadows. Start by anchoring the three quarter-tones. Then move the highlight and shadow quarter-tones to improve the image.
- To mollify the effect, which may still be too strong, use the Opacity setting for the mask layer. Knock it down to 90 percent for starters.
- It's just a mask, you know, so you can Paint it a little darker or a little lighter in one area or another to help it out. Try painting black with an opacity of about 20 percent to burn in shadows that appear too detailed. And paint white any highlights that look too dark. Beats dodging and burning any day.
We improved a particularly difficult high-contrast image recently with just this technique. The picture was a flash shot at night of a couple in front of the Trevi Fountain in Rome. The flash burned out the couple and fell well short of the fountain. When we dropped a contrast mask on it, the fountain suddenly emerged from the dark night with a mythic orange glow. And the ghostly couple in the foreground came vibrantly back to life, too.
Now if we could only get them to toss their coins in this direction!