Photo Corners headlinesarchivemikepasini.com
![]()
A S C R A P B O O K O F S O L U T I O N S F O R T H E P H O T O G R A P H E R
![]()
Enhancing the enjoyment of taking pictures with news that matters, features that entertain and images that delight. Published frequently.
A Discussion With Piccure+'s Lui


30 October 2014
After we published our Test Drive of Piccure+, we heard from Piccure+ Co-Founder Lui. "Thanks a lot for the in-depth coverage," he said, "and reading the handbook!"
We always Read The Fabulous Manual.
He answered a few of the questions we raised in the test drive and had a few suggestions for using Piccure+. So we thought we'd pass the new information along.
Cropped Image. Small detail of full image below, a DNG processed first in Piccure+ then processed as a TIFF in Photoshop CC 2014.2 with Camera Raw.
We also thought we'd illustrate some of the points Lui made, revisiting an iPhone 5s image and using the stand-alone Piccure+ to process a DNG file (seen above).
OPTICAL ABERRATION SLIDER
In our story, we suggested "that the sliders may not have been quite the right control for settings like Optical Aberrations, which seemed either enabled or disabled."
Lui confirmed that. "The Optical Aberration slider has only two settings: Normal and Strong. Strong also includes the correction of chromatic aberrations, which can in many cases outperform lens-profile based software solutions. We will make the GUI clearer in that respect. Sorry for the confusion."
Meanwhile think of it as a toggle with two positions: 0 and 100 percent.
QUALITY+
To get the best results from Piccure+, Lui recommends (as does the Manual) enabling Quality+ in the Menu under Advanced Lens+.
"It will take longer and since most people would have tried out 'the best quality right away' and later complained about the computation time and never touch Piccure+ again, we were hiding it a little. We saw you disovered it but just thought to send the reminder: if you are bothered about artifacts or the like choose Quality+.
In a review, of course, computation time isn't as important as the optimal results, so we had Quality+ enabled for all of our test images.
The artifacts that bothered us were in the iPhone image (the jersey lettering), which are in the original image. So we asked Lui if he was saying Quality+ will smooth those.
"Yes, it should," he confirmed. "With the iPhone image the problem is often more the compression. But I would guess that Quality+ should give nicer results."

In our iPhone 5s smartphone example above, Note the improvement with Quality+ the artifacts on the jersey lettering. Also note you are looking at a 200 pct. enlargement. The Strong version adds the Optical Aberrations correction but, as Lui explains below, it's a sticky problem with smartphone images.
STRONG & QUALITY
"If you choose the combination Strong and Quality+ the rendering will take quite long, but the results will most certainly be stunning. Quality+ also avoids artifacts, so you should not have any problems on this front."
We did just that for our DNG file (seen above and discussed below). It took 14 minutes and 43 seconds to process the 4320x2868-pixel image with Quality+, Strong, reduced Sharpness and slight Denoising. But it was worth it.
SHARPNESS
"We would recommend a slightly lower setting for Sharpness than the default. Most people think we are little bit oversharpening with the setting it has."
Indeed, the Sharpness slider in general somewhat confused us. Using any of the lens correction tools (Camera Raw, DxO) we don't affect sharpness (saving it for output considerations). So why is it in Piccure+? Is it microcontrast? Or unsharp masking?
"No, it's different," Lui told us. "It is very complex to explain since it actually affects the way the image is recreated through deconvolution.
"We use a completely different concept. The other solutions to the best of our knowledge do unsharp masking with different settings across the image to achieve uniform sharpness. We actually reverse optical flaws through a mathematical process called deconvolution.
"The advantage of these microcontrast/sharpening solutions is that they are fast. The disadvantage is that they can't restore "smears at the corners." They can make it appear somewhat sharper but actually destroy image information.
"In deconvolution, a single pixel is recreated from the information of about a dozen surrounding pixels. So what the parameter does is fiddling into the reversal process and thus increase/decrease perceived sharpness.
"Other solutions do different things to correct different errors. For example, chromatic aberration is corrected in one step, lens softness through some sharpening in another.
"Piccure+ describes the optical aberrations in total and reverses them in one operation. With the sliders, you can adjust the way Piccure+ determines the aberrations and reverses them.
"We are planning to write a blog article about sharpening and deconvolution. To cut a long story short, if you know the aberrations with 100 percent accuracy, you can essentially reverse them 100 percent by the means of deconvolution. Sharpening can not do that."
BATCH PROCESSING
"You can also batch process images with the same settings irrespective whether they are prime or zoom lenses. Piccure+ determines the optical aberrations uniquely for each image. We would recommend choosing the setting accordingly to the aberrations in the image though (e.g. large for open aperture, high chromatic aberration, high softness in corners)."
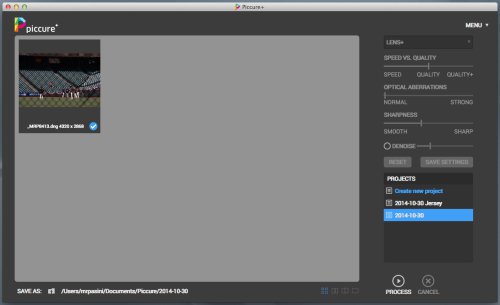
File Access. Images are stored in the Piccure directory (in Documents on OS X) in folders named for Projects.
Our thought when we cautioned using batch processing to a set of images taken a different focal lengths was just that at the different focal lengths of a zoom, you might want different Piccure+ settings. So in a set of photos that range from 18mm to 200mm, batch processing might not be optimal. Are we wrong?
"From that perspective," Lui replied, "you are right in the sense 'at 200mm we used f5.6 and had little chromatic aberration and little lens softness, whereas at 18mm we shot wide open and suffered heavy chromatic aberration and were processing them with the same settings.'
"However, you can still batch process all the images and get splendid results. You can select a setting for each image -- e.g. you know Image 1 had large chromatic aberration you choose Strong, Image 2 had little aberration, you choose Normal. They will then be batch processed with the settings accordingly. In essence you just need to differentiate between images with strong optical aberrations and normal aberrations. Piccure+ will do the rest for you automatically.
LENS QUALITY FACTOR
Lui emphasized the advantage of Piccure+'s computational rather than lens database approach to making corrections, too.
"The advantage of Piccure+'s non-profile approach is that it can account for lens-to-lens deviation. Piccure+ also models the optical aberrations in a more complex way. That's why it's slower than other solutions. I would be surprised if another software solution got better results than Piccure+ for visible optical aberrations (Piccure+ settings: Large and Quality+). Many people underestimate how big the deviations between lenses often are."
Indeed, it's pretty rare to find a lens review that tests more than one copy of a lens. Roger Cicala at LensRentals does have access to several copies of the lenses the company rents and his blog posts often sample several copies.
"Absolutely -- he was even kind enough sending us testcharts so we could run some tests," Lui said. "Great guy. Really great guy. He just loves lenses as much as we do. It is unbelieveable how supportive he is -- and still running such a successful business."
Lui said that at first the company "got many angry emails from photographers fearing we would render their expensive equipment useless. Until they realized the opposite is the case."
"Piccure+ can open up a real new world for shooting open aperture with expensive lenses.
"So our actual strength is getting something out of expensive equipment nobody else can."
No lens design is without compromise and certainly shooting wide open reveals issues like soft corners. Piccure+ does address those issue, as we reported.
But having a collection of pre-computer designed optics in our collection, we liked Piccture+'s concept of improving the results from even unknown glass (to the extent of encouraging generic lenses based on designs whose patent has expired).
SMARTPHONES
And what flies for old lenses, might go for smartphone lenses, too. But we weren't successful at improving an iPhone image. We asked Lui what the trick might be.
"The problem with smartphone images is not the compression per se," he said after discussing it with Piccure+'s head engineer. "The issue is that most smartphone cameras apply some preprocessing to the images that is unknown.
"Worse, this preprocessing is non-linear in the sense that different intensity values undergo different transformations. However, for Piccure+ to work well, the captures needs to be a Raw file, i.e. unprocessed or linear (linear relation between incoming light and intensity values of image).
"Since the manufacturers don't tell what they do to the images [in creating the JPEG], we can only guess. Unfortunately, we don't manage to undo these unknown non-linear transformations perfectly, rendering the results of Piccure+ on these images often unsatisfactory.
"The same is true when you develop your Raw files with a Raw converter that also applies sharpening, denoising or other image enhancing tools. Again in these cases, we don't expect Piccure+ to work well.
"Finally, compression artifacts often have a negative impact on the restoration process. So you get problems in the step determining the optical aberrations and then in reversing them."
RAW FILES
Lui concluded with the general advice, "Whenever possible, work with unprocessed Raw images in Piccure+.
That's a recommendation to run your Raw files through the stand-alone version of Piccure+ rather than using the plug-in version. To get to the plug-in version in Photoshop, for example, you have to open the Raw file in Adobe Camera Raw. Any automatic or manual changes applied in that step prevents Piccure+ from seeing the original Raw data.
We hadn't done that in our Test Drive because we processed the images for tone and color in Camera Raw first. So we used Piccure+ as a plug-in from Photoshop CC 2014.2.
We opened a DNG conversion from a Nikon NEF Raw file directly in Piccure+ and processed it with Quality+, Strong and a bit of DeNoising with Sharpness curtailed, as Lui had suggested. The screen shot below shows the before and after:
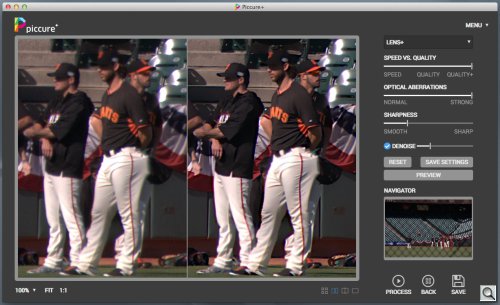
Piccure+. Small crop of the lead image above opened as DNG before any other processing.
Then we saved the image and opened it in Photoshop CC 2014.2 using Adobe Camera Raw. After a few small tweaks we had this:
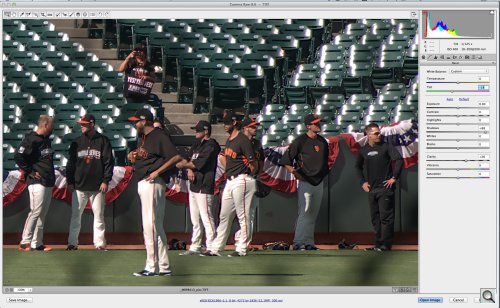
TIFF. Adjusted in Camera Raw..
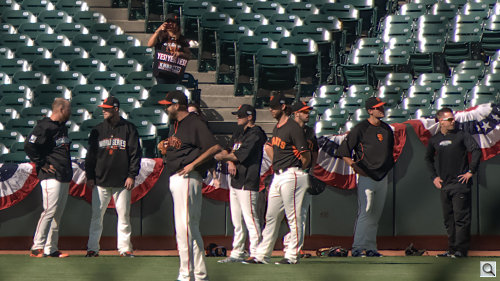
That, we should note, is a small crop of the larger, full camera image:
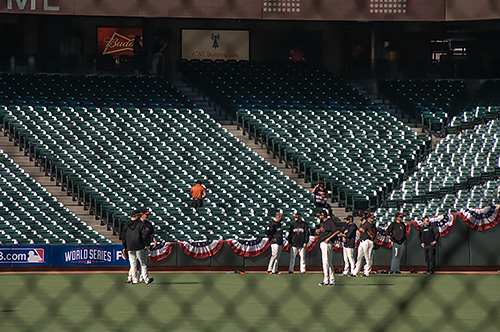
Full Image. This is the full frame image for reference.
We're not used to thinking about lens correction before tone and color but it worked well for this image.
MORE TO COME
"We are improving a few things in the GUI and the documentation so people can use Piccure+ more effectively and efficiently," Lui told us. "The new GUI has text boxes for the sliders and a better handbook with FAQ."
We had wondered if GPU processing had been enabled in this version. GPU processing might greatly reduce the time it takes to process an image.
"GPU is not enabled right now," Lui said, "but it's on our list. However, since we really do a lot of new stuff we have to rewrite big portions of code entirely ourselves and can only leverage existing routines to a certain extent."