Photo Corners headlinesarchivemikepasini.com
![]()
A S C R A P B O O K O F S O L U T I O N S F O R T H E P H O T O G R A P H E R
![]()
Enhancing the enjoyment of taking pictures with news that matters, features that entertain and images that delight. Published frequently.
Installing the DS40


20 November 2014
Once we had unboxed the DS40, it was time to install it. DNP supplies a two-sided Printer Quick Reference sheet that clearly spells out each step of the installation for both the DS40 and its larger cousin, the DS80.
It's so clear, in fact, we have to quote it: "The easiest way to determine what kind of printer you have is to look at the label on the front."
But more about the Quick Reference in a second. First we wanted to locate the printer in a convenient place because we really didn't want to have to move it around.
LOCATION | Back to Contents
There aren't too many physical considerations to worry about but there are a few.
You'll want the front of the printer near the edge of any table. A setback of about six inches is ideal, leaving plenty of space for either output tray. And you will use both. The smaller transparent one is ideal for 4x6 prints and the larger metal one is perfect of 6x8 prints.
You'll also want some clearance at the rear not only for the USB and power cables but for the fan exhaust. Dye subs print with heat and consequently have to dispel heat.
The final location issue is the data connection. You'll be connecting via USB cable to a computer. We tried a number of variations on this but since our printer table is near a USB hub, we didn't have to sweat this one.
QUICK REFERENCE | Back to Contents
DNP provides a two-sided letter-sized Quick Reference to help you set up the DS40. In six columns on one side of the sheet, you'll find everything you need to power up the printer, install the paper roll and the principal product manage ribbon, run the test prints, clean the platen roller (when the time comes) and troubleshoot.
It does not cover software installation, however. For that, read the PDFs that accompany the drivers and other software options.
PAPER | Back to Contents
You can't print without media, so the first trick is to install the paper roll and ribbon.
The first thing you should do is plug the power cord in and turn on the printer. The power switch is on the front in the lower right corner.
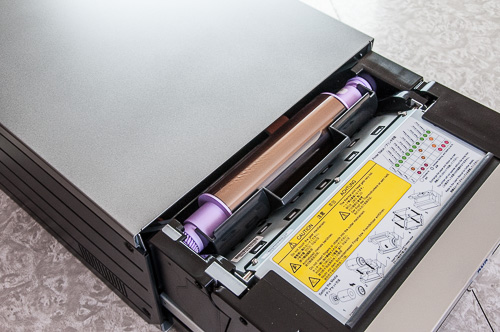
There is a blue latch along the bottom of the front edge of the printer that releases the front panel so you can pull it out like a drawer.
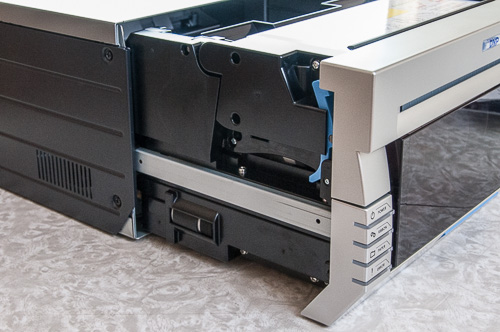
Printer Drawer. Note the (barely visible) blue latch is under the smoked plastic in front. The blue latch on the side accesses the paper compartment.
Then find the small blue release lever on the left inside of the drawer front. Pull that to get access to the paper compartment.
The smoked transparent box that is the drawer front is actually a scrap paper box. Remove that by lifting it straight up.
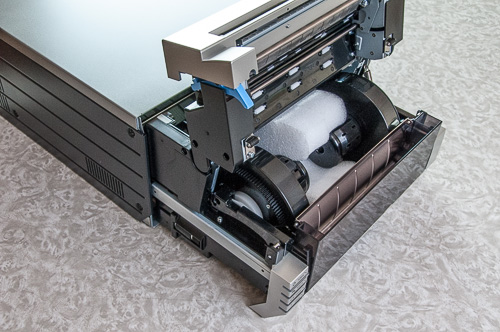
Spool Access. Styrofoam packing material hold paper spools.
Find the two big black spool ends for the paper roll and lift them out, too. Put one on each end of a roll of paper, noting the orientation of the paper. It should feed downward. You may have to push a little to get the roll to seat completely on the spool end. There should be no gap (or it won't fit back in).
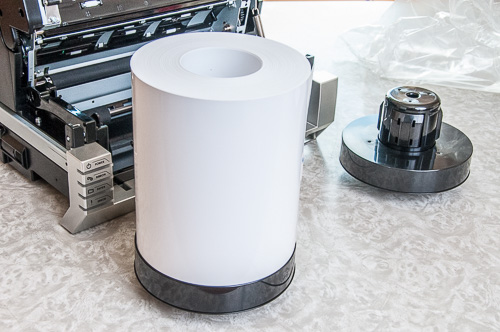
Paper Spooled. Just pop the spool ends on.
Paper Installed. Note the orientation.
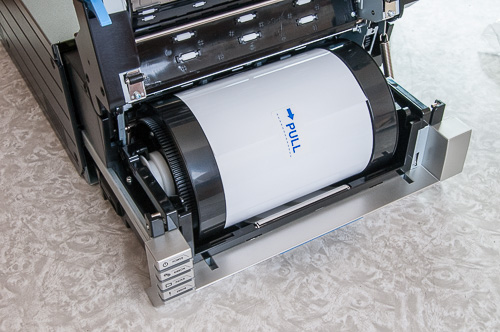
Remove the seal from the paper roll and feed the paper downward into the printer until the printer beeps twice. There's no magic here. Don't bother trying to find the slot under the roll. Just push the paper until the printer beeps, telling you it has enough paper to work with.
You can put the scrap box back in but don't close the drawer yet. You still have to install the ribbon.
RIBBON | Back to Contents
Remove the plastic tray that holds the ribbon from the printer but keep it in the same orientation. The take-up roller (which is empty when you pull the new ribbon out of its packaging) goes in the far end and the thick roller goes in the top end.
The gears on the rollers are to the left side of the printer when you are facing it.
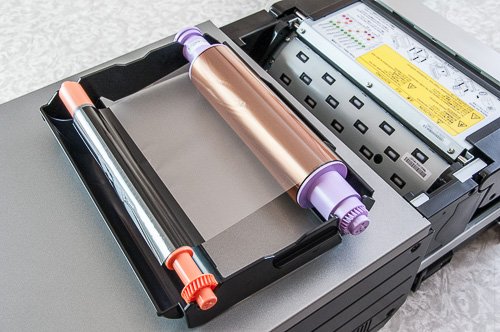
Ribbon Orientation. Rollers to the left.
If you've installed the ribbon correctly, the ribbon will run on top of its rollers with the gears to the left of the printer.
Just drop the ribbon holder back into the printer. It may take a little persuasion, but only a little.
Ribbon Installed. Ribbon over with gears left.
With everything installed, close the drawer. The printer will cycle through its status lights as it completes the media installation and then print four blank test pages. Yes, they're blank. Don't be alarmed.
SOFTWARE | Back to Contents
Don't connect the printer to a computer before you install the printer driver.
We installed the driver on Mavericks (10.9) and Lion (10.7). DNS provides a separate driver for Tiger (10.4), which we also installed. Yosemite (10.10) had not been released during the bulk of our testing over several months. But we installed the driver on Yosemite earlier this week and printed with it successfully.
The six-page PDF that accompanies the driver and ICC profile explains the process very well, so we'll just recap the highlights here.
Install the ICC Profile
A separate PDF accompanies the profiles. It's almost entirely about installing the profile on Windows but page 6 has a few lines about where to copy the profile on OS X.
First, you copy the ICC profile to the appropriate location on your hard disk. For OS X one locations for all users is /Library/Colorsync/Profiles/Profiles (but we had it one directory up). A typical Windows install would be in Windows/System32/Spool/Drivers/Color.
That will let you select the profile to manage color from your printing application rather than letting the system or the printer wing it. This approach almost always results in more accurate color.
DNS provides three profiles but only one is for the DS40: DS40_20140228.icm
Install the Driver
The driver installer is provided on a CD but we always recommend visiting the manufacturer's support site for the latest driver. DNS's download page has everything you need.
Installing from the CD or the disk image is painless and quick. But you aren't done yet.
Add the Printer
Make sure the printer is plugged into a USB port on the machine with the profile and driver installed.
It's a bit unusual, but DNS recommends you next turn on your printer and wait a minute. You'll see the printer automatically added to your Printers.
You can optionally do that manually if it doesn't happen magically. Just press the + button to Add a Printer and look for it on the list that is subsequently displayed.
Note that the correct driver should be Dai Nippon Printing DS40, 5.0.69 (CUPS). If that doesn't come up, reinstall the driver.
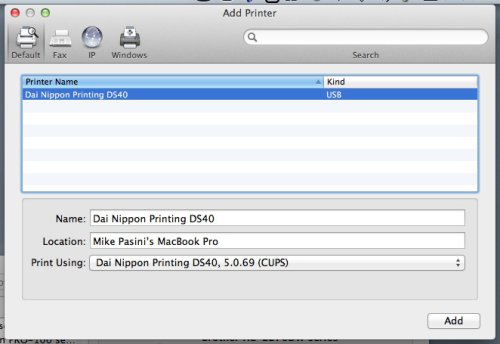
Add a Printer. Correct CUPS driver.
You can find the correct driver in /Library/Printers/PPDs/Contents/Resources as DNP-DS40.ppd.gz on OS X.
WIRELESS OPTION | Back to Contents
With only a USB port connection, the DS40 can't be called a network printer. But it is often possible to network a USB printer, so we gave it try.
The trick is to employ a wireless router with a USB port for sharing devices like this. We tried both an Apple AirPort Extreme and an Apple AirPort Express, both of which provide a USB port for printer sharing.
As for a standalone installation, we installed the driver first on our machines, then connected the printer to the network and turned it on.
Our results were mixed.
We were occasionally able to print to the DS40 wirelessly. But just as frequently the printer could not be found.
And when were able to print, we ran into two persistent problems.
The first was a failure to print the image with a "Incompatible media size" error. The second was a Lightroom phenomenon in which we would select a half dozen images to print and only the first four would be printed. No error was reported, printing just stopped.
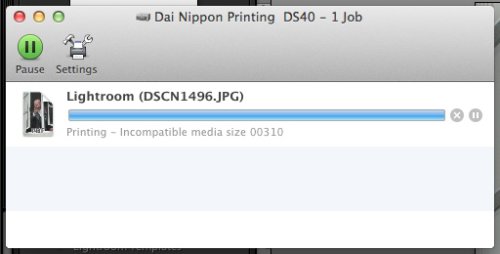
Network Error. We never saw this when cabled directly.
Subsequent print commands were ignored. We had to turn the printer's power off and restart the printer before it responded to print commands again.
We suspected network printing was not supported.
DNP Product Manager Matt Schmuck confirmed our suspicion, "You are correct about the shared connections, they are not supported configurations."
The best we could do was enable the Share this printer on the network option in the Print & Scan system preferences. That did work and was, in fact, how we printed from our Yosemite-based laptop.
OTHER SOFTWARE | Back to Contents
DNS does supply other software with the DS40 but it's Windows-only. We'll cover Mobile Party Print, which allows printing from iOS and Android devices to a DS40 cabled to a Windows computer, in our next installment of the review.
NEXT | Back to Contents
We'll discuss making prints on the DS40 in our next installment of this review. We won't keep you dangling, though. It makes very nice prints, quickly in three sizes.

First Print. Perfect.
(Editor's Note: This is the second part of a multi-part review of the DS40 printer. Links to the other stories are in the main table of contents at the top right of each story.)
Comments
Updated my Mac to Yosemite and have loss all functions of my DNP DS40 Printer !! surprise surprise there is no driver available as yet it seems.... so so disappointing and extremely frustrating!!
Can you offer any advice as I can find no helpful advice or info as to what to do online? Many thanks and best regards.
A great printer by the way -- at least when it worked!
-- David
Yes, we share your appreciation for the printer.
Before posting the first two parts of the review, we asked DNP about Yosemite support but didn't hear back before the 10.10.1 update came out and we could try it myself.
We installed the driver on the support site for 10.9 on a laptop connected to our network wirelessly. And enabled printer sharing in the driver on the machine to which it is actually connected. We updated our review to note that we have been printing to the DS40 from Yosemite using that arrangement.
Try this: 1) delete the printer from Printers & Scanners in System Preferences and reinstall the current 10.9 driver. You may have to hit the Plus button in Printers & Scanners to find the DS40 (it shows up as a Bonjour shared printer for our arrangement). Make sure the driver is the CUPS driver (we've seen a generic Postscript driver sometimes).
If that doesn't work, take a look at the Console program's logs for a clue. And let us know what you observe. We'll report it to DNP and we'll see if we can't get your DS40 back in harness.
-- Mike