A S C R A P B O O K O F S O L U T I O N S F O R T H E P H O T O G R A P H E R
Enhancing the enjoyment of taking pictures with news that matters, features that entertain and images that delight. Published frequently.
OS X And The RAM Upgrade Issue
3 February 2015
How long ago did you buy your computer? If it isn't brand new, we'll bet that's a tough one to answer. In our case, we are always shocked to discover exactly how long ago it was.
Nothing about our 2010 laptop seems dated. And that's the older machine of the two boxes we use to publish Photo Corners and practice photography.
But time waits for no one.
Sooner or later an application you love will require an operating system upgrade or more RAM. You may even be running out of space on your internal hard drive.
But buy new (four figures) or upgrade (three figures)? That is the question.
Upgrading is a good answer if 1) your CPU is sufficiently speedy and 2) you have a good GPU. RAM and the hard drive can be upgraded.
Our 2010 box meets that criteria but it's already maxed out with RAM. So only moving to an SSD would improve its performance.
But our 2011 box has been running Mavericks and then Yosemite with 4-GB RAM. It could use both a RAM upgrade and a hard drive upgrade to a solid state disk.
Details. Mouse over (or tap) for the caption.
But one or the other? Or both?
Before Apple released Mavericks OS X 10.9, performance issues on older systems could reliably be addressed by simply adding more RAM. Then Apple changed the game.
To figure this out, we decided to try a little experiment with both our machines to see if we could help you decide which upgrade makes the most sense.
With OS X 10.9, Apple introduced compressed memory, which replaced swap files for freeing up memory. When you run out of RAM in Mavericks, the least used active memory is compressed to half its size but stays in RAM. Previously it was simply written to a swap file on disk to free memory. Apple claimed the new method was faster -- even if your hard disk was a solid state drive.
This frees overall memory, increases speed (compared with swapping to disk), and lowers disk wear, but Apple claims that it also "reduces the need to read and write virtual memory swap files on disk, improving the power efficiency of your Mac," despite the small increase in CPU usage due to the compression and decompression.
Data spilling over from RAM to disk may not seem like such a big deal if you donât recall exactly how much longer it takes to get information from disk than from RAM. Reminder: it takes hundreds of thousands of times longer to read data from a spinning hard disk than from RAM. SSDs are much faster than spinning disks, but they're still hundreds of times slower than RAM.
And yet, sluggish performance continues to dog Yosemite users, although the soul-crushing delays in Mavericks seem to be resolved. Here's one person's experience, commenting at MacInTouch:
I have been running Yosemite on my 2008 iMac 3.06GHz C2D 4-GB RAM and on my 2008 MacBook Pro 2.5 Ghz C2D, also with 4-GB RAM, ever since it came out, and I have updated about 25 or 30 clients to Yosemite at their request, so I have seen the effects on quite a few upgraded Macs of various ages, including the latest models right out of the box.
The first thing everyone notices is how painfully slow every single app is in Yosemite, even (relatively) on the latest machines, which feature lightning-fast hardware and yet are often slower to respond than 5-year-old models running Snow Leopard.
They were advised by another MacInTouch reader to increase RAM to 8-GB, the traditional approach. But MacInTouch's Ric Ford countered:
If 4-GB of RAM were insufficient for Mavericks and Yosemite, Apple would presumably not be selling all the 4-GB MacBook Air models it does sell. I can personally attest that a 4-GB MacBook Pro 8,1 was unusably slow after updating from Mac OS X 10.6 to OS X 10.9 but upgrading to 8-GB of RAM did not solve the problem, while upgrading from Apple's slow original hard drive to an SSD (still with only 4-GB of RAM) completely resolved the performance problem and transformed the computer into a quick one.
We have the same MacBook Pro 8,1 that Rick Ford has. Our MacBook has the stock configuration of 4-GB RAM with a 320-GB hard drive. We've run Lion, Mavericks and now Yosemite on it. And we found it functional for photo editing if less so for text processing (oddly enough).
Mavericks would, after several days of usage, exhibit painfully long delays in drawing file open/save dialog boxes. But a restart would resolve the issue.
We spent some time eliminating old favorite utilities that would launch on a restart to make the system more reliable. Paring down helped. If the utility was really critical, we added it back.
We installed Yosemite after the first update was released (10.10.1) and have only had to restart once. We have updated to 10.10.2 and run Lightroom 5, OpticsPro 10 and Exposure 7 with that configuration without issue.
Well, mostly without issue. We have over 53,000 images in our Lightroom collection, which is housed in an external drive. Scrolling through the thumbnails of the entire collection often hangs (or seems to stall) on the first attempt. So we Force Quit Lightroom and try again without quite as long a delay.
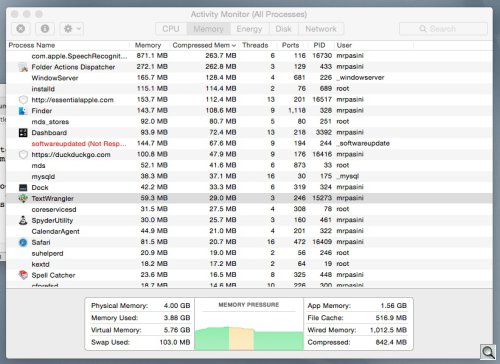
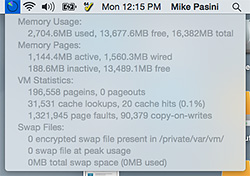
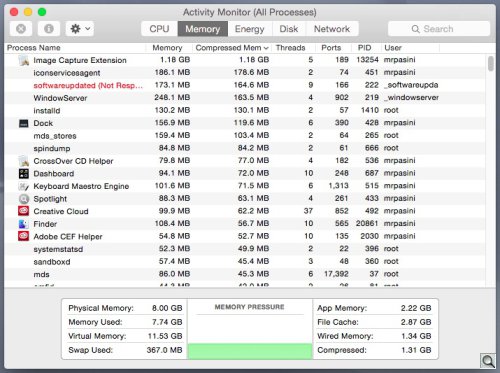
Activity Monitor Before. Typical usage with 4-GB RAM. Note the Compressed Memory column in the top table and the Swap Used and Compressed counts in the lower table..
We've also tested dictation on both Mavericks and Yosemite and find it far more reliable on Yosemite.
Our memory usage after a few weeks, as reported by Activity Monitor, shows Yosemite did have to resort to a 103-MB swap file even after compressing 842-MB of RAM.
So for us, the base configuration does work, admittedly with the typical glitches a new technology exhibits.
But were we inclined to upgrade to see if we could noticeably improve performance,. Here were our options:
RAM: An upgrade to 8-GB would be $100 but this MacBook Pro can use 16-GB, which is $33 more.
SSD: A 480-GB solid state drive (more room always makes sense for an upgrade) would be between $200 and $240 but for $20 more you can also get an external enclosure to house the original drive.
Of the two, we would be most inclined to do the drive upgrade because the anecdotal evidence is overwhelmingly in favor of an SSD, even with just 4-GB RAM.
But if compressed memory really works, a 16-GB RAM upgrade would obviate the need for the more expensive upgrade.
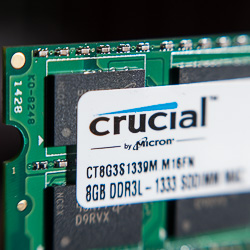
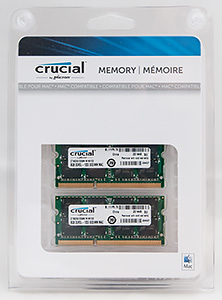
RAM Upgrade. A 16-GB kit from Crucial.
If Siracusa is right, that a swap file on an SSD is hundreds of times slower than using compressed memory, a RAM upgrade would easily accommodate our 103-MB swap file in compressed memory so we'd never need to write memory to disk, which in our case would be hundreds of thousands of times faster.
Whereas, if we upgraded the drive and not RAM, we'd notice a speed increase from hundreds of thousands to thousands of times faster for memory operations. For disk operations, though, we'd no doubt notice significant performance improvements.
Ford's observation suggests disk operations are what we normally notice and the swap file read and writes are not as perceptible. But with our Lightroom library on an external drive anyway, what disk operations other than launching an application would be sped up?
Well, the new operating system may be a factor. There are, for example, lots of blocks employed implementing iCloud's local storage. That wouldn't have been a factor in Lion, say.
So the hard drive issue of additional accesses may be more one of reclaiming lost performance.
We suspect we'd notice an SSD upgrade more than a RAM upgrade. But there was really no way to answer this without trying it. Fortunately Micron offered to send us a 16-GB Crucial memory upgrade.
If your relatives feel comfortable around you when you're holding a sharp knife, you can perform this upgrade yourself. If you like to take shortcuts and never read manuals, skip it. Something like this does have to be done in the right way. But it's simple.
Tidy Workplace. Screws on tape, sticky side up. MacBook upside down and safe from scratches on a purple towel.
We start with a clear table top covered by an old towel. We discharge any static electricity by touching something metal before we open the laptop.
Then we get to work:
Use the appropriate screwdrivers to unscrew the 10 screws that hold the bottom shell of the case on. The three in the top right are longer and should be removed first. Lay them out in the same pattern they were installed so they go back in the same holes and do it away from your work area.
[Optional] Unplug the battery connector by gently prying it up using a plastic tool (like a plastic spoon). Some videos leverage it from the short ends but the one long side is less likely to break.
If you can't find the RAM chips look at the upgrade kit. They're nearly identical. Spread the plastic clips gently to the outside until the top chip pops up. You can then slide it right out of its holder.
Repeat for the bottom chip.
Slide the new bottom chip in, aligning the slot on its edge with the finger on the holder. When fully seated, press down to lock it in.
Repeat with the top chip.
Reconnect the battery connector.
Pop the shell back on and replace the screws. It's advisable to turn each screw backwards until you feel a click to make sure you have aligned it properly. They are easy to strip.
Populated RAM Slots. Ready to restart.
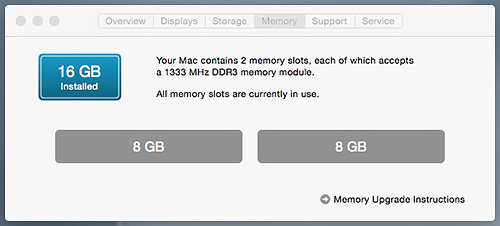
When you restart you computer, you'll notice the increased RAM capacity. The Memory Tab of the About This Mac app reports the current configuration:
Real life has its compromises and installation routines are no exception. After we successfully installed the new chips, we had a few thoughts we thought we'd pass off as genuine tips:
We used a piece of tape, sticky side up, to hold our screws in the order we removed them. They stayed put when we sighed deeply.
When replacing the screws, note that they don't go in perpendicular to your tabletop but at a slight angle (perpendicular to the curved surface of the bottom shell). When you have the shell off, take a look at the screw mounts to see for yourself the angle you should aim for.
Sometimes you can do more damage doing things right than taking a small risk by doing them wrong. That was the case for us with the battery connector. It seemed cemented in with no place to slip between the connector and the board. So we just left it, being very careful not to short out the board as we replaced the chips. While all the online videos we watched recommended disconnecting the battery, Apple's own MacBook Pro: How to remove or install memory doesn't mention it.
Getting the bottom chip out required releasing it from the side springs several times. We counted three. But eventually it pops up high enough to remove.
Inserting the new chips was a breeze. Very quick. Mind the alignment notch first. And make sure you completely seat the connectors in the slot before pressing down and then press down all the way.
Put the old chips in the plastic shell the new ones came in and store them away for a rainy day.
This sort of upgrade can be hard to test, easily confusing various factors. So we're outlining our method here.
MenuMeters. Handy graph updated every few seconds.
We had access to a recent Retina MacBook Pro with 8-GB RAM and an SSD drive, configured that way by Apple and running Yosemite. While we didn't run any of our image editing software on it, we did use it to run Numbers and various Finder tasks to get a feel for its performance.
Silent and fast, it was our benchmark for comparison.
On the older MacBook Pro with the RAM upgrade to 16-GB we used two tools to monitor performance.
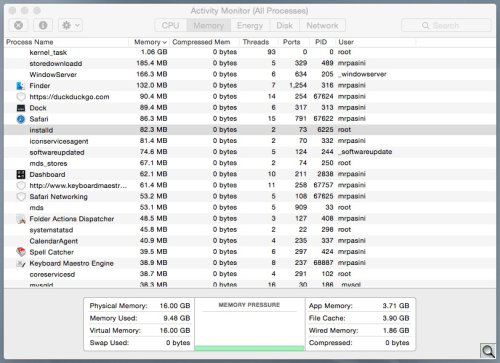
The first was simply Activity Monitor pointed to RAM usage. We tracked total Swap Used and Compressed Memory, primarily. Those are the two bottom categories in the lower window pane on either side of the flat Memory Pressure graph. Compressed Memory is also reported for each application in the second column of the large table above the window pane.
The second was the free MenuMeters, which displays a pie graph of memory usage (updated every 10 seconds, in our case) as well as a pulldown of the actual numbers.
On the upgraded MacBook Pro, we ran everything we had as we normally would for several weeks.
We'll note some application-specific results before more general results.
In Lightroom, Activity Monitor would note "Application not responding" when we would click on our complete collection in the Library module and wait for the thumbnails to be generated. But it would also show the memory allocation increasing as those thumbnails were being built.
That took as long as it usually did being a disk-based task, of course. But it didn't seem to hang, as it used to. It seemed as if everything was being written to memory rather than to memory, other parts of which had to be compressed, and then perhaps even swapped out.
Piccure+ actually measures available memory on launch, warning you if it doesn't have enough. On our 8-GB system, we typically have a few applications open, including some combination of email client, browser, text editor, a utility or two and image editing software. That often does not leave much room for Piccure+, which wants at least 1-GB.
So having more room for Piccure+ was a plus. And the latest version, if it can't be said to actually fly, really did run through a batch conversion quickly.
DxO OpticsPro 10 seemed to launch more quickly, oddly enough. Disk-based activity like launching an application is what we would not expect to see improve but in this case, we were surprised.
Activity Monitor After. Nothing compressed, no swaps at all.
Memory usage was interesting. Constrained to 4-GB, we usually worked on the 13-inch MacBook Pro one application at a time, although often with TextWrangler also open.
And, in the beginning, we saw via MenuMeters, that we were still only accessing about 4-GB of the 16-GB RAM available. As we used more memory-greedy applications that increased but only up to the 8-GB mark.
Only when we pushed things quite a bit more than we normal would did we get up to the 12-GB mark. It seems as if OS X sets the table at these marks and works within it -- not as long as possible but according to some criteria -- before it bites off another 4-GB.
The only time we had a slow down was very briefly and a quick look at Activity Monitor explained why. We had a brief peak in disk activity (Spotlight or some scheduled maintenance activity perhaps). When that subsided, performance returned to normal.
The significant speed-up we enjoyed seemed to be the result of preventing disk activity during an application's normal operations.
But it is important to point out that disk-based activity, like startup time and launch times, were not affected by the upgrade. Still, they were no slower than they ever had been.
And yet we enjoyed better performance in Yosemite than when we had only 4-GB RAM. We believe that's simply because many of the memory operations to compress memory and write to and read swap files on disk were avoided.
We also did not experience the beach ball waits in the Open File dialog box that we'd eventually get with Mavericks if less so on Yosemite. The only cure in Mavericks was a restart (every two weeks). We aren't seeing that at all with 16-GB RAM.
Spotlight indexing wasn't a factor on this system but it can be a huge drain on resources when you first install an OS upgrade. And it can slow things down in general when accessed if it is required to index new media. That's just the nature of the beast. It is disk-bound, so a RAM upgrade won't help.
Skipping the RAM upgrade in favor of an SSD upgrade might make a lot of sense in that while you are not avoiding the disk-based functions to optimize memory usage, they are occurring hundreds of times faster. And you will notice faster boot and launch times.
But we were impressed by the thousands of times faster performance of more RAM and the complete avoidance of Yosemite's disk-based memory functions.
Moving up from 4-GB, we had two options: 8-GB or 16-GB.
We observed a 4-GB threshold and an 8-GB threshold in our RAM usage as we watched Activity Monitor. The most we typically used was a bit over 9-GB, although our high was about 12-GB.
But then a funny thing happened.
We decided to install Yosemite on that 2010 MacBook Pro, which is limited to 8-GB RAM.
It ran quite nimbly at first with no compression or swap files. But that changed as we worked with our usual suite of tools, which includes Safari, InDesign, Photoshop, Lightroom, Interarchy, TextWrangler and Postbox, almost all of which are open at the same time.
We started to notice more and more disk activity. And we soon found our long list of processes all had compression and we were swapping files as well.
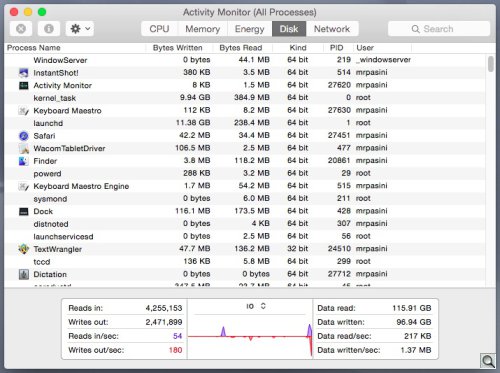
Disk Activity. Yosemite disk reads and writes with 8-GB RAM.
Memory Compression, Swaps. Typical usage with 8-GB RAM.
That strongly suggested 16-GB is required to get the benefits of a RAM-only upgrade.
Without testing an SSD install, we can't compare a RAM-only upgrade to an SSD-only upgrade. Nothing we experienced contradicts the conventional advice that prefers an SSD to a RAM upgrade for Yosemite.
But if you can only install a RAM upgrade, we suggest you install 16-GB if your system will support it. That way, you'll avoid compression and disk swaps.
If you are limited to 4-G or 8-GB RAM, we suggest installing an SSD upgrade. At that level, you can't avoid the disk activity. So you may as well make it faster than with conventional hard drives.
Those hardware specs are the same as those of the silent and fast Retina MacBook Pro we used and should also mimic its performance.
This doesn't so much contradict Ford's experience as it expands on it. His hardware update was done before Yosemite was released, reflecting his experience with Mavericks. And while Yosemite seems more refined to us, it uses the same memory management strategy.
Our experience with Yosemite proves a RAM upgrade will make a perceptible difference in performance of non-disk-based activity and it will also reduce disk-based activity.
At 16-GB you'll avoid those slowdowns all together. Less than that, you should consider an SSD upgrade.