Photo Corners headlinesarchivemikepasini.com
![]()
A S C R A P B O O K O F S O L U T I O N S F O R T H E P H O T O G R A P H E R
![]()
Enhancing the enjoyment of taking pictures with news that matters, features that entertain and images that delight. Published frequently.
Around Town


7 April 2015
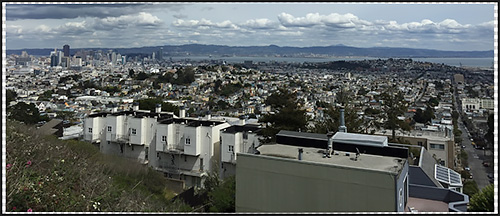
Yesterday afternoon the rain held off (which seems to have become its habit) and we took a walk to where Portola Dr. meets Market St. You get a lovely view of the city and the East Bay from there without the troubling of climbing Twin Peaks.

San Francisco Panorama. Scroll to get around town.
We left the bunker with the iPhone 6 Plus, intending to take a panorama. But when we saw the clouds overhead, we weren't sure whether the subject should be the city or those bright puffs marching in formation toward the Sierras.
We weren't the only ones hanging over the railing taking a shot. "I've been telling myself for ten years to pull over and take this shot," one photographer gleefully reported to us, waving his camera triumphantly over his head.
"You couldn't pick a better day," we congratulated him. "Right after the rain."
It was much clearer than it had been at the end of last week when we hiked up Twin Peaks and took a few shots with the Nikon D300. Those ended up being black and whites.
About the Image
The full-size panorama image is 3262 x 1392 pixels and was captured at f2.2, 1/4405 second and ISO 32 from the back camera at 4.15mm. The settings may see odd but that's life with a tiny sensor. You are shooting wide open.
We knew we had to resize it for display here. And while we were at it, we trimmed the bottom half off to minimize the loss of detail. You're looking at a final size of 1517 x 300.
We did that in Photoshop CC 2014 but before we did any cropping and resizing, we used the Lens Correction module to fix the slight inward curvature of the image that made the tall buildings on the edges of the image seem to lean in.
Photoshop CC 2014 has corrections for the Apple iPhone 6 Plus and its lens so we plugged that in on the full crop image.
Lens Correction. Not the warp required to keep the verticals upright (in the top half of the image).
Since we were in there, we ran the JPEG through the Camera Raw filter. We really didn't see anything to do, though, so we hit the Auto button to see what Camera Raw would do.
Well, it went too far. Auto always seems to go too far. But sometimes a peek at what Auto has done with which sliders is a hint at what you can do.
Auto had increased both Exposure and Contrast, then Shadows (the most). But we started with a little more Clarity (as we usually do) and opened the Shadows a tiny bit, increased the contrast just a smidge and did give it a little more exposure.
We really could have left it alone. Which, we suspect, is why people are so happy with their smartphone photography.