Photo Corners headlinesarchivemikepasini.com
![]()
A S C R A P B O O K O F S O L U T I O N S F O R T H E P H O T O G R A P H E R
![]()
Enhancing the enjoyment of taking pictures with news that matters, features that entertain and images that delight. Published frequently.
On Shooting Sunsets


28 September 2015
At the color lab where a couple of buddies worked in the 1980s, three subjects led all others: sunsets, babies and nudes. There were laws against printing nudes, babies were only of interest to the families into which they had been born and sunsets were never as successful as the photographer hoped.
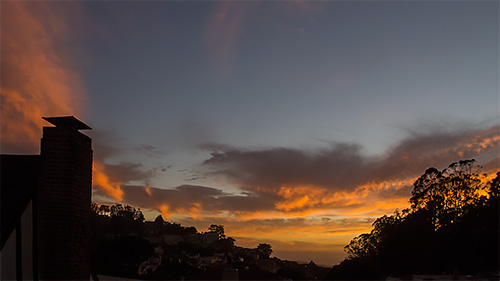
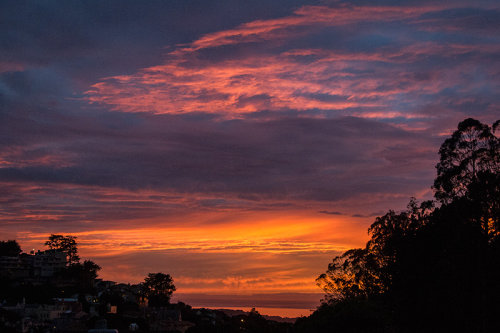
Saturday Night Live. Shot at wide angle, f5.6, 1/80s, ISO 200 in Aperture Priority mode.
That was then, though. These days, we have these luminescent screens to enjoy our work. No need for flat Cibachromes from the color lab.
Phosphor has come to the rescue of photons.
ON SUNSETS
If you scroll through our annual headline pages, you'll see a good number of sunsets (and storms) taken from our picture window overlooking the Pacific Ocean. We're unafraid of the genre, you might say.
For 28 years we lived on the bottom flat of a very tall building surrounded by two-story homes and three-story apartment buildings. The sun rose at 10 a.m. and set at 2 p.m.
Having captured a Raw image is a tremendous help in post processing. So much so it's practically the big secret.
So being able to look out a window high above the city and see the sky turn color and the clouds blush never gets old. Some days we sit on the couch and just take it all in, hardly looking away. Other days, we scramble down to the bunker, grab a camera and race back to the window to capture the drama.
And drama it is.
The clouds are only a part of the drama, particularly at this time of year as the weather shifts into autumn mode. The wind plays a big role too. Which necessitates our scrambling. We can barely get back to the window with a camera before the scene has changed.
And the sun itself has a starring role. There is the sunset shot with the sun in the sky (even if hidden by some trees, say). And there is a different sort of sunset shot after the sun has set.
Stay for the whole show.
ON CAMERAS
If you do this a lot, you'll probably find yourself following the traditional advice of shooting the sunset before sundown in Aperture mode and after sundown relying on Manual mode to capture the diminishing light.
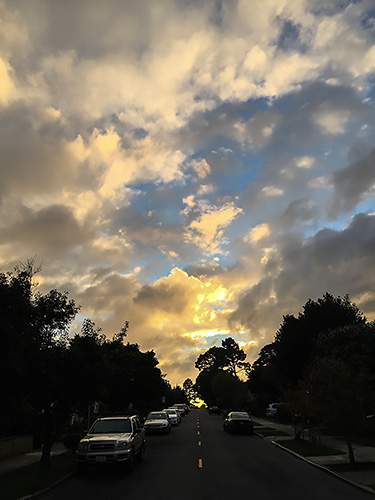
iPhone 6 Plus. Processed in Photoshop CC.
Auto exposure works well enough when the sky is bright but tends to falsely brighten the sky when the sun goes down. Of course, auto exposure can over-brighten the sky, too, which happens with a lot of smartphone shots.
The cure is often just a dose of Exposure Compensation, kicking the EV value down a bit. That's where your monitor comes in handy.
Compare your capture to the scene in front of you and adjust. It can take a few shots to dial in the right amount of EV or the best manual exposure.
And, most importantly, make mental color notes. Go through the range of colors in the sky and note their character. Remember that stain of yellow above the horizon or the brilliant magenta on the clouds.
Our iPhone sunset above profited from the sun being hidden behind the clouds. The automatic exposure didn't require any adjustment and left us enough latitude to bring out the image in Photoshop CC using the Camera Raw filter.
ON POST
Post processing is your friend. And it's a closer friend on your laptop or desktop than it is on your smartphone. The display is richer. Phone dither to emulate 24-bit color. Most laptops (Apple Air a notable exception, but others as well) don't.
When you bring up the image on your system monitor, it will be the first time you've really seen the capture, whether it's a JPEG or a Raw. You'll notice a tweak or two you want to make.
Is the yellow bright enough? Are you getting as saturated a pink as you saw? Should you bring up the shadow detail or play it like a silhouette? You decide.
And often that decision mixes and matches from one moment to another. Maybe the clouds were not quite so saturated when the horizon was blazing. It's perfectly legal to do both in your image.
Having captured a Raw image is a tremendous help in post processing. So much so it's practically the big secret. You have more to work with than you can see, so fiddle with the sliders or settings in your software to see what happens.
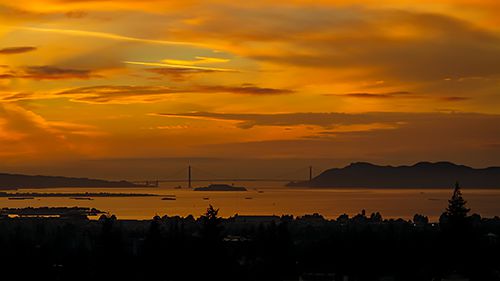
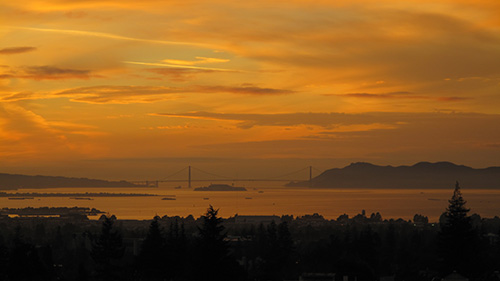
Our shot of the Golden Gate Bridge from the Oakland hills above was a Canon PowerShot G10 capture at f4.5, 1/200s, ISO 80. The After button shows you what it looked like after running it through Photoshop CC's Camera Raw filter (with a little Dehazing) while the Before button shows you what the camera captured. Quite a difference.
BLACK & WHITE
What attracts us to a sunset is the spectacular color so the idea of converting those colors into a monochrome image is probably the last thing on your mind.

Drama. It can work in black-and-white, too.
But drama is drama. And it can be played out in black and white as well as color. It's just a different kind of drama. Tonal drama.
A straight conversion isn't going to be very satisfying but a conversion that lets you adjust individual hues will do the trick. And even then you may want to add more overall contrast.
To convert our JPEG sunset above, we used Photoshop CC's Black & White adjustment, lightening the yellows and darkening the pinks, blues and greens before heightening Contrast in the Camera Raw filter.
DISPLAY
We're happy to take our image no further than a screen display we can use here. The same sunset you see above (just a few seconds later) was cropped for our fall front page shot and we like them both.
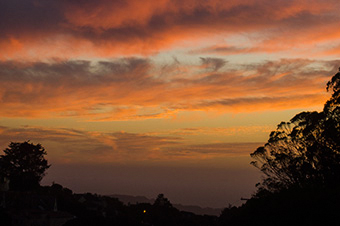
Front Page Image. Moments after our shot at top.
Prints are going to be a little more work. You'll want to save your printable image as a separate file because tweaking it for your ink set and paper may make it unviewable on screen.
Our best sunset prints use a dye-based ink set on a swellable glossy paper. We want the most intense color we can get out of the printer with the deepest blacks possible. So it isn't a job for pigments on art paper.
In fact, some of our favorite sunsets printed perfectly on nothing but 4x6 photo paper on an all-in-one device. They are, after all, dyes on glossy paper.
CONCLUSION
Sunsets are a very rewarding subject and don't require a model release, either. You can capture them with any camera, properly tuned to the light and later bring out their true beauty in post processing. They even work well in black and white.
But they can be a very discouraging subject, too. You won't get what you see the first time you snap the shutter.
Don't give up. Adjust. And you'll have a shot that you will always enjoy seeing again.
Comments
Great post, Mike. We all take them and love them, and it was good to hear your take on how to do them better.
-- Ken Cameron
Thanks, Ken. Funny thing was that sunset was upstaged two nights later. Seems like we could put one of these up every few days <g> -- Mike