C O N T E N T S
•
Photo Corners headlinesarchivemikepasini.com
![]()
A S C R A P B O O K O F S O L U T I O N S F O R T H E P H O T O G R A P H E R
![]()
Enhancing the enjoyment of taking pictures with news that matters, features that entertain and images that delight. Published frequently.
Exposure X: Editing


9 February 2016
We've been using Exposure X to edit both Raw and JPEG images for a few weeks now. While the mechanics of using the panels are no mystery and function well, we remain a bit confused about what role they should play in our editing process.
That suggests they aren't a complete replacement for what Adobe Camera Raw provides in Lightroom and Photoshop (even as a JPEG filter). But it also suggests there's some meat on these bones.
As with its organizing tools, though, we find we're missing functions that are essential to how we edit an image. And as we said then, because Exposure X functions as a plug-in, that's not a deal breaker.
But first let's look at what it does do.
IMAGE EDITING
The Alien Skin video segment on editing begins by pointing out the slider at the top of the tools panel that fades the overall effect. That's an important point. You aren't just optimizing the image. You can also applying a look and adjusting its intensity.
That's a lot different approach than we take in Photoshop or Lightroom.
JPEG VS. RAW
We've been shooting Raw exclusively for a while now. Lightroom's efficient user interface made that feasible (and fun). We'd do the same amount of editing on JPEGs but with Raws we have more latitude.
Exposure X doesn't penalize that approach, making it easy to batch edit Raw images. If anything, it makes it a little easier to do. Just select the images you want to batch edit in the browser and make the edits in the editing panels on the right. Simple.
And unlike Exposure 7, in which Alien Skin pioneered Raw editing, Exposure X handles many more Raw formats. Camera formats before 2003 are not supported but DNG is supported.
BASIC EDITS
Exposure X's Basic editing panel looks a lot like what you see in Camera Raw whether you engage it in Lightroom or Photoshop.
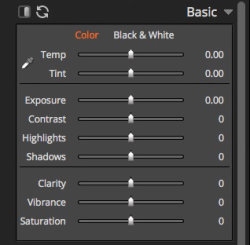
Basic Editing. Exposure X (above) compared to Camera Raw in Photoshop, which adds White and Black sliders to the options.
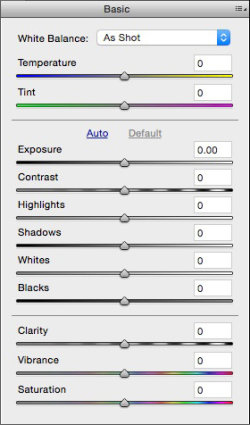
But the Exposure X controls do not include the White and Black sliders in Camera Raw. So we wondered if the other sliders worked quite the same way.
To find out, we created a simple step wedge, saved it as a JPEG and opened it in both applications. For each slider, we set the value to each of the two extremes. Then we took a screen shot of the step wedge to see what the tonal changes were.
In the following sets of images, the top image is the step wedge Exposure X produced and the bottom image is the wedge Camera Raw produced. In two cases the bottom two images are from Camera Raw.
ExposureThe Exposure slider controls overall tonal distribution in Exposure Value units, just as if you had changed your EV value on the camera.
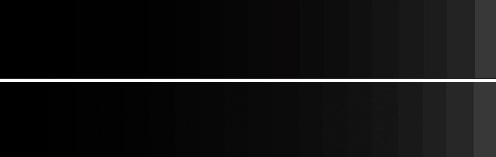
-5 EV. Identical to our eyes.
Contrast
+5 EV. More contrast in Camera Raw.
Th Contrast slider affects the difference between tones.
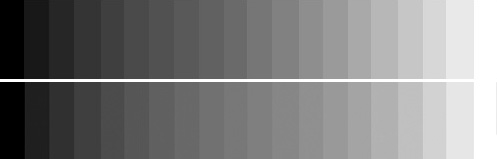
-100. Identical to our eyes.
Highlights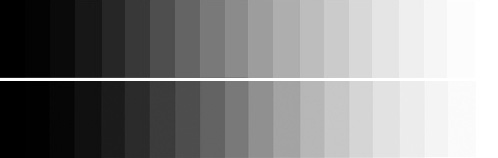
+100. Slight shift to toward the highlights in Camera Raw with Exposure X preserving shadows at the expense of highlights and Camera Raw preserving highlights at the expense of shadows.
Th Highlights slider controls the brightest tones in an image. Camera Raw's White slider focuses more narrowly on which distinct tones are white.
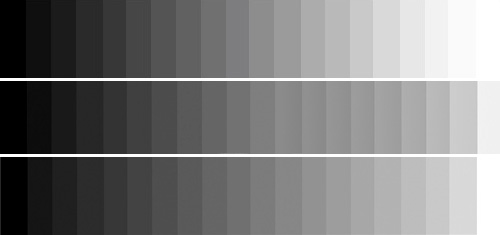
-100. Both Camera Raw sliders shift the scale to the right, adding tonality to the highlights, while Exposure X drops detail in the highlights.
Shadows
+100. Exposure X moves the fewest tones to white while Camera Raw's White slider moves the most.
The Shadows slider controls the darkest tones in an image. Camera Raw's Black slider focuses more narrowly on which distinct tones are black.
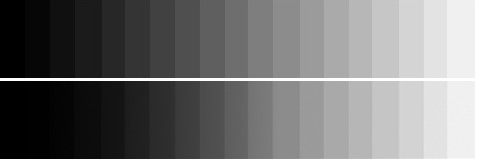
-100. Camera Raw's Black slider makes more tones black while Exposure X's Shadow slider clips the least.
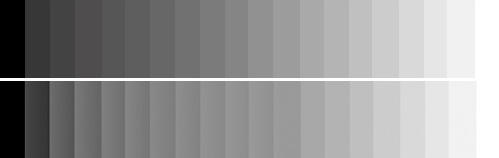
+100. Camera Raw maintains more contrast with Shadow slider, compressing the tonal scale, while Exposure X simply lights darker tones except for black and Cmaera Raw's Black slider darkens the shadow tones while maintaining separation between them.
If your eyes see what our eyes see, it appears Exposure X's sliders are affecting tonality a little less aggressively than Camera Raw. We think these are noticeable differences when working on real images, although the Curves panel certainly can compensate for any slider behavior.
A COLOR EDIT
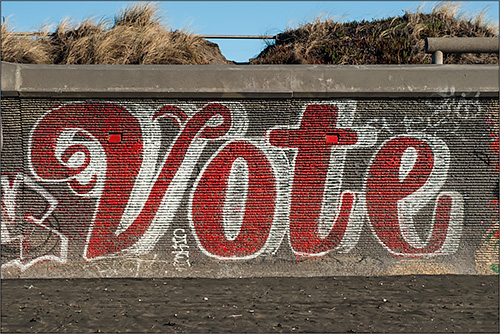
We selected an image we captured with a Nikon D200 and 43-86mm Nikkor with a polarizer on it to do a typical edit.
One thing missing in Exposure X is any kind of White Balance preset. But there is a White Balance tool you can use to select a neutral area of the image to set the Temp and Tint sliders.
It's important to have some way to control White Balance in a Raw file, which does not record a value for it. The White Balance tool does that for us.
We used that tool, pointed at the concrete, to adjust the white balance in this shot. In the examples below, the white balance is slightly different but we could have matched them in either application.
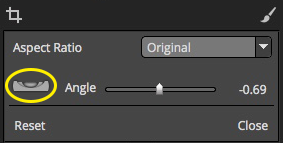
Level. Click on the highlighted Level tool to draw what should be straight.
We also straightened this image in Exposure X using the Crop tool. There are two ways to do that.
The first is to position the cursor outside the crop and drag. A more refined grid will appear to help you straighten the image. This is helpful when you have more than one line that should be straightened and have to compromise somewhere between the two.
The second is to click on the Level tool next to the Angle slider. Then you can draw a straight line along whatever it is in the image you want to straighten. This is more precise (and a bit easier) than the first method.
Our Basic edits were a bit different from those we made on the same image in Camera Raw. Here's the comparison:
EXPOSURE X VS. CAMERA RAW EDITS EXPOSURE X CAMERA RAW Exposure 0.62 0.40 Contrast 30 17 Highlights 44 46 Shadows -59 -15 White na +28 Black na -16 Clarity 39 39 Vibrance 0 0 Saturation 8 3 You can compare the final edits using those values below:

Both images were resized on export by the host application.
Before we leave the subject, we should add that these edits are non-destructive. They are saved as a recipe of sorts in a sidecar file in a folder named Alien Skin. So you can revisit and revise them at will.
That's the way Lightroom works, too.
But it's worth pointing out that the edits are not universally understood. So what you do in Lightroom won't be understood by Exposure X and vice versa. Should you abandon one or the other application, you'll lose your edits.
MORE TOOLS
That's just a brief look at the new editing power of Exposure X compared to what Camera Raw provides. You still have a few more tools at your disposal.
Like its predecessor, Exposure X offers a sophisticated collection of Presets based on film looks (which also let you create your own, sync and share them), Brushes for local corrections and layers for stacking effects.
We are not fans of presets for optimizing an image but we do really enjoy using Alien Skin's film-emulation presets.
MISSING
There are, however, a few tools we use a lot in Camera Raw that we miss in Exposure X. Let's take a look at them.
HistogramThe first thing we really miss from Camera Raw is the Histogram display. That gives us a second way to look at our image, which we find essential.
We can clearly see if we are clipping our shadows and highlights and how much room we have to shift our exposure. We can see what a Contrast adjustment is going to do. We can see if there are any Highlights to recover or Shadow detail to restore.
Exposure X doesn't provide a histogram display. Instead -- and it isn't a bad idea at all -- you have to examine the image carefully to see what's going on as you move its Basic sliders around.
The trouble with that approach is that it your monitor lies to you whereas a histogram can't. This is especially true if you're printing the image. So we find it a little less helpful, if essential.
Black/White SlidersThe Basic panel looks a lot like Lightroom's Basic panel but it's missing both the Black and White sliders. We find thems particularly useful as clipping controls (although they work in two directions) which let you decide how many tones go completely but independently white or black. Clipping the highlights does not affect the shadows and vice versa.
In Exposure X you can change Exposure to clip one end or the other but then have to use Highlights or Shadows to clip the other. But this seems to compress the remaining tones. So we were never comfortable with it.
Upright ToolBefore Adobe introduced the Upright tool, DxO Viewpoint was our tool of choice for correcting perspective. The Upright tool is both more convenient and automatic, but Viewpoint is no less effective and particularly useful for images that don't lend themselves to obvious correction.
We've found -- somewhat to our surprise -- that we can rarely get through a Friday Slide Show without resorting to the Upright tool. It helps unconfuse the image.
This surprises us because we're all accustomed to looking at (and ignoring) things like converging verticals. But it turns out sometimes those slanted lines take deciphering, which diminishes the attention paid to the subject. Removing the distraction makes the composition stronger.
We don't expect to see such advanced functionality in Exposure X any time soon. But that may not matter to you as much as it does to us.
DehazeWe're finding the Dehaze tool is sometimes just the ticket to fix an otherwise flat image either because of atmospheric haze or flare. Camera Raw's implementation is surprisingly sophisticated, achieving effects we can't do with other tools. We don't always miss it but when we need it and it isn't there, as in Exposure X, we do indeed miss it.
EVALUATION
Despite the similarity between Exposure X's and Camera Raw's sliders, they work differently. There are also a lot more tools in Camera Raw's bag than Exposure X's at the moment. And some of those tools we find indispensable.
But you can still have a robust editing session of even Raw files in Exposure X. And the intelligent tool layout only makes it more enjoyable. We never had the feeling that this was a cheap knock-off of Camera Raw. It's a more basic approach, which the company can build on.
It's faint praise to point out that the editing tools are a fabulous bonus if your aim is to apply a film emulation or other preset to an image. But you'll be very happy to have that sort of control as you work with the presets, which remain a very strong reason to consider Exposure X.
So does Exposure X provide a complete non-destructive editing solution? No. Is it a sufficient one? In many cases, yes. And even in this first release it's a pleasant experience.
(Editor's Note: This is the third part of a multi-part review of Alien Skin's Exposure X. Links to the other stories are in the main table of contents at the top right of each story.)