C O N T E N T S
•
•
Photo Corners headlinesarchivemikepasini.com
![]()
A S C R A P B O O K O F S O L U T I O N S F O R T H E P H O T O G R A P H E R
![]()
Enhancing the enjoyment of taking pictures with news that matters, features that entertain and images that delight. Published frequently.
OpticFilm 135: Resolution, Color, Operation


22 March 2016
Two of the first scans we do with any review unit are the USAF resolution target and an IT8 target. The former tells us how much detail the scanner can capture and the latter reveals its color accuracy.
RESOLUTION
When we reviewed the OpticFilm 120, we ran a set of resolution tests using the USAF-1951 Resolution Test Chart. In addition to the OpticFilm 120, we tested the resolution of the dual-bed Microtek M1, flatbed CanoScan 9000F, Canon MG8120 all-in-one and a 12-Mp Nikon D300 dSLR.
Using the USAF-1951 target shows us the level of detail the scanner can see, regardless of its stated optical resolution. So the CanoScan 9000F, for example, touts an optical resolution of 9600 dpi but can really only distinguish 1626 dpi in the test.
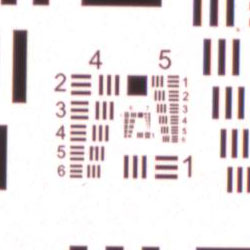
Chart. We called it a G5-E5.
The USAF-1951 chart's series of horizontal and vertical bars are arranged in sets of three to test the resolving power of both the horizontal and vertical resolution of a scanner.
Manufacturers don't always specify the horizontal and vertical resolution individually but the horizontal resolution is determined by how densely packed the photocells are on the CCD sensor itself while the vertical resolution relies on how finely the stepping motor moves across the image.
We explained how to interpret the results of the scan in the OpticFilm 120 review. But briefly, because the layout of the resolution target is known, a visual examination of its scan to find the smallest distinct set of bars can reveal the maximum number of dots per inch the scanner can see. You translate the location of the sharpest set on the target to a table of values to get that number.
Here's the table (G for Group, E for Element):
G0 G1 G2 G3 G4 G5 G6 G7 E1 51 102 203 406 813 1626 3251 6502 E2 57 114 228 456 912 1825 3649 7299 E3 64 128 256 512 1024 2048 4096 8193 E4 72 144 287 575 1149 2299 4598 9196 E5 81 161 323 645 1290 2580 5161 10322 E6 91 181 362 724 1448 2896 5793 11586 Here's the chart of the combined results along with the OpticFilm 135:
SCANNER RESOLUTION TESTS Scanner Optical DPI Tested DPI OpticFilm 120 10,600 4,598 Nikon Super Coolscan 500 4,000 3,650 Nikon D300 2,848 2,896 OpticFilm 135 3,600 2,850 CanonScan 9000F 9,600 1,626 Canon MG8120 4,800 1,626 Microtek M1 4,800 1,448 In our earlier review we also cited 3,200 dpi for an Imacon and 2,300 dpi for the Epson V700/V750 but we didn't test those ourselves.
COLOR
There isn't anything you can do about resolution. But the color target makes it possible to compare the values the scanner captures to known color values. That information can be used to create a color profile to adjust the scanner's captures toward a more accurate scan of the original.
But you do that in software. And the only software that ships with the OpticFilm 135 is Plustek's new QuickScan Plus. Which does not build ICC profiles.
We asked Plustek about that and the answer was that the profile was "built into the software." We took a look at the components of the package and didn't find anything resembling an ICC color profile. Nor was one installed with the software elsewhere on our system.
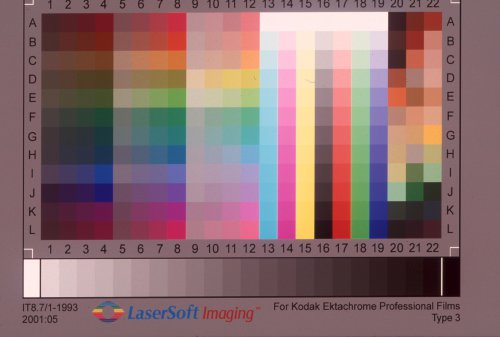
IT8 Target. Note the magenta cast where a neutral gray background should appear.
We were surprised by the magenta cast, which you can also see on the USAF-1951 target above. Compare the above scan to the OpticFilm 120 target.
Both targets were scanned by QuickScan Plus, of course. We'll look at QuickScan Plus in depth in the next installment of this review.
OPERATION NOTES
We made just a couple of notes on the physical operation of the OpticFilm 135 in general that we'll include in this segment of the review.
Holder InsertionThe film strip holder had a rough time engaging with the OpticFilm 135, a problem we did not have with the slide holder.
To insert a holder, you simply slide it in until it stops. The Eject button will turn orange to indicate a holder is present and shortly after the OpticFilm 135 will try to catch the geared side to move it into the scanner.
You must have the USB cable connected to a computer that is running QuickScan Plus or the scanner won't grab the holder.
The film strip holder made a clicking sound when the scanner tried to engage it. We had to give it a little nudge to get it to catch. Visual inspection of the geared edge of the holder did not reveal a problem.
What might have happened was that the scanner was ejecting when we were inserting, so the internal gear was running in the opposite direction than we expected.
The holder slot in the scanner itself is a bit wide and you might be tempted to slide the holder in flush to the left side. But you want it lined up to the right side, we learned.
Only one end goes in first, so make sure you've got the horse by the tail.
Your only clue to what's going on are the LED indicators, so we'll repeat our chart on how to interpret them here:
LED INDICATORS EJECT POWER STATUS ● Scanner is on, no holder inserted ● ● Holder inserted, ready to scan ● ● Holder being scanned ● ● Holder has been ejected, remove
Holder cannot be inserted, no USB connection● Scanner is in sleep mode No power We found it advisable to wake the scanner from sleep before inserting the holder, although it will wake up when a holder is inserted.
ScanningThe scanning process itself is automatic but that doesn't mean we have nothing to say about it.
First, the OpticFilm 135 has an annoying pitch. We thought we'd get used to it, but compared to the almost silent CanoScan, it's a screecher.
Scanning. What a scan sounds like.
Second, the little flaps that cover the access doors flap down at some point during the scan and ejection. It's alarming at first, sounding as if something has broken. But it's just the front or back door flapping shut.
Eject. What eject, moving backwards, sounds like.
It is nice that the holder is automatically moved along for you and automatically ejected, though.
You do have to hold down the Eject button a couple of seconds before the scanner will release the holder. Which is nice if you want to rescan the strip.
(Editor's Note: This is the third part of a multi-part review of the Plustek OpticFilm 135. Links to the other stories are in the main table of contents at the top right of each story.)