C O N T E N T S
•
Photo Corners headlinesarchivemikepasini.com
![]()
A S C R A P B O O K O F S O L U T I O N S F O R T H E P H O T O G R A P H E R
![]()
Enhancing the enjoyment of taking pictures with news that matters, features that entertain and images that delight. Published frequently.
OpticFilm 135: VueScan


21 July 2016
As we reported a few months ago, Ed Hamrick acquired a Plustek OpticFilm 135 and updated VueScan to support it. That provided the first third-party scanning support for the hardware.
We detailed our experience with Plustek's QuickScan Plus in the previous section of this review. We summarized our experience:
Unfortunately, QuickScan Plus does not support ICC profiles for the scanner and provides no control over exposure. The Mac version suffers from extreme overexposure of negative film and slight underexposure of positives.
So the question is whether VueScan can do any better. And the answer follows.
BUT WAIT
There are some things no software can do because the hardware itself is limited. In the case of the OpticFilm 135, that limitation is defect removal.
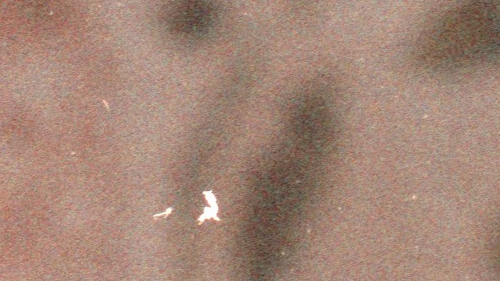
Defects. Commercially processed color negative film with defects at 100 percent.
Defect removal involves detecting scratches and dust on the film and removing them by filling them in with neighboring data. It does this by reading an infrared scan of the film that shows physical abnormalities.
That approach rules out doing defect removal on emulsions that are not smooth like black-and-white film or Kodachrome slides. But it can be a time saver on color negatives.
Some software does promise to handle defect removal without requiring an infrared channel. It tends, however, to make the image soft.
So our general rule is to scan without defect removal and spend time spotting important images in the collection. A lot of time.
It can take an hour to scan a roll of film and two more hours to spot everything.
THERE'S MORE
There are, alternately, some things software can do that dramatically enhance the scans. The three most important are profiling, multiexposure and providing emulsion profiles. QuickScan Plus does none of these but VueScan does them all.
Every scanner captures a limited range of color values we call a gamut. That's not all, though. The captures vary in their accuracy hue by hue. So your candy red car paint may look a little orange. And your freshly picked lemon may look a little green to your scanner.
Fortunately you don't have to live with this "personality." You can profile the scanner by simply letting it tell you what it sees when it scans a target with known, measured values. Then you compare the what the scanner says it is to what we know it is to see just what sort of adjustment is required to accurately capture that particular hue.
VueScan makes it easy to profile a scanner as long as you have an IT8 target (also called a Q60 target) and the data file that goes with the target. You can also get an affordable IT8 target from Wolf Faust.
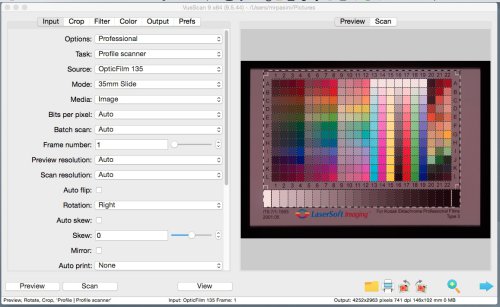
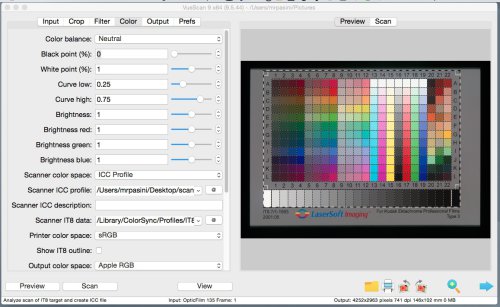
The illustration above shows how to set VueScan's input page to profile the scanner and the resulting correction. Here's the step-by-step process:
To profile your scanner or digital camera with an IT8 target:

• Set Input | Task to "Profile scanner"

• Click the '@' button next to Color | Scanner IT8 data and choose the IT8 description file that came with your IT8 target

• Click the '@' button next to Color | Scanner ICC profile and choose where you want to write the ICC profile

• Press the Preview button

• If necessary, rotate the preview image so that the gray scale is at the bottom and the letters and numbers can be read normally

• Adjust size of the VueScan cropping mask until it matches the IT8 target image

• You may need to readjust the target on the scanner platen and press the Preview button again if the image is at an angle

• Choose Profile | Profile scanner from the drop-down menu

• The ICC profile will be saved to the file name you specified
Once you've created an ICC profile for your scanner, you enable it by telling VueScan 1) to use it and 2) where it is:
• Set ColorScanner color space to "ICC profile"< • ?Set Color Scanner ICC profile to file name of ICC file You can download our profile, the default name VueScan uses, at no charge.
The other major enhancement scanning software can provide is primarily for scanning film with a wide dynamic range, like slides.
A scanner can capture only a limited number of tonalities from dark to light. Your slide can easily exceed that range so the final image shows either (or both) blown highlights and shadows without detail.
The OpticFilm 135 does better than most scanners with a dynamic range of 3.4. But slide film can have a dynamic range of 4.1. So what can you do about that?
You can scan twice, much as you might bracket exposures for a High Density Range image. One scan captures the highlights and the other looks for the shadow detail. The software combines both passes into one perfectly aligned image.
And just like that you've got a capture that exceeds the scanner's dynamic range.
In VueScan you enable this on the Input screen by checking the Multiexposure box. You can also specify how many passes to make on the slider above it.
There have been quite a few emulsions developed in the history of film photography. It helps enormously when your scanning software includes a library of presets or profiles for them.
This feature, missing from QuickScan Plus, is one of the strengths of VueScan. There is an extensive list of color negatives as well as several types of slide film. And though the information is primarily about color sensitivity, there are even some generic black-and-white film profiles.
Hamrick Software publishes a list of Film Types to help you identify what emulsion your film is from the codes printed on the edges.
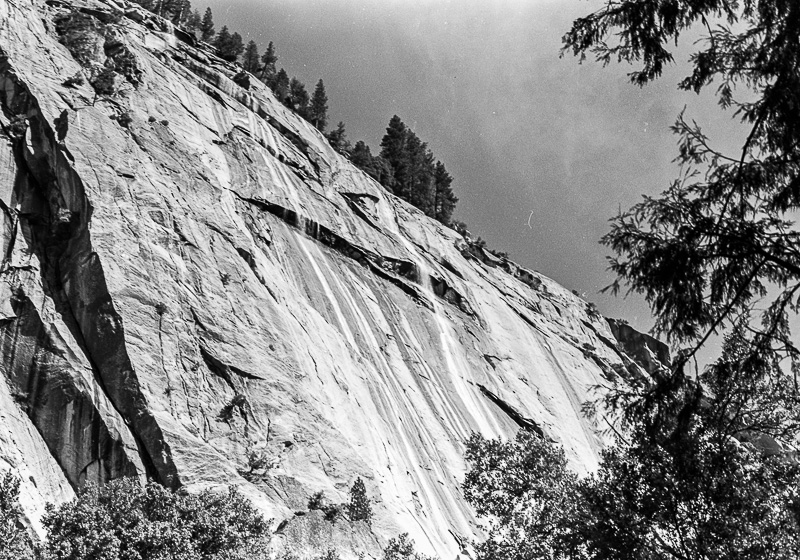
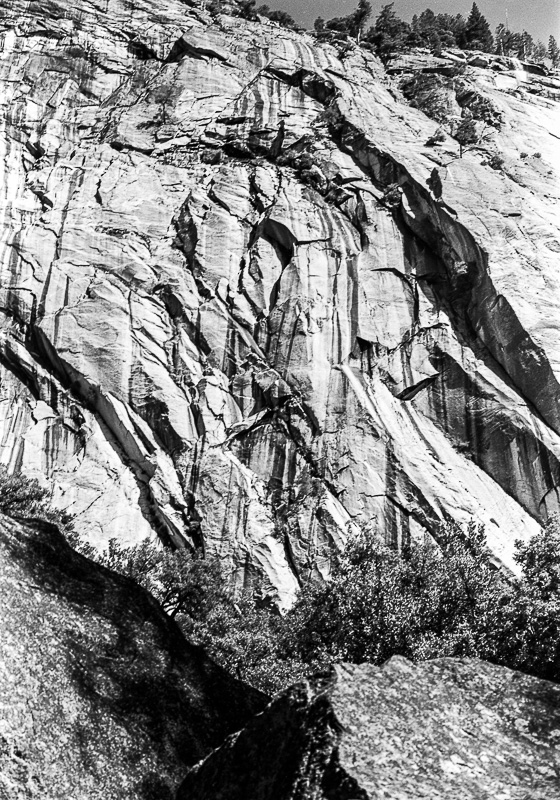
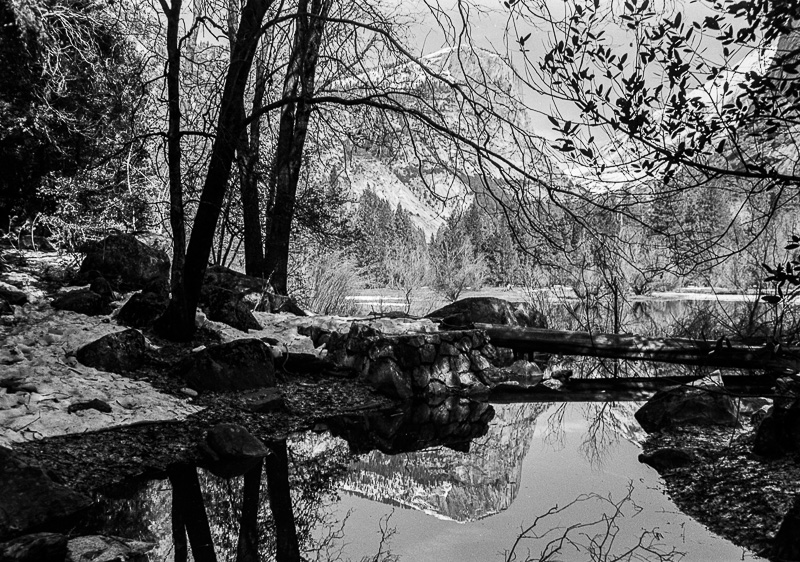
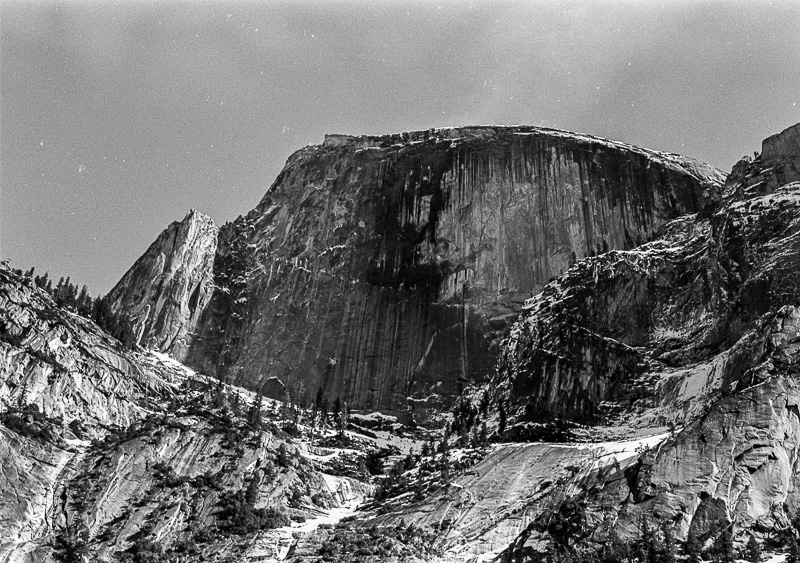
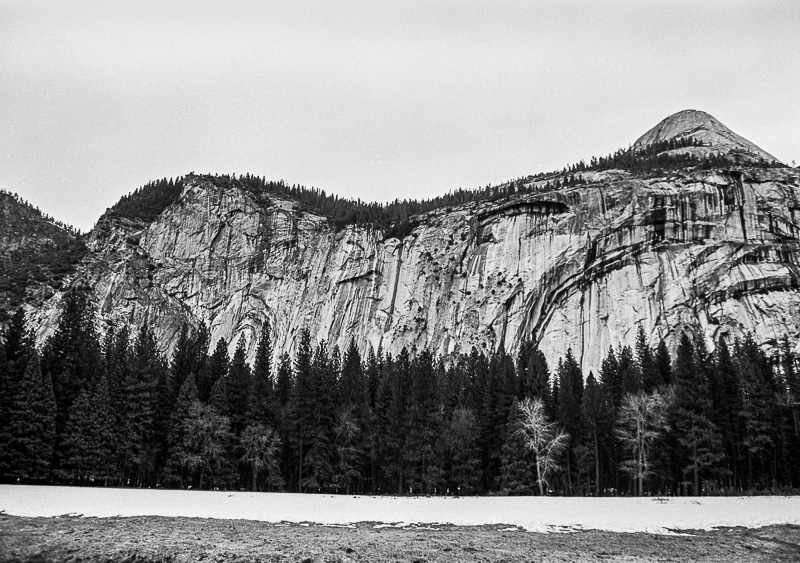
B&W NEGATIVES
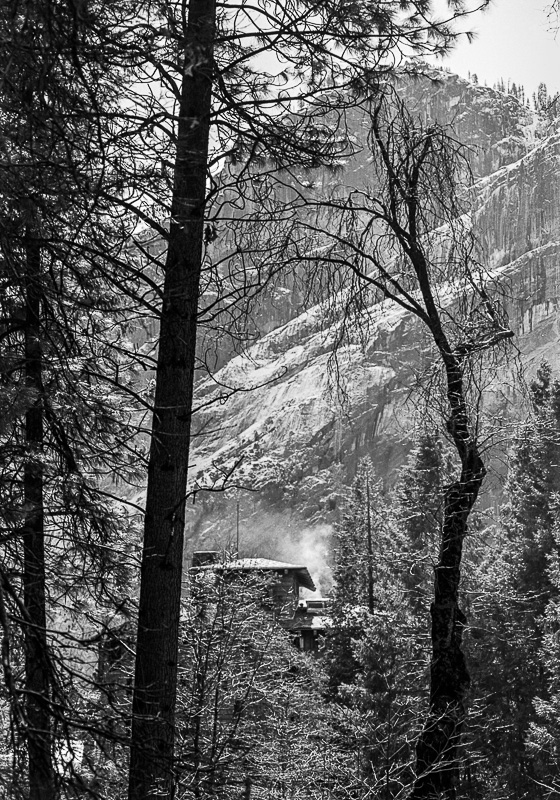
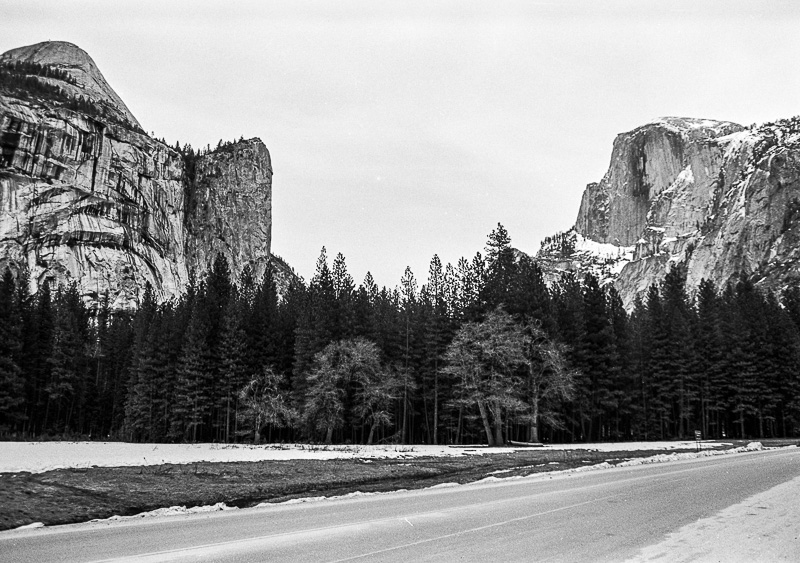
Our first scans with VueScan on the OpticFilm 135 were black-and-white negatives. We published a set of Yosemite Scans for a Friday Slide Show a couple of months ago. We used a split tone on that set because we liked it but here we'll display a few of the images simply as monochromes.
Even at this reduced size, a couple of the images show defects in the sky that have to be retouched manually.
Picking a negative profile, though, is a bit tricky. There wasn't an option for the emulsion we used for these images, although we have found one for other black-and-white films.
In fact, the black and white library is pretty simple compared to the color options. Simple but sufficient, we should add. Grayscale scanning isn't quite as complex.
After identifying the emulsion as black-and-white film, the VueScan User Guide recommends, "If you can't find a film type that exactly matches the film you're using, experiment with the Kodak T-Max settings."
One of the nice things about VueScan is that once you've previewed the negative strip, the data all stays in memory so you can try out different adjustments on individual images or the whole strip. When you tap the Scan button, the results are saved to disk. But they're still in memory so you can try another adjustment.
We scanned these in a single pass and saved them as JPEGs.
COLOR NEGATIVES
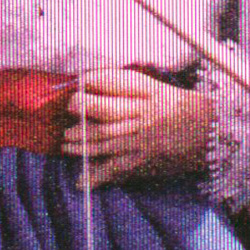
To test VueScan with color negatives, we scanned some candid wedding reception images from 30 years ago. We used Kodak Gold 400 Gen 1 film and a flash in a large dimly-lit (well, romantic) room.
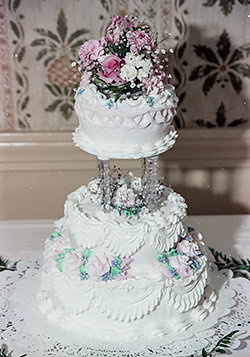
VueScan. Nice.
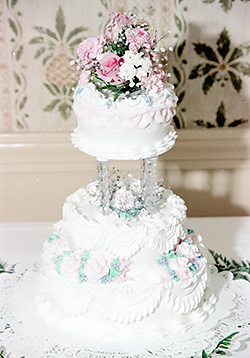
QuickScan Plus. Ouch.
We picked the profile to match the color sensitivity of the film and scanned in a single pass to JPEGs. VueScan maintained the color characteristics of the film itself, rather than neutralizing them. The images were so gorgeous we spent two hours spotting them before sharing them with the still happy couple.
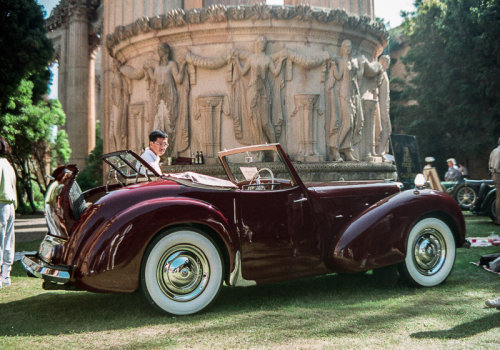
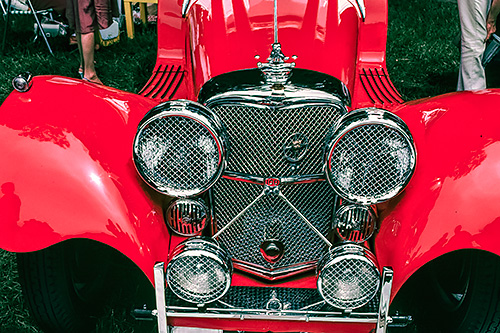
Then we scanned some Kodak Gold 400 Gen 3 film from 1991 of a vintage car exhibit at the Palace of Fine Arts. You can see a selection of the images in our Friday Slide Show titled Art & The Automobile.
Color Negatives
We scanned these a number of ways but again we found a single pass saved as a JPEG did the job very nicely.
EKTACHROME SLIDES
Things get a little more complicated when you are scanning slides, though.
With their extended dynamic range, using VueScan's multiexposure option makes sense. And with a good ICC profile, you can get very nice results from VueScan. Here's an old slide of Fisherman's Wharf:
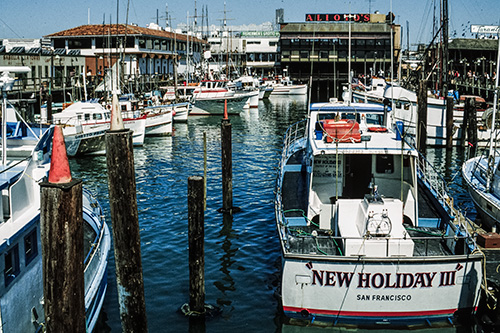
Ektachrome Scan. VueScan did a nice job.
Our IT8 target was itself an Ektachrome slide, so this is as good as it gets for color fidelity.
In our Sneak Peak: OpticFilm 135 Ektachrome Scans, we compared the image displayed here with our scans from the OpticFilm 120 and Microtek M1. Admittedly, these are thumbnails of the scans but they give you a sense of the detail and color you can capture.
KODACHROME SLIDES
Kodachrome is a bit trickier to scan than Ektachrome, with scans that often appear blueish. Even though our IT8 target was Ektachrome instead of Kodachrome, it still measures how the scanner deviates from known values. Those values may not include all Kodachrome values but they paint the picture:
Kodachrome Scan. Good reds.
In Sneak Peak: OpticFilm 135 Kodachrome Scans we compared the above scan to what QuickScan Plus delivered.
QuickScan Plus did best with slides but you can see in the Sneak Peak that the image is blueish with the green of the grass completely gone.
VueScan gave us more than an sRGB color space in 8-bit channels to work with. And while you can't see it on the Web, the final scan was much richer than what QuickScan Plus delivered.
POLAPAN, POLACHROME SLIDES
Polaroid introduced a transparency film in the 1980s that could be had in Polapan black-and-white and Polachrome color emulsions. We have some images on both.
The Polapan images scanned well with VueScan. We liked them so much we featured them in a Friday Slide Show called The Old Place. Here's one:
Polapan. Polaroid's black-and-white slide film.
The Polachromes were another story.
The color scans all showed striations running in the long direction that weren't visible as physical phenomenon when viewed through a loupe.
Polachrome. he scanner picked up these lines on the Polachrome. The long line in the middle is a string but the clothing should be solid color.
We scanned the Polachrome slides both vertically and horizontally and were not able to avoid the striations.
A 100 percent detail (left) from one of our Polachrome scans shows what we're talking about. The doll's blouse should be white but you can clearly see magenta stripes running through it that continue through the blue dress.
We scanned the same slide in a CanoScan 9000F and it did not exhibit the striations. It produced a very nice image.
We held this section of the review for several weeks to give Plustek a chance to investigate the Polachrome issue but the film is rare enough they weren't able to duplicate the problem.
We asked VueScan's Hamrick what he thought it might be, but apart from guessing it might be a calibration error, he had no idea.
While the issue does make us wonder what about the OpticFilm 135 causes the problem, we don't imagine there are a lot of Polachromes loose in the world.
SCANNING TO TIFF/DNG
VueScan does permit you to save a Raw scan as a TIFF or DNG file. It won't apply the scanner profile to the data. It really is raw data that must be processed in a Raw converter to create an acceptable image.
When using more than 8-bit channels, VueScan stores Raw scan files in linear format. It uses a gamma 2.2 format when using only 8 bits per sample. The saved TIFF files are always gamma corrected according to the
Color | Output color space(1.8 for Apple RGB, ColorMatch RGB, ProPhoto RGB and ECI RGB; 2.2 for other color spaces).This can be useful for archival scans where you want to revisit the data with better image editing tools in the future (which has happened to us a few times now).
CONCLUSION
To answer the original question: Yes, VueScan does a much better job than QuickScan Plus.
Not only that but QuickScan Plus has only had one update (early in May) in the months since it was released, despite the serious problems it has controlling exposure. VueScan, on the other hand, has had about half a dozen updates since it introduced support for the OpticFilm 135.
But beyond that VueScan simply outperforms QuickScan Plus.
On OS X, VueScan is required to get decent scans from the OpticFilm 135 but even on Windows, it promises to be a vast improvement over QuickScan Plus if only because it will allow you to profile the scanner accurately and use multiscanning for slides.
VueScan's interface isn't easy to master and conflicting settings, which are too easy to make, can leave you scratching your head at the results. Start from the default, save successfully setups to recall and refine those to improve your odds.
But VueScan makes the OpticFilm 135 a legitimate option for scanning your film archive, which is something we can't say about QuickScan Plus.
(Editor's Note: This is the fifth part of a multi-part review of the Plustek OpticFilm 135. Links to the other stories are in the main table of contents at the top right of each story.)
BackBack to Photo Corners