Photo Corners headlinesarchivemikepasini.com
![]()
A S C R A P B O O K O F S O L U T I O N S F O R T H E P H O T O G R A P H E R
![]()
Enhancing the enjoyment of taking pictures with news that matters, features that entertain and images that delight. Published frequently.
Printing A Time Stamp On Photos


26 July 2016
Live long enough and you'll see everything. We can recall looking for ways to eliminate a time stamp on images (burned into the negative by certain point-and-shoot film cameras of the last century) but we never thought we'd want to add them.
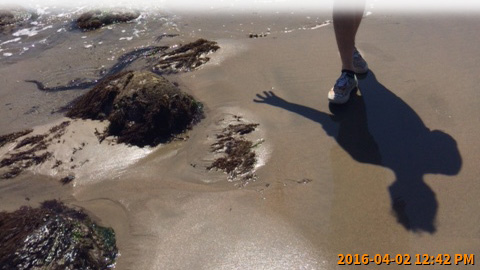
Time Stamp. Adding a time stamp to smartphone prints helps document them. We cropped the top of this vertical image for a better look.
Until the other day when we realized all the 4x6 prints we were making of the next generation of the family would -- very shortly -- lose their chronology.
THE PROBLEM
They're all smartphone photos sent cross-country or up the highway via a text message. The original has all the data, of course, as long as you keep the particular phone you received it on (unless you backup your images, of course).
But to test a new dye-sub printer, we've been printing copies for everyone right from the phone. And the copies have been piling up on the piano. So we bought some 4x6 photo albums to put them away.
They'll be in order but it won't be long before we start wondering when they were taken. What year was it? How many years ago? Can't be!
We won't look up the original for the date information, we're sure. But it would be nice to have it printed in a corner of the image.
These aren't portraits, just snapshots. So a little caption overlaid on the image won't ruin it.
We thought we'd just write our own to have control over all the variables like font, size, color, location, etc. With ImageMagick and ExifTool, how hard could it be?
COMPLICATIONS
You may be familiar with the biggest problem. Orientation. When you get an emailed smartphone photo, it's always displayed in landscape mode.
That's because your email client isn't paying any attention to the Exif header's Orientation tag, which is no doubt screaming, "Rotate 90 CW."
But that's just one problem.
Another is color. You are working blind, so you don't really know what color your are overlaying the text on. It could be the same color as the text (and hence invisible). Same black text in a dark corner.
You could pick some oversaturated neon-bright color that does not occur in the wild. Or you could use a shadow effect like TV text does. Or you could have a ghosted overlay. Or....
Size is an issue, too. Not all images are the same size. So you can't really hard code the font size. It has to be relative to the width of the image. Which means knowing the width (ExifTool), doing some math and rounding out numbers.
The data turns out to be another problem. The iPhone doesn't store the capture date and time where everyone else stores it, so you have to grab it from the GPS date and time. How clever. And what do you do about an image that doesn't have the capture time in its Exif header?
Then, of course, there is the user interface issue.
Some of these complications might best be resolved by the user as options. Which ones? Text color? Font? Shadow? Date format? Hmmm.
SETUP
The first thing we did was put together a short Perl program to read a particular test image, get the capture date, format it and overlay it on the image, writing a new image with the overlay.
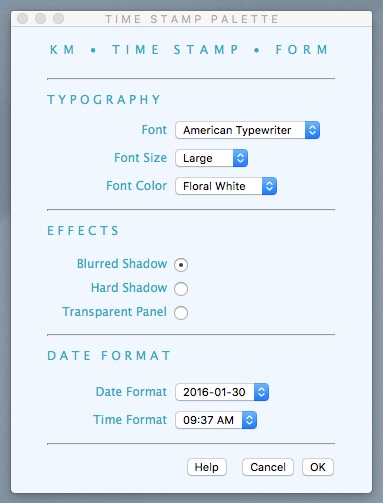
Options. Keyboard Maestro lets us use an HTML form to pass options to the Perl program.
Turns out there are a lot of ways to do that. So we experimented.
We also experimented with various text effects including bright colors, drop shadows and ghosted overlays. As we did so, we created variables for these factors so they could turn into options in the user interface.
CODING
ExifTool isn't much trouble to work with, especially in Perl. Phil Harvey, its author, has provided a nice Perl library to do anything you need and there's also the command line interface that can be called from any scripting language.
So it was easy to look into any image's Exif header for its capture time and orientation.
But ImageMagick has an automatic orientation option that will read the Orientation tag and display the image correctly. It's lossy rotation, which is preferable to rotating the JPEG and then compressing it again.
It can also read the date information from the Exif header but it can't format it as easily as ExifTool, so we stuck with ExifTool for that. We want to be able to offer a choice of formats.
We used ImageMagick (which would do the heavy lifting) to read the width and height of the image to calculate the point size to use. The heavy lifting was writing the text in the font of our choice (a nice bold sans serif) in a particular location on the image.
That just left the user interface.
We used to rely on AppleScript to provide a user interface with CocoaDialog providing whatever was missing. But it's a lot more efficient to use Keyboard Maestro, which lets us write an interface in HTML and instantly reflects any changes.
You can see what we came up with above.
QUICK & DIRTY
We were amused to learn you can (almost) do this in one line using the
convertcommand line utility that comes with the standard ImageMagick installation:convert orig_image.jpg -auto-orient -gravity SouthEast -font 'Arial'
-fill 'DarkOrange' -annotate 0 "%[EXIF:DateTimeOriginal]" new_image.jpgBut that leaves out a lot of the niceties we introduced which eventually became necessities for us.
One thing that isn't a necessity, though, is saving the time-stamped images. You can recreate them in the blink of an eye as long as you archive the originals.
TESTING
As we said, we have a lot of baby pictures. Those were our test images. We ran them through our time stamp software and printed them. Now we'll leave them out in full view to see how we like them.
That's part of the test too.