C O N T E N T S
•
•
•
Photo Corners headlinesarchivemikepasini.com
![]()
A S C R A P B O O K O F S O L U T I O N S F O R T H E P H O T O G R A P H E R
![]()
Enhancing the enjoyment of taking pictures with news that matters, features that entertain and images that delight. Published frequently.
Test Drive: SilverFast SRDx Plug-In


9 February 2017
When LaserSoft Imaging announced the availability of its SilverFast SRDx as a plug-in we called it "a significant productivity improvement."
SRDx, until then, was something you could only activate during scanning and only when scanning with SilverFast. So it applied to your entire batch, which slowed things down.
But there was another side to our argument. Without defect removable software, you were condemned to manually spot scans using the clone stamping tool or spot healing brush.
Because SRDx doesn't require an infrared channel to identify defects, it also works on more emulsions. Black-and-white film, for example, confuse defect removal software that looks for physical variations in the surface of the film emulsion.
Add to those benefits, the ability to sniff out sensor dust and you didn't even need a scan to make SRDx attractive.
That's all theory, though. How does it actually work in practice? To find out, LaserSoft Imaging sent us a copy of the plug-in, which we've been working with on a variety of images for a few weeks now.
INSTALLATION
Where Photoshop plug-ins go these days is confusing. The very latest version of Photoshop CC has a secret place to permanently stash your plug-ins so when Photoshop undergoes its major update each year, you don't lose access to them.
But we continue to prefer the more transparent approach Alien Skin has long recommended of copying your plug-ins to a plug-in folder outside the application folder which you can reference from within the application.
The key to this, though, is that the plug-in installer should let you point to that alternate location. Many don't.
In that sense, the SRDx installer is conventional. It puts the plug-in in the Photoshop application's Plug-in folder (among other places). We just moved it to our permanent folder, which has an alias in the Photoshop application plug-in folder.
That works fine. And minimizes disk space usage, since all you need for other applications is an alias to the permanent folder.
USING THE PLUG-IN
LaserSoft Imaging does an excellent job in providing QuickTime videos as tutorials of the various features of its software. And SRDx is no exception.
There's also a PDF manual available.
We'll summarize the process for you with our own usage notes:
The plug-in works on a single layer (but all channels of that single layer), so make sure you have selected the layer you want to massage before invoking the plug-in.
We also recommend that you convert any grayscale image to RGB because the plug-in won't be able to show you what it considers defects without a color image. When we tried running the plug-in on a grayscale image, the defects were marked in gray, not red. You can revert to Grayscale mode afterwards, of course.
Grayscale. Convert to RGB to see the marks.
Finally, if you make a selection on a part of the image, that's all SRDx will consider even though it displays the whole image in its preview. So if you have trouble with SRDx's masking tools, you can just select the area you want SRDx to see using your image editing software's tools. We liked using Photoshop's Quick Selection tool to select things like skies.
We also recommend greatly enlarging the dialog window from its default small size so you can see more of your original at once. You can navigate the image by holding down the space bar to scroll. There's also a floating Navigator palette (you may to hunt around to find it).

Size. Several options to adjust what you see.
You can also adjust the size of the preview using the tools in the lower left corner of the dialog window.
There are three tabs controlling what you see:
- Original shows the unrepaired image
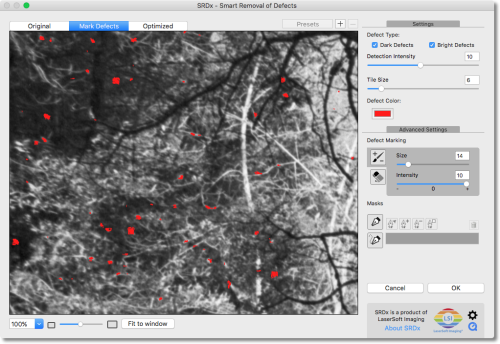
- Mark Defects previews what pixels will be automatically repaired and permits manual marking
- Optimized shows the results and allows fine tuning of the repair

Three Views. Original, Mark Defects and Optimized tabs.
You'll also find a popup menu for Presets with a plus and minus button to add or remove presets. We recommend saving the initial configuration as
Defaultbefore doing anything.Then, to the right, there is a panel of controls.
Here's a brief description of each control and what it does:

Settings. For sensitivity.
- Dark Defects checks for defects in the shadows.
- Bright Defects checks for defects in the highlights.
- Detection Intensity sets the probability level of a pixel being a defect.
- Defect Size expands the correction area to accommodate larger defects.
- Defect Color sets the masking color to identify defects, with red as the default color.
Typically you adjust the sliders for Detection Intensity and Defect Size to automatically mark a majority of the problems while leaving image detail alone. You can resize the preview to help you see what's going on.
You aren't limited to those two sliders, however. You can manually fine tune the automatic selection with the Marker and Erase tools as well as mask out entire areas.
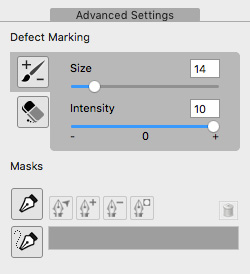
Advanced Settings. For manual changes.
- Marker Tool increases Detection Intensity
- Eraser Tool decreases Detection Intensity
You can use either tool to affect a spot on the image and by going over the same area you can intensify the effect. There are Size and Intensity sliders for each tool, as well.
Sometimes, though, you want to exclude whole areas of an image from processing. You can do this with the masking tools:
- Path Mask allows free-form drawing of a mask boundary.
- Polygone Mask allows a more geometric (and quickly drawn) mask boundary just by clicking along the boundary.
You can also use the Eraser Tool to rough in or fine tune your mask.
TEST IMAGE
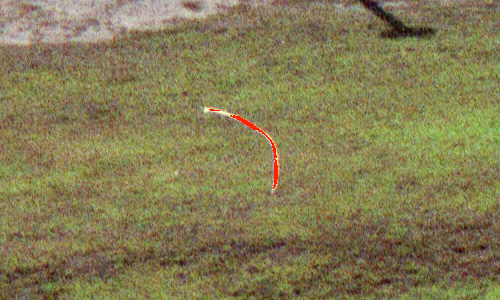
We ran a Kodacolor color negative scan through SRDx to see how well it would detect and repair some obvious problems. To show what happened, we picked one part of the image to display at 100 percent that showed a common defect and took it through the process:

The first image shows what you see in the first panel, which is the Original image and, in the center, the defect. The defect is a white thread that wasn't cleaned from the negative before scanning.
The second image, titled Find, shows the SRDx has detected the defect, marking it in red. Note, however, that the red marking doesn't completely obscure the entire white area.
That's what the sensitivity settings are all about. We increased the Detection Intensity to get the coverage shown in the third image, title Sensitivity.
In the fourth image, titled Fix, you see the repair that SRDx has applied to the problem. This is what the image looks like in the Optimized tab and is exactly what you see when the image is returned to Photoshop.
That is an interesting repair. Step back a bit or squint and you won't be able to detect the repair. Pixel peep and you will. It's important to note that the repair is sufficient for normal viewing even though it can still be seen at 100 percent magnification.
That's OK with us.
But we thought we'd compare that to what Photoshop's Healing Brush does. And that's the fifth image, Heal. It's a seamless retouch of the area.
LESSONS LEARNED
One problem we had with testing the plug-in is that our images are pretty pristine. It took us a while to find anything with sensor dust on it, for example.
We did better finding scans that exhibited imperfections, particularly on black-and-white film, which we used to hand process ourselves.
With that in mind, we make the following observations after using the plug-in for a few weeks:
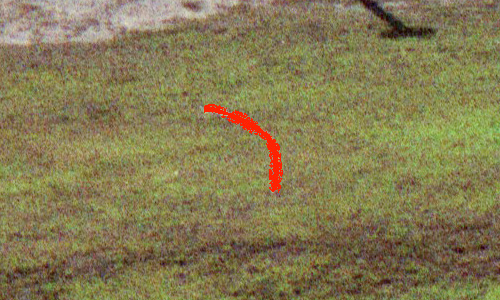
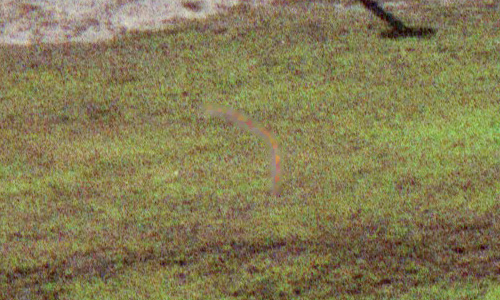
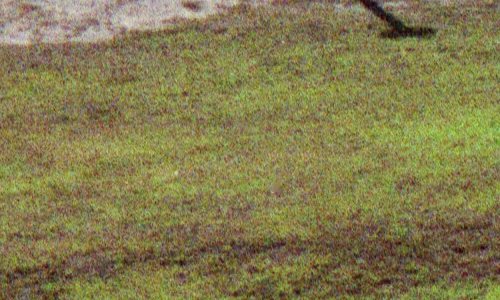
Our one image exhibiting sensor dust eluded the plug-in's automatic detection. You can see the blob in the sky just above the hills. And you can see the Mark Defects tab is active with a small highlight on a distant roadway marked for correction.
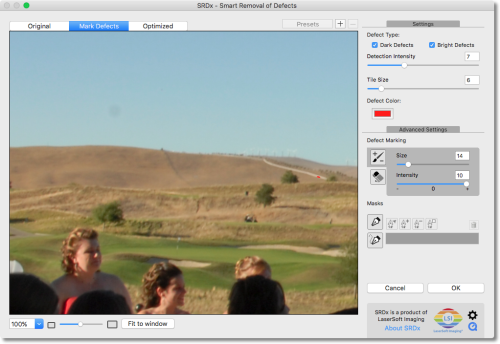
Sensor Dust. The blurry blob in the sky wasn't detected.
The trouble with sensor dust is that it tends to be blurry. You have to stop the lens down to sharpen it up and even then, it's not as sharply defined a defect as a thread on a negative.
This image, for example, was taken at f18, which is certainly stopped down, and it's still blurry.
So we can't recommend relying on the plug-in to remove sensor dust. It seems not to be looking for the blurry blobs that characterize dust sitting on your sensor.
Often defect removal softens an image but SRDx avoids that issue. After processing the image, sharpness was not affected.
Our usual approach to defect removal is to spot it with Photoshop's Healing Brush. And we do this almost exclusively on scanned images because our digital camera captures are pristine and usually processed in batches using Lightroom.
Working section-by-section with the Healing Brush might be considered up there with basket weaving as a calming therapy. And we'll be the first to admit that while we enjoy it, the pleasure passes pretty quickly.
But can you trust an automatic repair tool like SRDx?
Well, we don't even think LaserSoft Imaging would trust it. That's why it was designed with so much flexibility. You have sliders to control its sensitivity and tools to manually mark what it misses and to mask off areas that it might misread.
So the question comes down to efficiency. Can you efficiently set the sensitivity to save you Healing Brush time?
And the answer is: Yes, you can. And it isn't difficult once you understand how the tools and masking works, although we preferred to do our masking in Photoshop.
CONCLUSION
Because it works without blurring the image or using an infrared scan of the film, SRDx a valuable tool. And having it available as a Photoshop plug-in makes it possible to skip much of the tedium of manually touching up your important images.
It's not perfect but it's useful in several ways.
First, it works on any scan. It can analyze scans made from black-and-white negatives and Kodachrome positives that other defect removal software like ICE can't. Just make sure the scan is in RGB rather than Grayscale mode.
Second, for the first time you use SRDx without SilverFast, LaserSoft's third-party scanning solution. Unbundling the software from SilverFast means you can use the defect removal technology on scans captured with VueScan or Epson Scan or any other scanning software and any scanner.
Third, because it runs as a plug-in, you don't have to enable it as part of the laborious scanning process but can tap into it was part of the editing process for just those images you really want to polish.
Fourth, it will leave image detail alone but save you a lot of spotting time by automatically repairing a good portion of the image, if not the entire image. It's always a worthwhile first pass for images that need spotting.
And that earns it an all four photo corners rating from us.