Photo Corners headlinesarchivemikepasini.com
![]()
A S C R A P B O O K O F S O L U T I O N S F O R T H E P H O T O G R A P H E R
![]()
Enhancing the enjoyment of taking pictures with news that matters, features that entertain and images that delight. Published frequently.
Late Afternoon Skyscape


27 February 2017
When we climb out of the bunker to take our afternoon break, we usually pop into the kitchen for an espresso. And as we wait for the espresso machine to warm up, we are often blinded by the beauty over the ocean.
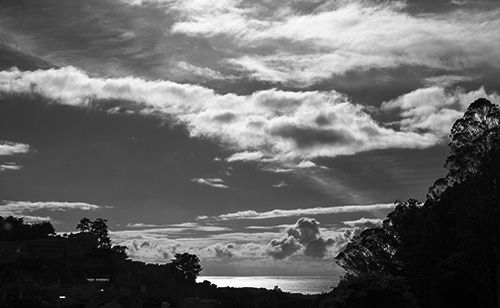
Late Afternoon. The sun turns the ocean metallic.
Yesterday the sun, which is high to the left, blinded us as it bounced brilliantly off the ocean. To our naked eye, the entire ocean was white.
So when we got the camera, we made sure we also had a circular polarizer on the lens to cut down the glare off the ocean. And still it sparkles.
We shot with a Nikon D200 (whose shutter still makes the sweetest sound of any dSLR we've ever used). And we had a 35mm f2.8 Nikkor on it. Manual focus, f16 at 1/320 second and ISO 100. We'd been shooting with that setup all day so it was right at our side.
But we never publish our skyscapes from this time of the afternoon because they tend to be much less dramatic than the saturated colors of the sunsets that follow.
That's too bad, we thought, remembering the sheen on the ocean.
Then we realized there was something we could do about it. Make a black-and-white image. The tonalities are the story even if the color is not.
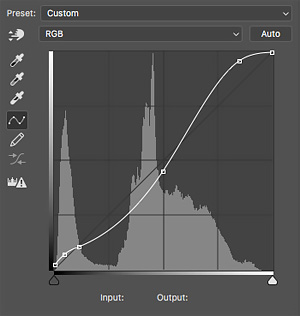
Curves. Lighter highlights, shadows with darker midtones of an M curve.
We weren't really sure where to take this Raw data so we opened it in Photoshop CC, which brought up the Adobe Camera Raw dialog box where we made our usual tweaks with the sliders after straightening and cropping the image.
When we loaded the result in Photoshop we immediately sent it over to Alien Skin's Exposure X2 running as a plug-in. There we scrolled through the black-and-white presets, which were instantly previewed on the image.
We liked a couple of them. One increased the contrast a good deal (too much, in fact) and another opened up the shadows (again too much). You can certainly apply a preset and tweak it with the sliders in Exposure X2 but we had another idea.
We scrolled the right panel up a bit until we could see the Curves dialog. Then we compared the curve for each of our favorites.
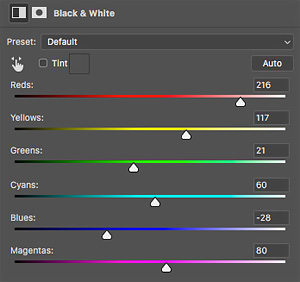
Monochrome Conversion. Dark blues, lighter reds.
We canceled the effect in Exposure X2 and returned to Photoshop where we added a Curves Adjustment Layer and drew the same shape for the shadows and the same shape for the highlights we'd see in Exposure X2.
Of course that was still a color image, so we added a Black & White Adjustment Layer to convert it to monochrome, fiddling with the sliders to enhance the contrast of the black and white image.
That meant, as we show you on to the left, lightening the reds and yellows we found on the horizon to brighten them a bit and darkening the blue of the sky. We turned off the layer to look for any other color whose shade we might want to adjust, then turned it back on to make the adjustment and see the change.
So by editing hue by tonality and tonality by hue we were able to arrive at an image with all the drama that hit us from the kitchen window. And it didn't take much longer than it takes for the espresso machine to warm up, either.