C O N T E N T S
•
•
Photo Corners headlinesarchivemikepasini.com
![]()
A S C R A P B O O K O F S O L U T I O N S F O R T H E P H O T O G R A P H E R
![]()
Enhancing the enjoyment of taking pictures with news that matters, features that entertain and images that delight. Published frequently.
Epson FastFoto: Conclusion


8 March 2017
We write our conclusions around here a little differently. For a multipart review like this, we cover the arrival, installation and basic operation as we experience them. Then we dig into whatever special issues come up.
But it can take us a while to wrap things up with the final segment of the review. That's because we actually like to use the product a while before coming to a conclusion about it.
The FastFoto is a good example.
When we were briefed on the product just before it was announced, we were convinced it would be worth a prolonged evaluation because we knew how many unscanned prints were laying around in shoeboxes all over the world.
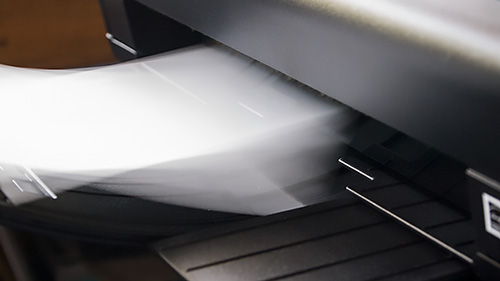
Epson FastFoto. Zipping through some prints.
Over the years we'd heard from dozens of recent retirees wondering which scanner to buy to digitize their film and print photo archives. You won't live that long, we had to tell them.
Instead, we recommended they pay someone with some fancy equipment to do it. Someone not too far away.
Some large companies have offered a scanning service that ships your originals offshore where labor is less expensive. We never recommended them because we felt the risk to your one-and-onlies was not worth the benefit.
Better to have just one undigitized copy than nothing at all.
But local labs (when there were local labs) would sometimes have the equipment to do the job quickly with sufficient quality. And where there was no local lab, we recommended Mitch Goldstone's ScanMyPhotos.com.
We ran into him at PMA one year and admired his Kodak scanner that went through a stack of prints like a bill counter. That was about 300,000,000 scans ago, he calculated recently when he got in touch about this review.
"You'd have to have ScanMyPhotos.com digitize more than 8,000 just to cover the cost to buy the Epson, then the work," he scratched his head. That's about eight cents a scan.
You pay him $145 for a prepaid fill-the-box to scan about 1,800 photos in Irvine, Calif. He hasn't lost a print yet, he tells us. He figures there's only abut 3.5 trillion unscanned prints out there left to go.
And he makes an excellent point. Our old advice isn't obsolete.
THE CASE FOR THE FASTFOTO
Still, there's a case to be made for the FastFoto.
It provides a two-pronged benefit. You'll live long enough to finish the job and you don't have to send your prints out. You can enjoy the same efficiencies of a lab like ScanMyPhotos without any risk.
But we also found some benefits we didn't expect.
This is a very fast scanner. And it can handle documents. So you can, with either the bundled software or Adobe Acrobat, create searchable documents in the blink of an eye.
Even if you don't have a business use for that, you do have taxes to do every year and digitizing your documents is right up there with shredding them.
And, besides, we grew quite fond of listening to it fly through whatever we put in it to scan. Here's what a few photos being scanned sounds like:
The only issue we had with the scanner is its price. It isn't cheap for something you'll use for one job -- even if that job may take you a few months to complete.
On the other hand, it does make a tempting business equipment purchase. Were we running a photo lab, it would make an inexpensive way to test the local market for a print scanning service. You still wouldn't be able to compete with ScanMyPhoto's negative or slide scanning service, but a lot of old (and valuable) images only exist as prints.
ONE JOB OR NOT
In theory it's one job, we hasten to add. In practice, it's more like a season-long project.
That's because it isn't likely your prints are well organized.
The most organized ones, unfortunately, are probably in albums. You can't scan album pages, so you have to take the prints out of the album and put them back in.
If those prints were captioned on the album page, that's more manual work for you.
Some color photo labs dated the back of prints. And the FastFoto can scan that data at the same as it scans the photo. But this brings up another issue. Chronology.
DATES
We found in our extended experience with the FastFoto that the scanning software was not only efficient but effective in enforcing some organization to the dozens of events we scanned.
In fact, the software alone is nearly worth the price of admission by itself.
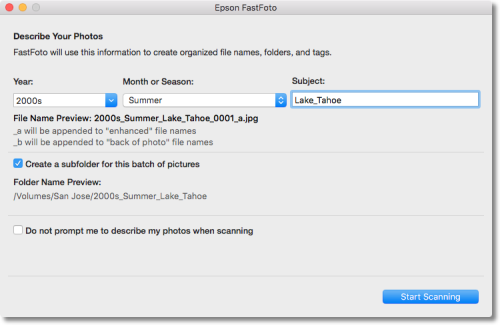
FastFoto. Its enforced organization really works.
Which we feel is a little sheepish to say since it's so simple. You simply enter three fields, each optional: year or decade, time of year, slug. A folder name and file name is constructed from that data that sorts chronologically.
Ingenious.
Except the big problem is that often the prints are undated, the events unknown, the era forgotten, the people unrecognized.
So the real problem with scanning your analog print collection is organizing it.
ORGANIZING
In fact, we spent more time going through the prints than scanning them.
And by "going through" we mean not only collecting the prints from one roll of film that had been scattered about. We also mean trying to divine the order they were taken.
Some people, flipping through a stack of prints, keep them in order. Others inevitable reverse the order. And if there's a group viewing them, one or two prints usually get passed around out of order so everyone can see what's so funny or adorable.
Add a few house moves into that mix and you get collection chaos that can be difficult to straighten out. In fact, if you start now, you might be able to save some money on the FastFoto because by the time you finish and are ready to scan, it may have come down in price.
The bundled software, fortunately, will take you as far as you can go. But there's no reason to stop there.
Do some research. Email a scan to a relative who might know something about it and you can update your folder name and, with a good batch file renaming utility, update the file names too.
WORK FLOW
Our scanning workflow evolved as we worked with the FastFoto.
We decided to enable enhancement for every scan. It was one less setting to fiddle with, one less decision to make.
We were primarily interested in scanning prints for which we had no negatives. Some of those were bad Instamatic photos from the 1970s. Some of them were nice Kodak lab color prints sent to us by relatives on special occasions like Thanksgiving or graduations we missed.
The quality of the print determines the quality of the scan. So we felt it would do no harm to let FastFoto try to enhance the scans.
And, in fact, it did better overall than we expected.
The Windows version of FastFoto provides its own organizer but the Mac version will simply switch to either the Finder, Preview or Photos. We opted to keep Photo Mechanic running to show us our scans and handle rotation and file organization.
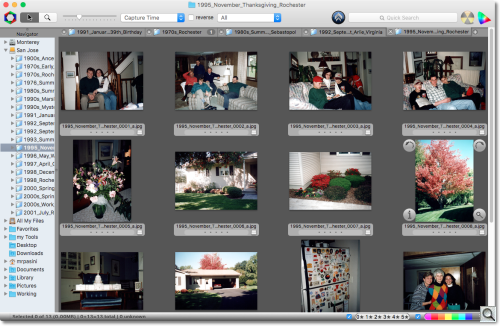
Photo Mechanic. Our preferred way to organize the scans.
One thing we particularly like about Photo Mechanic (we are running the older version 4) is that it doesn't build its own database. It simply lets you browse your directory structure, which is how FastFoto stores your scans.
Photo Mechanic, the same software that provides lossless rotation, allowed us to easily select the scans that were not enhanced and move them to a subfolder which we called
originals.That makes it possible to run a slide show on the enhanced images without seeing the duplicates.
While our tests showed we could scan a mix of landscape and portrait prints at the same time, feeding the long and short sides in the same stack, we didn't actually bother.
We just stacked them up and let them fly.
That's because we used a lossless JPEG rotation program to change the orientation. It takes a lot longer to align the prints before scanning than it does to rotate the scans.
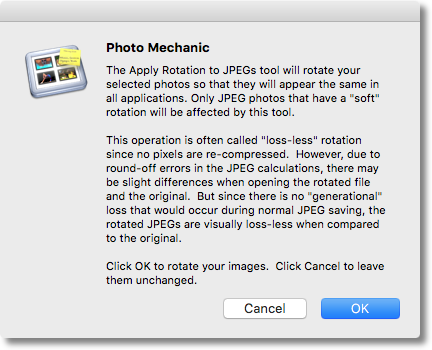
Apply Rotation. Photo Mechanic explains its hard rotation.
You can certain rotate images in many photo organizer applications but often it's a soft rotation. The image data itself doesn't change but the orientation tag is set correctly by the software. So other software that reads the orientation tag will correctly display the image.
And, conversely, software that just reads the data and ignores the tag, will not.
To correct that some software will perform a lossless rotation that actually rewrites the image data to the JPEG file (and corrects the tag). So no matter what application you use, the image will appear in the right orientation. That's called a hard rotation.
You'll want to do a hard rotation. In Photo Mechanic, that's a menu command.
If we have a suggestion (not really a complaint) about the software it would be that the options for things like scanning the back of the image or red-eye reduction are one click too far away.
We'd like to see them in the same dialog window as the filenaming options.
That's because we did want to reconsider them with each batch but we didn't because the options were not easily accessible.
We did get two harmless paper jams in scanning hundreds of prints. Both were problems with the old prints themselves.
Storing prints in boxes won't prevent their edges from getting bent or curled. And that's what happened to us. It made the print too thick to get through the scanner. So the scanner stopped and threw up an error message on our screen.
No print was damaged.
We just opened the lid, pulled the prints out, fixed the problem with a little persuasion and ran them through with no problem.
We're so used to printing dye sub 4x6 prints at 300 dpi that we scanned at 300 dpi. We might have scanned at 600 dpi for archival purposes but that is noticeably slower with little benefit on the low quality scans we were dealing with.
It is worth noting that a 300-dpi dye sub printer makes a nice companion to the FastFoto, easily allowing you to make copies of your precious prints. Enhanced copies at that.
CONCLUSION
In a review, the job is to evaluate the hardware and software. Not much consideration is given to the task itself.
When we sat Joyce down to look over the hundreds of scans from years ago, she didn't say a single thing about the quality of the scans. Even though they looked a good bit better than the old, faded prints.
What she talked about was the people in the photos. That's what it's all about, after all.
Being able to efficiently scan a stack of prints at home is a remarkable advance in the art. And it's something we know many of us desire. We know how easy it is to lose every memory in a disaster. And disasters are becoming shockingly commonplace.
So we're awarding the Epson FastFoto all four photo corners. It's the best way to scan a collection of prints at home and will happily serve as a speedy document scanner, too.
(Editor's Note: This is the fifth part of a multi-part review of the Epson FastFoto FF-640. Links to the other stories are in the main table of contents at the top right of each story.)