We've never taken this long to publish our installation experience with a product before. We hope that means it will save you a lot of time.
So what happened?
This is really the story of two installations. One for the DS620A printer and another for the WPS Pro. Or three installations, since it was originally written for the WPS-1 print server.
And each of those installs had a hardware component and software component. The hardware story is simple to tell. The software story kept being rewritten.
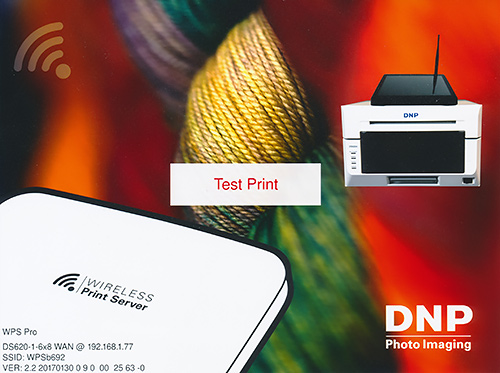
Test Print. Configuration information is disclosed in the bottom left corner.
Finally, though, we were able to establish not one but two configurations of these two products to accomplish nearly everything we wanted.
None of this, however, was as simple as installing a wireless printer or even a wireless all-in-one on our network. Those devices have built-in WiFi, which makes the printer visible on the network.
DNP has elected to separate WiFi from the printer, providing a wireless connection to a print server that establishes its own network that can handle up to two printers. Printers you connect to the WPS Pro will not be visible to your own network, however.
That's what led us to setup and use two different configurations to print to the DS620A.
And that's where we'll start, discussing the two configurations.
Here they are:
Network printing: To access the DS620A from our local network via either a wired or wireless connection to our routers, we eliminate the WPS Pro from the chain.
Mobile printing: To allow access to the DS620A from mobile devices, in general, we took the printer off the local network and made it accessible solely through the WPS Pro using the free apps from DNP.
We change configurations by swapping USB cables on the printer. One cable goes to one of our wireless routers while the other leads to the WPS Pro.
We followed several rabbit holes trying to achieve a single configuration that would work equally well for both local network access and mobile device access. But the main issue is that the printer can't be seen through the WPS Pro on the network. The WPS Pro does not currently function in bridge mode, in short.
One possible workaround is to use a hot folder on a host machine on the network that mobile devices could FTP images for printing. We cover that in the software installation section below. But we found it more difficult to explain to visitors how to do that than how to use the DNP apps (which was amusing enough).
Setting up the DS620A is a breeze. There are only two cable connections to make and just the dye ribbon and paper roll to load, both of which are child's play.
If you're setting up on location, you'll just have to find a power outlet to plug the printer's power cable into.
But making a data connection to the printer is not quite child's play. The printer itself does not have any built-in wireless connectivity. The only way in is through a single USB port.
If you want to see the printer on your network, it's a simple as plugging a USB printer cable from the DS620A to a free port on your router.
To provide a wireless access point on location, though, the best option is to connect the WPS Pro printer server.
Either option requires further software configuration, which we'll discuss below. But let's continue.
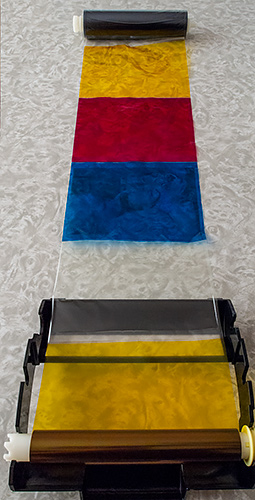
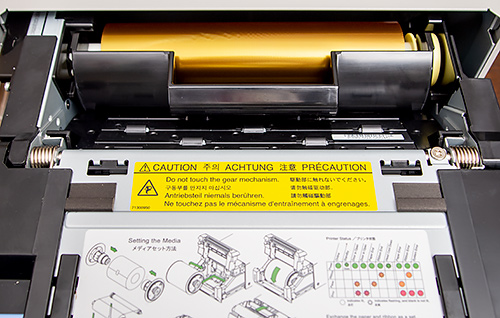
6x8 Media. The larger ribbon panels make 6x8 prints possible.
The first only makes prints as large as 4x6 while the second makes prints as large as 4x6, 5x7 and 6x8. The difference is in the ribbon itself, whose dye panes are laid out differently.
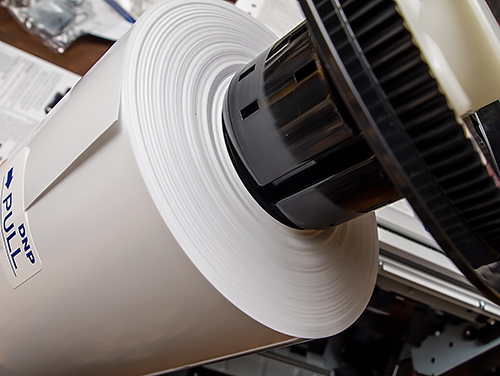
To load the paper, you unlock the front of the unit using a blue lever at the bottom of the front panel. Pull the drawer out and lift the blue paper lever to open the paper compartment. It will swing up and away from you.
Take out the smoked plastic scrap box in the front of the drawer by lifting it straight out. That gives you room to remove the paper holder from the printer.
The holder separates into two halves so you can fit a roll of paper on it. Make sure to close the two halves on the paper roll so there is no gap between the edges of the roll and the holder ends.
Then just place the holder with the roll back in the printer.
Paper Holder. Just pop them in, one at each end.
With the printer's power on, turn the paper roll downward so it feeds under itself until you hear the printer beep. The orange LED with stop flashing, too.
Return the scrap box to the front of the drawer and close the paper compartment.
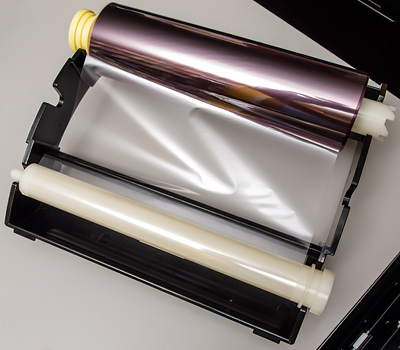
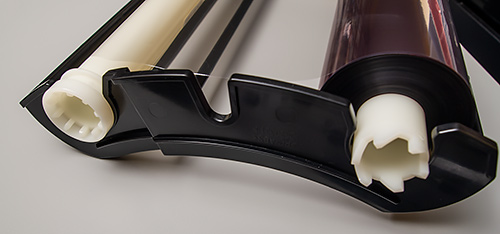
The ribbon cassette is further back in the drawer. Find the handle near the front and simply lift it out.
New Ribbon. Correctly installed in the cassette.
The new ribbon has a supply side and an empty take-up side.
Drop the heavy supply side into the slots near the handle, give a little pull to roll out enough ribbon to reach the slots on the take-up side and drop that roller into place.
Then return the ribbon cassette to the drawer.
Cassette. Note the full roller gear position.
Close the drawer completely. You'll hear a mechanical click.
Ribbon Installed. The instructions provide a helpful reminder on location.
Then you'll see five blank sheets exit the unit to guarantee a pristine first print.
There are two trays but they install the same way.
At the top corners of the scrap box are two notches. Slip the fingers of the tray into the notches while holding the tray parallel to the table the printer is on. Then lower the tray to lock it in place.
The plastic tray has two folding stops you can open to catch 4x6 prints. If you leave them closed, you can slip the metal tray under it to catch 6x8 prints.
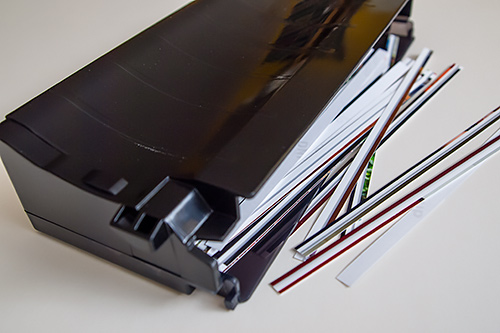
Because the paper is supplied in a roll, each print must be trimmed. The front of the printer does contain a trimmer and the scraps fall into the paper scrap box. Once in a while, you'll have to empty that.
Scraps. It takes a very long time to fill the tray.
We did not need to clean the machine in over a year of use. But it can be done. Ethyl alcohol is the only cleaning fluid recommended. It won't damage the plastic parts.
To clean the platen roller, remove the paper roll to expose the bed of small rollers at the back of which you should see the larger platen roller. Use a small cloth moistened with ethyl alcohol on the roller as you rotate it.
That will clean up and dirt you see on the back of the prints or regularly-spaced indents on the print.
To clean the thermal print head at the back of the printer, remove the ribbon cassette and wipe the head with a soft cloth moistened with ethyl alcohol. A polishing sheet like the Mipox GC1000-75 FEY-A can also be used.
The first problem we had was the power adapter. At just four feet long, the outlet will have to be directly under the printer perched on a table. You'll want to bring an extension cord with you on location but we even needed one in the studio.
Theoretically, the WPS Pro doesn't have to inhabit the same footprint as the printer, so you might get more length if you add the USB connection from the WPS Pro to the printer. But because the WPS Pro is a wireless connection point, you'll want to locate it as high as possible and not just as a coupler to a power outlet.
The second issue we had was with the memory card slot.
On the WPS-1 the memory card slot is an SD-sized slot. On the WPS Pro, it's a microSD slot. And the WPS Pro does not recognize SDXC cards (capacities, that is, over 32-GB).
So you have to find the right card but that wasn't the big problem. The big problem we had was inserting the card. It took us a while to figure out you have to insert the card upside down rather than right side up.
And push it in until it clicks. Otherwise, we can confirm, it will fly across the room.
USB
There are two USB ports on the back of the WPS Pro to connect two printers. But they are not equal. If you are connecting a single printer, DNP advises using the lower port (USB-2), although wee followed the company's documented advice to use the upper port (USB-1).
DNP explained that its newer iSerial-compatible printers printers (like the DS620A) "work well with all ports on the WPS Pro. Other DNP printers actually work best in single printer configuration with the lower USB port on the back of the WPS Pro and that is what we advise users to use (the lower port for one printer and both back ports for two printers) . The WPS-1 had a definite sequence for USB printer connections and the documentation for the WPS Pro seems to reflected that particular situation."
The Ethernet connection is optional but not if you want to escape with your life.
Except on location where a server may not be available, you'll want to cable the WPS Pro to your router so anyone using a DNP app to print can also access the Internet.
While hardware installation can be covered on a device-by-device basis, software is the glue that makes everything work. You'll need different kinds of glue to bond different sources and destinations.
While there is no software to install on the WPS Pro itself, anything that connects to it will require a software installation of some kind.
And for computers on your network there are several software installations possible to provide various services from direct printing from applications to setting up a hot folder.
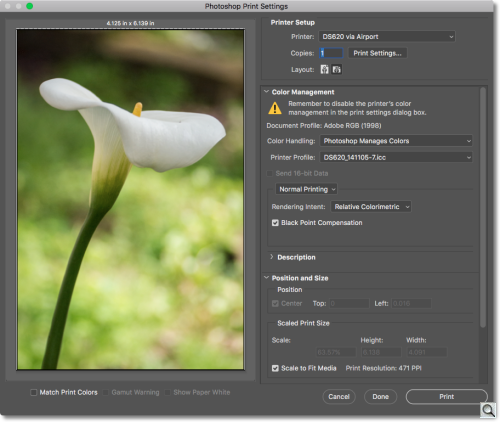
To use the DS620A with a direct connection between your computer and the printer (even through a router), you'll need to install the print drivers and ICM profiles for the printer on each computer that wants to print to the DS620A.
That's really no different than any other printer you've ever installed.
What is a little different is that these drivers are not used by the WPS Pro, as you'll see in the next section.
With the drivers (available on the DNP Web site) installed, you can select the printer as your output device and use your application's Print dialog to control color using its profile and the paper profile (DS620_141105-7.icc) or default to printer control. Business as usual.
And, frankly, this is the way we typically have used the printer. It's connected to our wireless router with one computer connected to the network by cable and the others wirelessly, so the DS620A is available on the network both ways.
When you add the WPS Pro to the mix, things get complicated.
Mobile Printing
The chief reason to add a WPS Pro print server to your arsenal is to provide printing for mobile devices that may include smartphones and wireless-capable cameras.
It is a less satisfactory solution for wireless network printing where the preferred approach is to cable the DS620A directly to your router and use the router to provide wireless connectivity to computers on your network with the printer drivers installed.
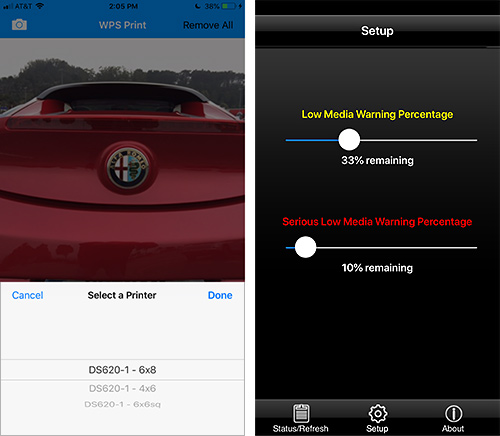
DNP Mobile Apps. Selecting print size in WPS Print 2 (left) and the setup screen for WPS Status.
DNP provides WPS Print 2, an app for mobile devices to send images to the WPS Pro for printing on a connected printer. Download and install the app on any mobile device like a smartphone or tablet that you want to print from.
Once installed, you'll have to switch to the WPS Pro network before launching the app. The app will let you select images stored on your device and set the print size and number of copies before sending the data to the WPS Pro, which in turn will send it on to the printer.
DNP also provides WPS Status, an app to monitor the status of the WPS Pro and connected printers.
Hot Folder Printing
The only way to get an image from computers on your local area network to the DS620A via the WPS Pro is to use Hot Folder Printing.
This is a two-step process in which you first connect via WiFi to the WPS Pro (which will disconnect any WiFi connection to your local area network unfortunately), opening a Hot Folder, and then copy any image you want to print to the appropriate size folder (they are named by print sizes) to the Hot Folder.
You can export from your image editing program directly to the Hot Folder. But you can't use the ICC profile. You're telling the printer to manage color.
The step-by-step process is outlined on page 55 to 57 of the current WPS Pro User's Guide but here it is in a nutshell:
Configure for Hot Folder Printing:
From the Desktop, select Go.
Select Connect to Server.
In the Server Address field, type the address: smb://192.168.43.1
Click Connect.
Select the Connect as: Guest radio button and click Connect.
From the Volumes To Mount list, select the Hot Folder Printers option and click OK.
When the Finder window is displayed, make note of the WPS Pro device name.
Print Using HFP Printing:
Open the Hot Folder Printers folder you created.
Open a second finder window and browse to the images you want to print.
Copy the images and paste them into the print size folder in the Hot Folder Printers folder. And the images will print.
Recommendation
Frankly, we found it easier to leave our network settings along and just swap cables at the printer. When we wanted to print from our local area network, we plugged in the USB cable that connected the printer to the router. When we wanted to print from mobile devices, we plugged in the USB cable that connected the printer to the WPS Pro.
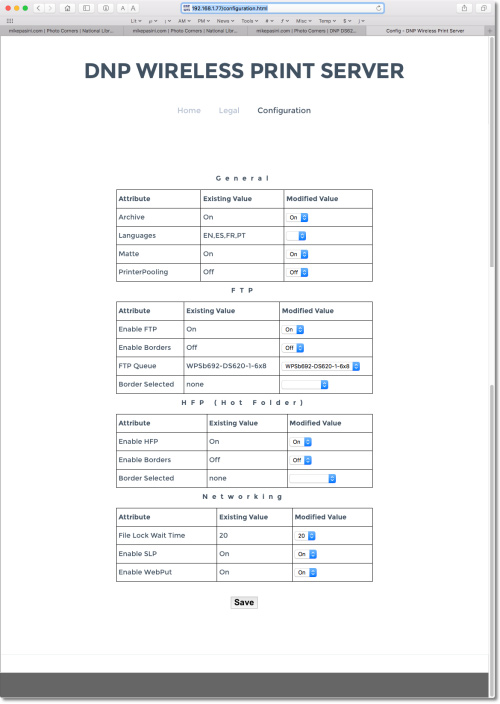
While we're discussing software installation, we should point out that altough the WPS Pro itself can be configured either via its touch screen or its HTML interface, the company recommends using the touchscreen.
The HTML interface, originally developed for the WPS-1 which had no display, is accessible via your browser at configuration.html on your local IP address for the device. In our case that was http://192.168.1.77/configuration.html.
HTML Interface. Settings in a nutshell.
Just make sure you have the WPS Pro on and connected to your DS620A before trying to access it from your browser.
There are several categories of settings available. Let's look at each of them.
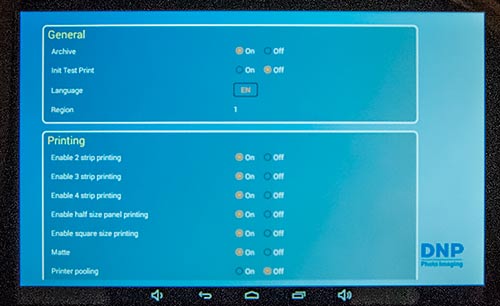
Details. Mouse over or tap for captions.
To access these options, tap the Configuration button on the left side of the main screen.
There are four General options: Archive, Initial Test Print, Language and Region.
When Archive is enabled whatever is sent to the WPS Pro for printing will also be written to a microSD/SDHC (maximum 32-GB) card inserted in the card reader.
We found this an indispensable option, so it was always enabled.
It's helpful to have the images for both archiving and reprinting, of course, but it's also useful to have them for billing. The Exif header of each image contains a wealth of information to help you determine whether or not the image should be billed, for example.
The Test Print option will print a 4x6 test print when you turn the WPS Pro on. This is helpful when you are changing the network setup of the WPS Pro and DS620A because in the lower left corner, the test print contains the IP address of the DS620A, the SSID of the WPS Pro and the WPS Pro firmware version.
That IP address appears in the documentation from time to time but varies with your setup. So use the one on the test print.
You can select from four languages in the Language option: English, French, Spanish and Portuguese. But the available languages depend on the sales region.
The Region setting is the sales region and cannot be changed.
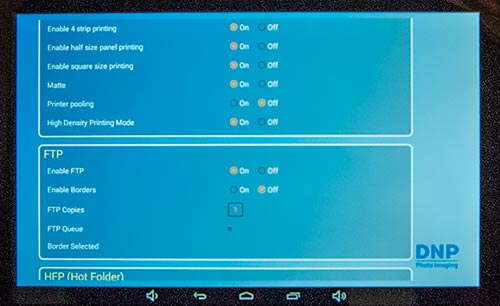
There are four Printing options: Printing Size, Print Finish, Printer Pooling and High Density mode.
The Printing Size options include six options for non-standard prints, four to enable strip printing for multiple images on one sheet (which are also trimmed to size), one to enable half-size panel printing, using only half of a ribbon panel, and another to enable square (5x5, 6x6 and 8x8 inches, for example) printing.
Strip printing can be confusing to mobile users. When they send a 4x6 as 2x6 strips they get the image printed at 4x6 but cut down the middle as two 2x6-inch strips. You can eliminate any confusion by disabling it here so they don't see the option in their mobile app.
The Print Finish option lets you change the default Glossy finish to Matte. A matte finish is achieved by modifying how the clear protective overlay is applied and it works quite well.
Finish can be selected in the native print driver as well as in the mobile apps on an image-by-image basis. But if you want to enforce either finish for mobile users, for example, you can do it here.
Printer Pooling requires two of the same printers both set to the same output size. If that's your setup, the WPS Pro will keep both of them busy, balancing the print load between them.
High Density printing mode is used exclusively with the DS820A printer, using DS820 Pure Premium media.
FTP
There are five FTP options: Enable FTP, Enable Borders, FTP Copies, FTP Queue and Border Selected. These options help make up for any printing instructions missing from an FTP transmission.
If you are not receiving images via FTP, leave Enable FTP off.
Enable Borders allows the border specified in Border Selected to be printed. FTP Copies sets the number of copies to print. FTP Queue indicates the folder named for the printer and print size to use. Border Selected allows you to pick a border (if any) to print with every image.
HFP
There are five HFP or Hot Folder Printing options: Enable HFP, Enable Borders, HFP Copies, Border Selected and Windows File Protocol.
Enable HFP enables Hot Folder Printing. Enable Borders makes it possible to print the border specified in Border Selected. HFP Copies sets the number of copies to print. Border Selected allows you to pick a border (if any) to print with every image. Windows File Protocol is on by default to avoid failed image transfers.
There are four Networking options: Enable SLP, LPR, Enable OTA and Enable Name Service.
Enable SLP turns on SLP broadcasting to make it possible to use the native print drivers. SLP is an older version type of network device broadcasting and will be removed and replaced by MDNS in future releases, DNP told us. LPR or line printer protocol is an older print transfer protocol that doesn't require drivers, but needs proper printer names. Enable OTA enables over-the-air transfer protocols for product updates. Enable Name Service turns on the WPS to be a named server (dnpwps.local) if not using the WPS attached to a router and the internet.
We never had to touch these settings, which by default are all enabled. In future releases, DNP said, these may be moved to a secondary menu.
Plan to spend a little more time (and inconvenience) configuring local and wide area network access to the DS620A than you might for a wireless all-in-one or laser printer.
While you can, using hot folders for print sizes, use a single USB connection for local and wide area access to the printer via the WPS Pro, local access requires switching to the WPS Pro as your network connection. That's not a choice many will find convenient.
The WPS Pro is upgradable and our conversations with the product manager covered some interesting options down the line to expand capabilities and improve ease-of-use. So we're inclined to think of it as a work in progress rather than a wireless workaround.
(Editor's Note: This is the second part of a multi-part review of the DS620A printer and WPS Pro print server. Links to the other stories are in the main table of contents at the top right of each story.)