C O N T E N T S
•
•
Photo Corners headlinesarchivemikepasini.com
![]()
A S C R A P B O O K O F S O L U T I O N S F O R T H E P H O T O G R A P H E R
![]()
Enhancing the enjoyment of taking pictures with news that matters, features that entertain and images that delight. Published frequently.
Test Drive: SpyderLENSCAL To Tweak Autofocus


13 February 2019
One of the more obscure features of your digital camera may just be the Autofocus Micro Adjustment. Not every camera includes it but it's an essential setting for tweaking how your camera autofocuses with any autofocus lens or a particular autofocus lens.
Manual lenses, of course, do not focus automatically so there's no micro adjustment to make apart from setting the diopter adjustment on your viewfinder so you can actually see what the lens sees when you focus it.
But autofocus lenses are focused by the camera when you half-press the shutter button. And you can tweak where focus is set on many cameras.
Years ago we reviewed Michael Tapes' LensAlign products designed to do just this. And recently we acquired a SpyderLENSCAL from Datacolor that does the same thing.
We liked the LensAlign. So what did we think of the SpyderLENSCAL?
THE PROBLEM
First, let's discuss the problem the SpyderLENSCAL is designed to solve.
It's important to understand the problem is not focus itself but autofocus. Half press the shutter button on your camera and your autofocus lens will hunt for focus automatically.
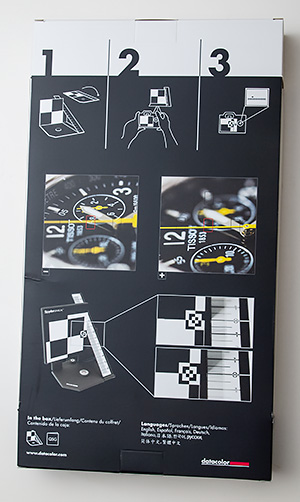
Back of the Box. All the documentation you get.
It may not quite get there, though.
If it falls short, focusing in front of the target, it is front focusing. If it goes long, focusing behind the target, it is back focusing.
While the difference may be minuscule, it can matter when depth of field is very shallow. For example, focusing wide open at close distances it's a killer.
Detecting the problem is often more difficult than it may seem.
You can see the autofocus point in the viewfinder or using software than can display the focus point in your image. When you do, you may notice that actual focus was either in front of or behind the intended target. But you have to look for the problem to see it.
The cause of the problem may be in the camera body itself or in a particular lens. Cameras featuring a microadjustment for autofocus provide two modes: a default that can be applied regardless of the lens mounted and another for just the particular lens mounted.
Not all cameras offer autofocus microadjustment. Datacolor provides a list of older cameras that support micro adjustments to autofocus:
- Canon: 50D, 70D, 7D, 7D Mark II, 6D, 5D Mark II, 5D Mark III, 1D Mark III, 1D Mark IV, 1Ds Mark III, 1DIV, 1Dx, 1Dc, 5DS, 5DS R
- Nikon: D7000, D7100, D7200, D300, D300s, D600, D610, D700, D800, D800E, D810, D750, D3, D3s, D3x, D4, D4s, Df, D500, D5
- Sony: A77, A850, A900, SLT-A77, A99, A7, A7 II, A7s, A7r, NEX-x * LA-EA2 or LA-EA4 adapter may be required
- Olympus: E-30, E-620, E-5, [E-M1 only with Micro 4/3 lens adapter]
- Pentax: K20D, K2000, K200D, K-5, K-5 II, K5-IIs, K-5 II2, K7D, 645D, K-x, K-30, K-3 Hasselblad: H4D, H5D, H6D
- Sigma USB Dock: All Global Vision lenses
- Tamron USB Dock: Tamron SP 85mm f1.8, SP 90mm f2.8 macro
The number of lens corrections each camera can remember, however, varies. Nikon stores 12 in the D300 and D700 but 20 in the D3/D3X. Canon stores 20 in the 1Ds Mark III, 1D Mark III, 5D Mark II and 50D. The Sony A900 stores 30.
So which do you use, the general adjustment or a particular lens adjustment?
If every microadjustment is back or front, you can find the common amount and subtract that from every adjustment. So if you have lenses that require an 18, 14, 7 and 4 adjustment, you can use a 4 adjustment for the body itself to limit the specific lens adjustments to 14, 10 and 3.
But first you have to test each of your lens-camera combinations to see if you have a problem. And that's where the SpyderLENSCAL comes in.
IN THE BOX
SpyderLENSCAL includes just the device itself in the box, which requires no assembly. The back of the box tells you just about everything you need to know (but not quite). The Datacolor Web site does include a helpful User Guide that fills in the blanks.
SETUP
The $64 SpyderLENSCAL lies perfectly flat for storage and quickly folds into a 45° angle which is locked into place when you drop the scale into position. It's a very efficient and clever design.
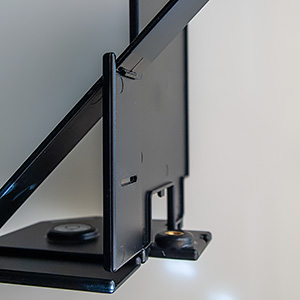
Ruler. Note the bump on the bottom of the ruler sitting on the support and the slot below which the bump snaps into when the unit is folded flat.
But it can be a bit tricky at first. Look at the back and you'll see the ruler is locked into position with a tab that snaps into a slot on the target. Release that and you can fold the SpyderLENSCAL. To lock the SpyderLENSCAL into its 45° fold, hook the ruler into the top of its support on the target.
The base plate has a tripod mount and a spirit level.
You'll want to mount the plastic SpyderLENSCAL on a tripod or light stand and level it. And you'll want to mount your camera on a tripod as well, setting it's height to the same height as the SpyderLENSCAL.
Datacolor recommends you set the distance between the camera and the SpyderLENSCAL 25 to 50 times the focal length of the lens. You'll have to convert millimeters to feet (one millimeter is 0.00328084 feet) or use our form below.
Just enter a value for the focal length of the lens and hit tab to get the distance at the default multiplier.
Instructions. Enter the focal length of your prime or the longest focal length of your zoom in the first field. The tab out or just hit enter to see how far away to set the target. Distance is rounded up to ensure sufficient space. The 25x multiplier is the minimum recommended.
A 35mm autofocus prime would have to be about three feet away while a 200mm prime would require about 17 feet. Zoom lens distance should be calculated using the longest focal length on the lens.
Alternately, the PDF documentation provides a handy chart so you don't have to bother with the calculations.
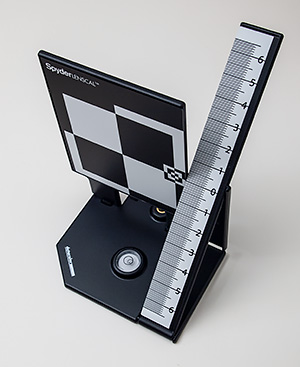
SpyderLENSCAL. Assembled for use.
Camera settings are next. Datacolor recommends:
- Manual or Aperture Priority mode
- The lowest native ISO
- Turn off image stabilization on the lens
- Open the aperture to its wide setting
- Set any zoom lens to its longest focal length
- Use a flash if you need more light
If you use a flash, make sure it doesn't throw a shadow on the ruler itself.
We also suggest setting a single point for autofocus and making sure that it is in the center of your viewfinder.
Next you have to compose the image in the viewfinder so the center of the viewfinder is aimed at the set of small concentric squares next to the ruler on the SpyderLENSCAL.
Here's what our target looked like in the viewfinder:
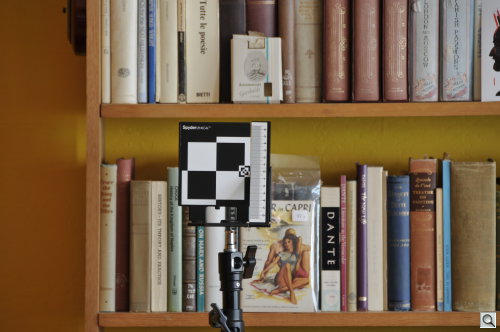
Setup. Perched on a light stand, 17 feet away for a 200mm lens.
It's key to have the sensor and SpyderLENSCAL parallel to each other and to make sure the target on the SpyderLENSCAL is in the middle of your viewfinder where, presumably, your autofocus target is set. You should confirm that it isn't set off center.
CAPTURE
Now you're ready to autofocus and capture the image. But there's a right way and a wrong way to do it.
Datacolor recommends you use the self-timer or a cable or remote release to avoid introducing camera shake when pressing the shutter button. It also advises against using Live View.
This is a great excuse to use tethered shooting because you should evaluate the capture on a computer monitor. We've reviewed a number of tethered shooting solutions, a few of which are free.
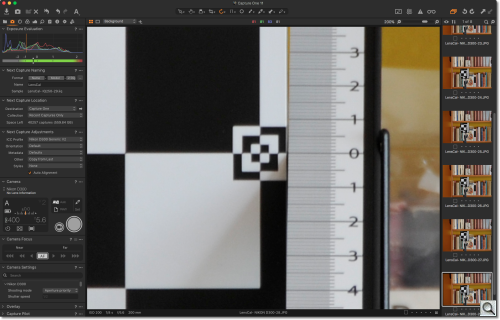
Capture One 12. With tethered shooting, you see the image on screen large enough to evaluate focus, adjust the setting and confirm the results quickly.
Otherwise throw the lens out of focus to begin with, then shoot and copy the image to your computer for evaluation.
So what are you looking for?
Examine the ruler markings to find the sharpest line.
If your lens autofocused correctly, that line should point to the zero on the ruler. But it may focus on a line in front of the zero (front focusing) or behind it (back focusing).
Front focusing requires setting a minus adjustment to back focus up while back focusing requires a plus adjustment to move focus forward. A little trial and error will show you which way you should go on your camera. And shooting tethered will make it quick and easy to see when you've nailed the adjustment.
You make the adjustment with your camera's Autofocus Microadjustment option.
Because the values on the ruler do not correspond to the units in your camera's adjustment, you simply have to work by trial and error. In our case, positive values move the focal point away from the camera while negative ones move it closer.
If you have trouble finding the sharpest line on the ruler, try using the Find Images filter in Photoshop.
Datacolor recommends repeating the test annually for lenses that have been used frequently to account for any changes in performance.
REAL WORLD
We gave it a try with two lenses we had previously adjusted using Michael Tapes' LesnAlign products, which we liked very much.
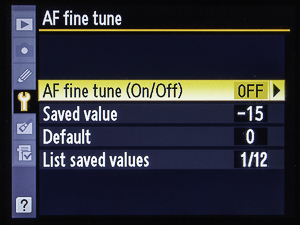
AF Fine Tune. From the Tools menu.
AF Fine Tune. Main Menu.
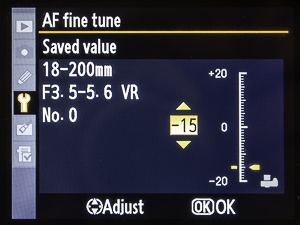
AF Fine Tune. Set.
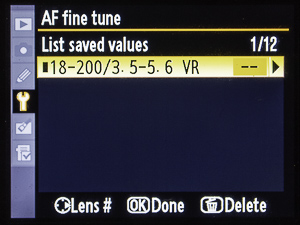
AF Fine Tune. List.
We put the SpyderLENSCAL on a light stand, screwing it into the tripod mount. We set the height about chest high, which is where we wanted the camera.
Our lens was the 18-200mm Nikkor (with no filter) so we marked off 18 feet and set up the camera on a tripod there. We aligned the target in the viewfinder, making sure by sight that the sensor plane and SpyderLENSCAL target were parallel.
We turned off image stabilization on the lens, racked it out to 200mm and connected it to our laptop with Capture One 12 running. Capture One recognized the camera right away and we finished our setup sitting down at the keyboard.
We set the ISO to 200, the lowest native ISO, set the f-stop to f5.6 (the widest) and selected a JPEG capture. The camera was already in Aperture Priority mode.
We hit Capture One 12's shutter button to fire the camera without touching it.
Bingo. Because we'd previously set the autofocus micro adjustment for this lens, it hit the zero.
But it was a little dark in the studio so we tried a few other f-stops, all of which confirmed the results. The wider f5.6 is more helpful because it's shallower but you have to have enough light to evaluate the image. And, just as important, to keep the shutter speed quick.
COMPARISON
Both the LensAlign and the SpyderLENSCAL can get the job done, the SpyderLENSCAL a little cheaper.
The LensAlign is made of cardboard while the SpyderLENSCAL is made of hard plastic. The LensAlign has to be assembled while the SpyderLENSCAL can be carried flat and quickly folded into position. The LensAlign has a variety of easily-bowed rulers (some quite long) while the SpyderLENSCAL's stiff ruler is just short of eight inches. The LensAlign helps you set it parallel to the camera sensor while the SpyderLENSCAL has a spirit level but no parallel sighting.
The most significant issue would seem to be the lack of any parallel sighting on the SpyderLENSCAL. But is it really? The target itself is located right next to the ruler, so if you are focusing there, you are aligned to the ruler.
The rulers themselves have quite different designs with the LensAlign offering a dizzying display of patterns compared to the SpyderLENSCAL's simple ruled markings. Again, we don't think the more elaborate patterns provide much more help than simple markings.
Different designs, in short, but not really deficient in any respect. They both, as we said, get the job done.
Can you cobble together something similar. Sure. A ruler propped up next to a high contrast target you printed or found would work. That will show you the problem but it probably won't be as easy to confirm you've solved it.
CONCLUSION
The SpyderLENSCAL provides a simple but effective design for adjusting autofocus lenses on cameras that have a micro adjustment feature.
It's main benefit is how compactly it can be stored when not in use, which is most of the time. And though it doesn't really need to be handy, it's nice to know it can easily slip into a camera bag. Its compact, flat storage and quick setup is really what distinguishes it from the competition.
So we're awarding it all four photo corners.