Photo Corners headlinesarchivemikepasini.com
![]()
A S C R A P B O O K O F S O L U T I O N S F O R T H E P H O T O G R A P H E R
![]()
Enhancing the enjoyment of taking pictures with news that matters, features that entertain and images that delight. Published frequently.
Installing ImageMagick With PerlMagick


8 June 2022
We rely on the free ImageMagick suite, usually run from Perl scripts that call the PerlMagick module, which themselves are embedded in Keyboard Maestro macros, to do a lot of the image processing here at Photo Corners.
ImageMagick can be installed on Linux, macOS and Windows. The PerlMagick module must match the revision version of the ImageMagick installation. Those are the rules.
Once upon a time, you could configure this to happen during the ImageMagick installation with a configuration option. But not any more.
The other day we broke our long-running ImageMagic 6 installation when updating components for another installation. These dependencies, as they are called, can turn out to be vulnerabilities.
Rather than try to repair the damage, we thought we'd spend the time to update our ImageMagick installation to version 7. Which meant updating PerlMagick, too. It wasn't easy. So if you're inclined to tap into this otherwise wonderful utility, we thought we'd detail the process on macOS Catalina here.
IMAGEMAGICK
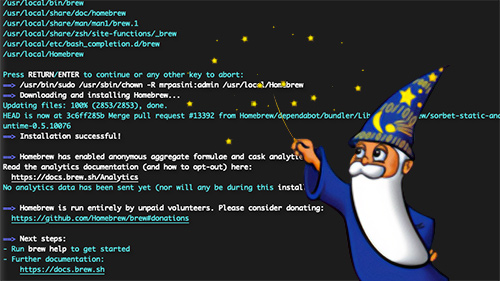
We've done it the hard way and we've done it with Homebrew and we're sticking with Homebrew on macOS.
Homebrew manages Unix packages on macOS. It installs them in
/usr/local/Cellarso they can be run from the command line in Terminal or iTerm or whatever your favorite command line application is.It uses Ruby scripts to do the installations that otherwise would require multiple steps at the command line. And if you can't dance that can threaten your sanity.
To install Homebrew you just drop this one liner into your command line app:
/bin/bash -c "$(curl -fsSL https://raw.githubusercontent.com/Homebrew/install/HEAD/install.sh)"You will get an occasional prompt during the installation but it's merely to let you know what's going on. You respond by pressing the
Returnkey.With Homebrew installed, you're ready to install ImageMagick.
At the command line, simply type:
brew install imagemagickAnd in a bit, you'll have a folder called
imagemagickin/usr/local/Cellarwith, at the moment, ImageMagick 7 installed.To prove that it works, you can copy a JPEG to your Desktop and run this series of commands at the command line prompt:
cd ~/Desktop

convert -flip [filename].jpg result.jpg
And in the blink of an eye you'll see your JPEG has been flipped in the file called result.jpg.
PERLMAGICK
You don't want to live at the command line with ImageMagick, although there are plenty of stunts you can do there. For more complex tasks, it's helpful to script the commands.
And while you can write a list of commands in shell scripts, it's more flexible to call ImageMagick from a Perl script, say. At least for us.
That requires compiling the PerlMagick version compatible with your ImageMagick installation. The compiled Magick.pm module will be written to
Library/Perl/[version]/darwin-thread-multi2-level/Image.There are several ways to do this.
The first thing we tried was using Homebrew itself:
brew install perlmagickIt had tried to update the module during the ImageMagick installation but failed because the module wasn't "bottled" by Homebrew.
But that didn't work for us because the module has to be written to the
Library/Perldirectory and there were insufficient permissions.We might just have run:
cpanm install perlmagickBut we visited metacpan.org to find the latest version of PerlMagick (searching for "Image-Magick") to match our new ImageMagick installation and downloaded that.
Uncompressing that left us with a PerlMagick folder in our Downloads directory.
From the command line again, we did this:
cd ~/Downloads/PerlMagick-7.0.10

perl Makefile.PL

make

sudo make install

make test
Each step took a few seconds or so. The procedure changes to the module's directory, uses Perl to get what it needs to compile the module and installs it using the
sudocommand to get around the permissions issue.The finally step runs a series of standard tests to make sure everything works. Each text should return an "OK" after it runs.
Ours did.
So how do you use PerlMagick? Here's the standard Perl example script from the ImageMagick site's PerlMagick page:
#!/usr/local/bin/perl

use Image::Magick;


my($image, $x);


$image = Image::Magick->new;

$x = $image->Read('girl.png', 'logo.png', 'rose.png');

warn "$x" if "$x";


$x = $image->Crop(geometry=>'100x100+100+100');

warn "$x" if "$x";


$x = $image->Write('x.png');

warn "$x" if "$x";
This reads three images, crops them and writes a single PNG image as an animated GIF.
CONCLUSION
You can tie yourself up in knots going through all the configuration options for this process but you can ignore the advice and just do what we did.
You'll end up with a free image processing utility you can program to do all sorts of things, including batch resize images with sharpening, composite them, and perform other routine edits that you can run from a sweet little macro program like Keyboard Maestro.