Case Study: Automated Image Processingmikepasini.com
Image processing is a black art. Mysterious potions involving snake skins and unsharp masking take years to master. Batch processing your stir yourself never quite gets the job done so you resort to special incantations that take forever. But it doesn't have to be that way. With free image processing software and a smart front end, you can just throw a selection of images at an application and get exactly what you need. Instantly.
Components
For the person using this software, this is so simple we have to get a little technical to come up with a whole page to describe it. We'll start by describing the software components we need to build this system. Like our other case studies, it uses all free stuff.
Our case study system is running OS X. What do we need to install?
The only tool we need to install is ImageMagick, an image processing engine famous for its Unix command line applications. But we'll tap into its power using Perl.
Perl is installed with OS X, so nothing to do there.
We'll use AppleScript for most of the user interface -- but that too comes with OS X. So our total cash outlay so far: $0.00.
Application
Instead, your resources pay to craft these components into tools that do what you want them to do. Unlike buying a commercial image editing software application and then trying to hire someone who really knows how to use it, you invest in software that does what you want done. And save very time you run it.
In this case, we want to have original JPEG images resized for several different purposes:
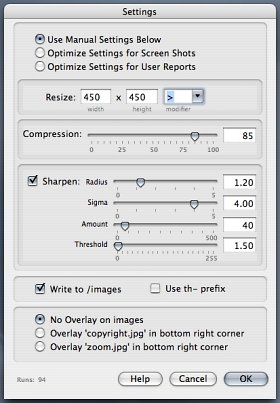
One of those purposes is to be very flexible, allowing you to configure the resizing application's settings however you like. This Manual Mode takes care of any special circumstances you might run into.
Another common resizing task is to resize screen shots into a particular standard size used in your publication's Web reviews.
Finally, we want to be able to configure our settings automatically for product shots used in your Web reviews.
Those are three typical resizing tasks this custom application handles automatically, while giving you a few handy options, too.
Among the options are whether or not to write the resized images into their own directory and whether or not to prefix their filenames with "th-" for thumbnails.
There are also several overlay options, including overlaying a copyright notice or a zoom icon. Because this application is for a specific publication, we don't have to worry about where to put the zoom icon or which fonts to use in the copyright notice. That's all part of the specification and built into the application.
Panels help separate (and group) options. The two bottom panels, for example, are not affected by the settings in the top panel.
And help is available by simply mousing over any of the controls. The Sharpen options have extensive help with secret formulas for various tasks. But you can just deselect Sharpen to have the application pick the appropriate formula for you.
The screen shots on this site and many of the photo thumnails were made with a version of this application. It's just too handy to use only for work!
Results
The application above is launched by dragging some images onto it. It's an AppleScript application that calls a Perl program that uses ImageMagick to resize the images.
A progress bar lets you know which image is being processed and how far along things are.
You can throw a lot of (quite large) images at this application and your settings can affect how long it takes to process them, but things move along pretty quickly even on a slow machine.
When processing is complete, the application displays a report, which can be edited before being saved to disk. The report shows the application settings that were used and then lists each image and its resized dimensions formatted for inclusion in an HTML img tag.
The beauty of a custom application like this is that you can decided exactly how it should behave. Want the whole img tag and not just height and width? No problem. Want it to spin off an HTML contact sheet based on this information. Sure!
Oh, there is one other beautiful thing about it, we should mention.
Unlike a commercial image editing program, there's no learning curve. All you really have to know to run this application is either how wide or high the resized image has to be.
If you know more (like how to tweak unsharp masking), you can do that. But you get nicely sharpened images with either the default values or by unchecking the option and letting the application set it for you.
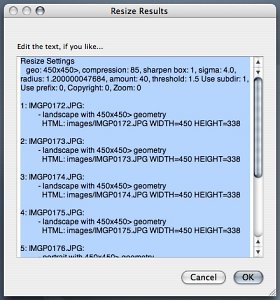
The report shows what settings were used and then lists each image and its resized dimensions.