Photo Corners headlinesarchivemikepasini.com
![]()
A S C R A P B O O K O F S O L U T I O N S F O R T H E P H O T O G R A P H E R
![]()
Enhancing the enjoyment of taking pictures with news that matters, features that entertain and images that delight. Published frequently.
Aquatic Park Panorama


18 May 2015
Lightroom CC added a Panorama Photo Merge to the application's bag of tricks and we found a use for it after taking a walk this weekend by Aquatic Park. The graceful breakwater cried out for a portrait.
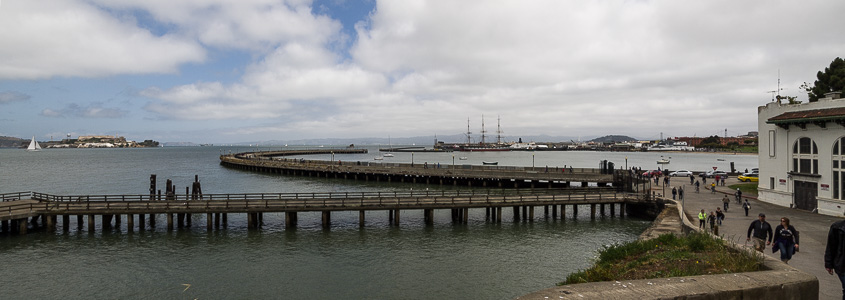
Aquatic Park. A Lightroom CC Panorama.
But we couldn't fit the whole scene in even at the widest angle of our zoom lens. So we took a series of three images with significant overlap. There's no penalty for overlapping.
Exposure was a constant 1/2000 second at ISO 200 and f5.6 in Aperture Priority mode. That's important for seamless stitching.
We didn't have a tripod handy so we just tried to keep things level. We're not very good at that, but we were good enough.
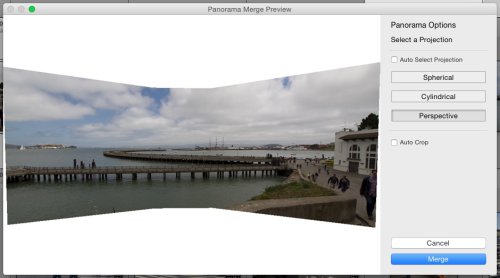
PHOTO MERGE
In Lightroom, we imported the three Raw captures, selected them and used the Photo>Photo Merge>Panorama command to preview the panorama.
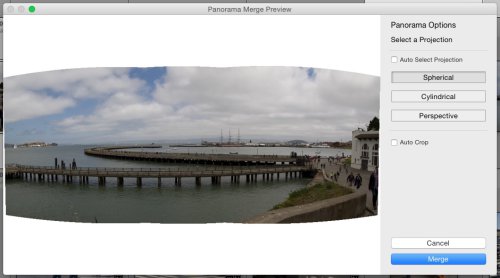
You have three manual rendering (or projection) choices in addition to letting Lightroom pick (Auto):
- Spherical: Projects the stitched images onto an imaginary ball
- Cylindrical: Projects the stitched images onto an imaginary cylinder (like a bottle)
- Perspective: Projects the stitched images into three dimensional space with the center further away than the sides
And you can tell Lightroom to auto crop the image.
You can get a clearer idea of what each projection option does by turning off Auto Crop, as we did in the rollover above.
We didn't like the curvature that the first two projections introduced to the straight pier in the foreground, so we chose Perspective for our image.
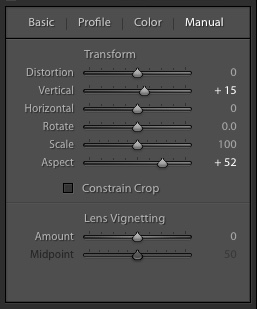
Manual Correction. Two improvements.
DEVELOP
That created a DNG Raw file to play with in Lightroom's Develop module.
We really appreciated having the headroom of a Raw file to work with in Lightroom, particularly with this image. We made some dramatic changes to the Highlight and Shadows to bring out detail that otherwise would have been lost.
When we shot our iPhone 6 panorama that's exactly the sort of thing we missed. It produced a single image that did not need stitching but it wasn't much fun to optimize the tone and color.
After we optimized the image using the sliders in the Basic panel, we reduced the panorama's distortions in the Lens Corrections panel.
There were two problems the Photo Merge left us that we fixed in Lens Corrections:
- Slightly converging verticals, which we fixed with a +15 adjustment in the Vertical slider
- A horizontal stretching most noticeable on the figures and building on the right, which a +52 adjust on the Aspect ratio fixed
That's all there was to it.