C O N T E N T S
•
Photo Corners headlinesarchivemikepasini.com
![]()
A S C R A P B O O K O F S O L U T I O N S F O R T H E P H O T O G R A P H E R
![]()
Enhancing the enjoyment of taking pictures with news that matters, features that entertain and images that delight. Published frequently.
Mounting an External Drive


30 May 2019
It's a fact of digital life. If you play this digital photography game long enough, you're going to need to mount an external storage device to archive your collection. That can be an annoying household task but don't despair.
This is a digital game, after all, whose coming and going you can automate. We'll show you how we do it on the Macintosh platform. If you have a Windows solution, please use the Feedback button to share it.
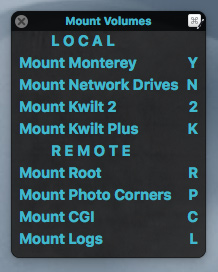
Mount Volumes Palette. A keystroke puts any of these drives on our Desktop.
There are two network drives (among others) we use to archive our photos:
- A network drive attached by Ethernet to our Apple Extreme router
- A WD Passport drive attached to the USB port of a 13-inch laptop on our network
We mount both of them when we have images to archive so we can just drag-and-drop the new folder of images to them.
You can do that manually, of course. Use the recent Servers list in the Apple Menu or Command-K in the Finder's Go menu to Connect to Server. Select the one you want, enter your username and password, confirm you want to connect, wait for it to appear and double click on its icon on the Desktop to open it.
Or you can automate all that and just tap a key to have them mount and open themselves. That's a real blessing.
But it isn't easy. So we though we'd detail the tricks here.
APPLESCRIPT
To mount a drive connected to the USB port of another computer on our network, we use a one-line AppleScript:
mount volume "smb://Little-MacBook-Pro.local/Mount%20Sutro" as user name "myname" with password "mypassword"There's a little problem with that. The username and password are accessible to anyone looking at the AppleScript. We'll solve that below.
To mount the other network drive, we use a similar one-liner:
mount volume "smb://MYBOOKWORLD/MRPASINI" as user name "myname" with password "myotherpassword"KEYBOARD MAESTRO
We pack both one-liners in an
Execute AppleScriptaction in a Keyboard Maestro macro which can be accessed from a palette of mounting options (we have a lot of stuff we mount). Here's the whole thing: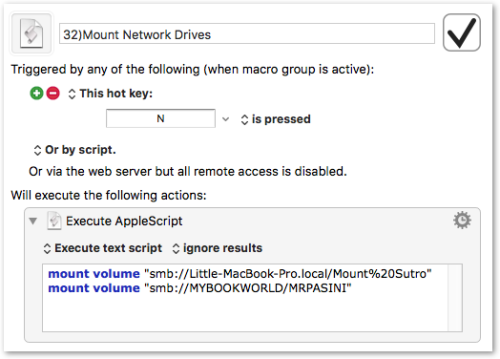
You'll notice there are no usernames or passwords referenced in the production macro. Read on.
HANDLING THE PASSWORD
The trick to hiding the username and password is to let Keychain Access handle the request. And the trick to that is finding the entry for each drive (note the title bar in the screen shot below) in Keychain Access and adding the relevant applications to its Access Control panel.
Here's what our ethernet drive's Access Control panel looks like:
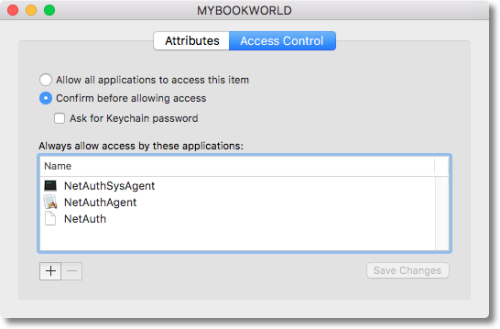
We found the drive in Keychain Access's list, used Get Info on it and clicked the Access Control tab to add to the list of safe applications.
We could then remove the username and password from the Applescripts to mount remote drives.
CONFIRMATION DIALOG
Since Sierra, the operating system asks you to confirm logging into any server that requires a username and password. It's a security measure, Apple says, to prevent sending those critical two pieces of information out into the world without your approval.
But as we are the ones trying to mount the devices, our approval is implied. So we want to skip the confirmation dialog seen below.
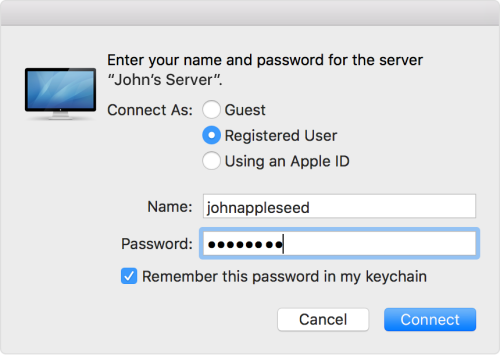
Fortunately there's with a command line option to shut it off. An Apple support article spills the details but the gist is to run this one-line command in Terminal:
sudo defaults write /Library/Preferences/com.apple.NetworkAuthorization AllowUnknownServers -bool YESTo turn it back on (in case, for example, you invited some Russian military officers to tea):
sudo defaults delete /Library/Preferences/com.apple.NetworkAuthorization AllowUnknownServersWhy that is necessary is baffling to reasonable minds. The change, introduced in Sierra, caused all sorts of problems with access to network servers. InDesign users who had to access fonts and images on a server were particularly steamed.
The change really should have been clearly documented and been implemented as an option with a System Preference under Security instead of being toggled with an obscure command line option.
ONE MORE STEP
So what is the first thing we always do when we have those network drives finally mounted? Well, we double click on them to show the directory structure so we can drag our new folder to them.
Why not automate that too?
We set up a second Keyboard Maestro macro to look at the name of the volume being mounted and if it matches anything in a list of names, open it in List view with the Toolbar visible.
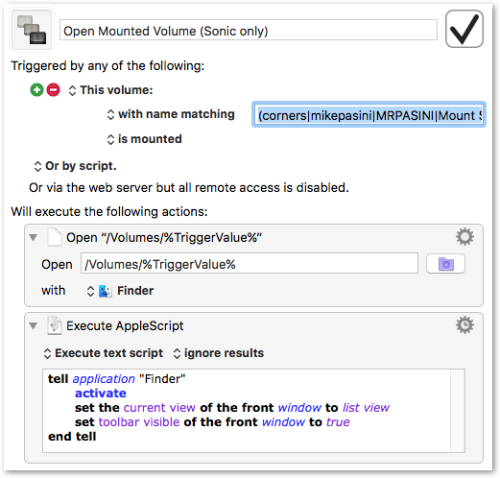
Now when we hit the N key with our Mounting palette displayed, our network drives appear on the desktop and open in list view. With just one keystroke.
That second macro's AppleScript could certainly be folded into the first if you don't have Keyboard Maestro. Just duplicate it in the script for each drive.
CONCLUSION
We do so much mousing around during the course of the day that we appreciate any trick that lets us automate frequently performed acrobatics. And this is one of them.
You don't need Keyboard Maestro to build two macros for this but as your needs get more complex (like using one macro to open any drive in list view with the toolbar), it's nice to build on its framework.
You can, however, easily enjoy the benefits of automated network drive mounting with just an AppleScript.
And there's no reason not to do it. In fact, it provides one less impediment to backing up your photos.