Photo Corners headlinesarchivemikepasini.com
![]()
A S C R A P B O O K O F S O L U T I O N S F O R T H E P H O T O G R A P H E R
![]()
Enhancing the enjoyment of taking pictures with news that matters, features that entertain and images that delight. Published frequently.
Road Test: DxO PhotoLab 3's HSL Tool


26 November 2019
We're regularly disappointed by new interfaces to accomplish old tasks but for some reason we keep trying them out, hoping one day to find a new tool that extends our power over an image. Sometimes that happens.
Photoshop's Select Subject was a recent example. Creating a selection has long been a trying and time-consuming experience. Suddenly it became a one-click task.
Color replacement is another trying and time-consuming task. So we were excited to try DxO PhotoLab 3's new HSL tool.
HSL stands for Hue, Saturation and Luminance, the three dimensions of any color. Hue is its actual color, Saturation is the amount of gray in it and Luminance is how bright it is. The new HSL tool lets you work with all three at once.
And we were surprised to fall in love with it. For two reasons, which we'll detail below.
We spent half an hour with DxO's Fabrizio dei Tos, who went over the new tool's features and demonstrated some of its power in a briefing. Here's what we learned.
READ ME
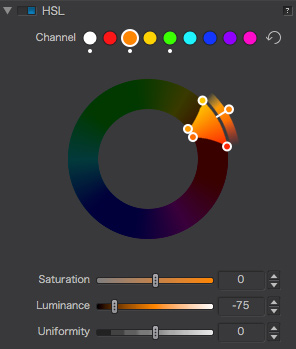
Much as we love the interface, which is compact and simple (once you learn the controls), you still need an introduction. DxO provides an excellent one, which we will boil down to a cheat sheet:
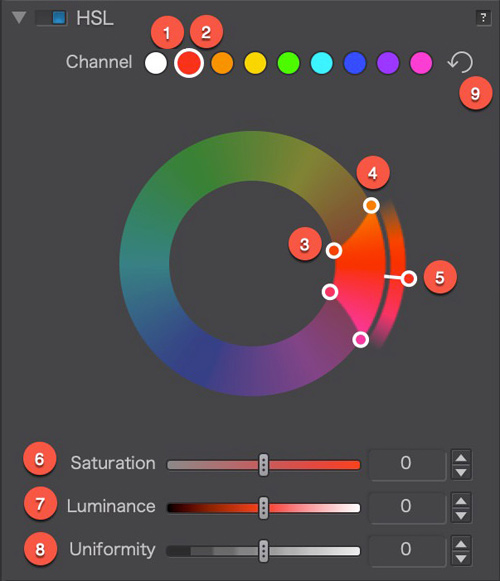
- Color Channel Selector. With White selected, all colors are affected, otherwise only a specific color range will be affected.
- Selected Color Channel Selector. Selecting a color chip sets the source color range on the Hue wheel. Here Reds are selected.
- Primary Hue Selection Range Tool. These two inner handles define the range of color to be manipulated.
- Feathered Edge of the Hue Range. These two handles expand or contract the color range defined by the Primary Hue Selection Range Tool.
- Hue Rotation Slider. This handle rotates the hue around the color wheel. When White is selected, all hues rotate. When a color range is selected, only the selected hue range is changed, replacing the color.
- Saturation Slider. Increase or decrease the intensity of the selected range.
- Luminance Slider. Increase or decrease the brightness of the selected range.
- Uniformity Slider. Compresses or expands the colors in the range selected, making them more alike or more different. Helpful for evening out skin tones and making skin color appear more uniform.
- Reset Button. Undo all edits. You can also turn off the HSL panel with the blue button on top.
The first thing we liked about this interface was that it was compact. We didn't have to scroll through a set of sliders to handle Hue and jump to a different tool to deal with Saturation.
The second thing we liked about it is that once you know what the handles do, they're pretty easy to remember. With the exception of the Feathered Edge handles, which are easy to confuse with the Hue Range handles on the inside. We try to keep them straight by observing that feathering profits from a longer "slider" than mere hue range so it's on the outside.
The other difficulty we had was in using the Color Change Selectors. It was sometimes difficult to identify the hue range we wanted to target. But we got better at that quickly.
Note that this tool makes global, not local, color changes. So if you select Orange, for example, and have a tree full of oranges, it will affect every one of them. Moving the Hue Rotation slider to Yellow will turn them all into lemons.
COLOR REPLACEMENT
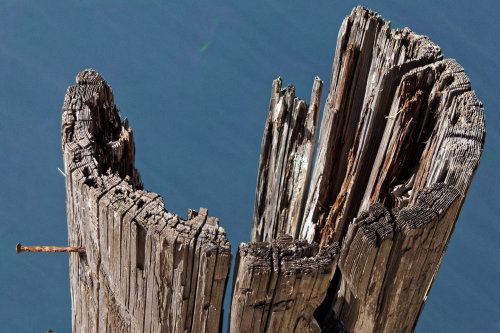
To test how easy color replacement might be with the HSL tool, we used a simple image of a weathered piling above green bay water. There was no green in the piling and no gray in the water. The original was a DNG Raw file.
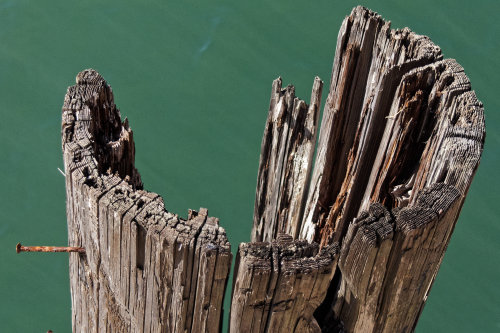
The task was to swap the green for blue.
We selected the Green color channel and rolled the Hue Rotation slider from the green to the blue part of the color wheel.
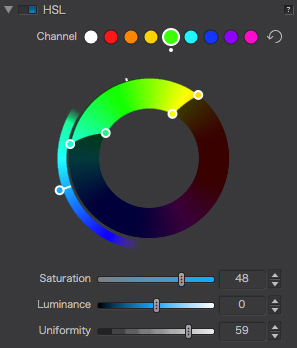
Then we played with the hue and feathering controls until we had changed all the green to blue.
We really appreciated we could do this in any order. Change hue, revise selection or set selection and change hue. Interchangeably.
That's how a good interface behaves.
As you can see from the screen shot of our HSL panel, the Green channel has been feathered so the greens include some blues but no yellows. The blue hue we picked replace all of those hues.
We also bumped up the Saturation of that change, leaving Luminance alone and we increased the Uniformity too.
When we'd finished, we had changed the color of the water from green to blue in a click or two of our mouse.
BLACK & WHITE
We hadn't realized until dei Tos demonstrated it that the HSL tool is also an excellent black-and-white editor.
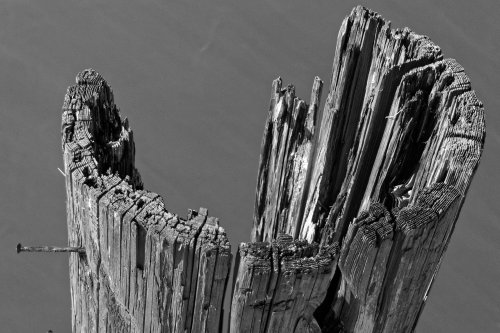
The trick is to click on the White color channel to select all the hues in the image and then set the Saturation slider, the only one still active, to -100. You now have a black and white image.
But the image still retains hue information so you can subsequently select a different color channel and manipulate its Luminance to change how that color range is rendered.
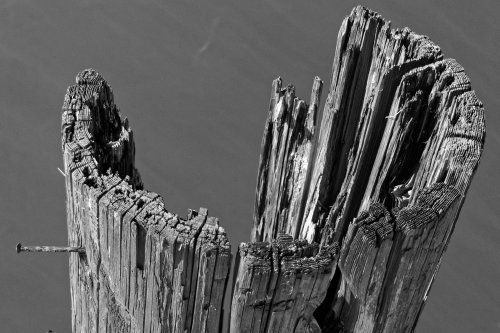
Using the same image of the piling, we first selected the White channel to set the Saturation to -100 to create a black-and-white version of the image.
Then we lightened the water by selecting the Green channel and adjusting the Luminance.
We moved to the Orange channel to darken the piling and were done.
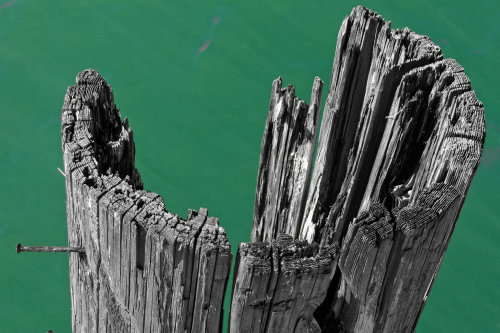
But notice that the various color channels we edited are marked with a white dot. We can revisit those edits by clicking on the channel and changing the sliders or adjusting the handles on the Hue wheel.
In the third case we illustrate above, we revisited the original Green channel and brought back the Saturation so the color was restored.
We did find the Luminance slider to be less aggressive than expected. You can't get to black or white by running the slider to the ends of the scale.
ISSUES
We did have one issue with the HSL tool. It was simply that the nine color selectors were insufficient. Which color channel would you select for skin tones or hair color, for example?
We had so much fun changing the color of a model's clothes and knocking the background back to black-and-white that we wanted to change her hair from brunette to blonde so she could have fun too.
Which color selector is brunette, we asked dei Tos.
The problem extends to selecting any dark color. You just can't tell what the hue is when the luminance is reduced beyond a certain point. And even if you could, these are global adjustments, not restricted to a contiguous area.
Wrong tool, dei Tos said. Try the U Point tool to target local edits. And that does work.
We did have one suggestion, though. Instead of clicking a Channel Selector, it would be more intuitive to click in the image to set one.
CONCLUSION
We found the HSL tool in DxO PhotoLab 3 is a valuable advancement in color replacement and monochrome editing.
It's just the first iteration of the tool so we look forward to seeing some enhancements but it's already quite useful for global color changes. We particularly liked it for changing the color of clothing and for adding a color back to a monochrome image.
But that's not all it can do, of course. It can make quite subtle but convincing adjustments to your images like toning down the saturated greenery rendered in many landscapes.
That earns it all four photo corners from us.