Photo Corners headlinesarchivemikepasini.com
![]()
A S C R A P B O O K O F S O L U T I O N S F O R T H E P H O T O G R A P H E R
![]()
Reviews of photography products that enhance the enjoyment of taking pictures. Published frequently but irregularly.
Video Editing: The Ins & Outs


30 August 2013
So what's the difference between all those clips spliced together into a rough cut and the final movie? The art of editing. And it makes quite a difference.
R E S O U R C E S
Using Keyframes to
Control Audio VolumeWe're no expert. Cementing silent strips of Super 8 film together represents our video editing education. But we did improve our clips with a number of fixes and effects and put them together in a composition that replayed the day in an hour.
By the time we were done, we'd stabilized our handheld video, adjusted the gamma to improve exposure, applied filters, shifted white balance, resized higher resolution clips to match lower resolution clips, synced audio, dropped stills in for titles, added picture-in-picture to merge two clips, nested sequences, used keyframes to adjust volume, added chapter markers and, well, you get the idea.
There's quite a bit to video editing apart from the art. There's the craft. And in this piece we'll discuss some of the more important edits we had to make.
But let's start with a conclusion.
We had a lot of fun editing the clips into a movie. Using Premiere Pro CC, we found a software solution for every problem our clips presented. And we were never frustrated trying to figure out how to do something. It was as if Premiere Pro just got out of our way and let us do it.
Not that we had any idea how to do it, of course. But after a brief video tutorial from one source or another (and, yes, we'll link to our favorites for each trick), we simply went back to Premiere and did exactly what we'd seen.
TITLES | Back to Contents
With an outline of the day's major events, our first task was to design some kind of title. On a smaller production, say a birthday party, it might have been enough to work out a main title and just use fades to black between the main scenes.
But we had five major events to the day and within a few of them we had various sections. The Reception, for example, was full of various different scenes from the introductions to the first dance to the toasts to the cake cutting to the father/daughter dance and the mother/son dance to the garter and bouquet and so on.

Title Design. A cyanotype still with shadowed type of various sizes that comes alive in color.
We wanted to title all of those for two reasons. To give the viewer a break. Non-stop hilarity can exhaust you. And to be able to make them chapter marks so you can easily just view someone's toast or a dance or some such.
That works out to three levels of titles. We decided to use three different font sizes to indicate the relative importance of each title. The largest type (with some smaller type) for the main title. And the smallest title for the parts of each main section.
Overlaying the type on the first frames of the clip wasn't going to work because there was just too much color and action. And using a black background wasn't going to work because this was a wedding, not a funeral.
But we came up with the idea of taking the first representative frame of a clip and converting it to a still we could bring in for a few seconds over the audio and change it to a monochromatic image. At the end of its few seconds (enough time to read it), it would spring to life in full color. You know, like married life.
Premiere makes it very easy to save a frame as a still and bring it right back into the project. You just scrub to the frame you want, click the Camera icon and a still with the right dimensions is saved to disk and imported into your Project.
From there you just drag the still to your Timeline and set the duration if the default isn't what you want. We tended to extend our still display.
Premiere also makes it easy to style the still and save the style as a preset you can apply to other stills. All we had to do was drag the effect we set up onto the still on the Timeline.
The bride had designed her own wedding, choosing a lovely aquatic blue for everything. So we turned the color still into a blue monochrome (much like a cyanotype) over which we would fade the white, shadowed title text in.
That approach would keep the text readable as it lingered for a few frames into the the scene, transitioning into color.
For the type we used Lithos for its modern engraving effect with a shadow. Nothing fancier was required.
We worked all this out first for the main title, a shot of the harpist playing in the wind. Her music played under the still as the date then the location and then the two names appeared over her. The text was carried into the color image that sprang to life before dissolving away.
Each piece -- the still, the various pieces of type, the audio -- were on separate layers so we could adjust their duration and timing.
It worked great, was easy to do and played well in the final movie.
ROLLING CREDITS | Back to Contents
A rolling credit is just another kind of title. Again you're just setting up some text that will overlay the background image. But the kind of text is a rolling credit.
In this case, we wanted a close-up on the very first part of any party: the invitation. And with that still as the background, we wanted to roll the names of everyone in the wedding party up over it, starting and ending off screen. There are little checkboxes for all those options.
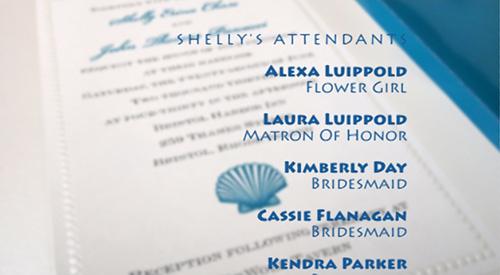
Rolling Credits. The invitation was in sharp focus until the names started scrolling up.
For the sound, we just grabbed more of the preliminary harp music with the crowd noise in the background. We liked the idea of going back to the beginning of the day to end the movie.
We ran into a couple of problems.
We had a lot of text. You have to draw a text box deep enough to include all of your text but you can't tell how deep that is (and you certainly can't see it). You have to drag the text box blindly beyond the frame size in the Titler and then paste your text in.
Running text over invitation text wasn't a great idea but it worked very nicely with a shadow on the credit text and applying a blur to the image of the invitation as the text scrolled over it. You hardly notice the invitation blur because you're reading the text.
And adjusting the speed of the roll was simply a matter of working on the duration.
We also extended the duration of our music clip to fill, making sure we didn't distort the audio (yet another checkbox).
So with a main title (and a title design) and the credits done, all we had to do was sandwich a movie in between them. Piece of (wedding) cake.
STILLS | Back to Contents
Before we get into the edits we did to the clips, we should discuss our use of stills. We took quite a few but we also had access to a few others. And in one case, we shot a video clip of someone taking stills.
So we wanted to incorporate a few stills into the movie.
With the video clip, it was easy. You see the uncle lining everyone up and snapping the shutter and then the clip cuts to the still, with a shutter sound overlaid on it. Those stills we framed in Photoshop with a simple Frame action. We changed the Frame color to match the event color scheme (an aquatic blue).
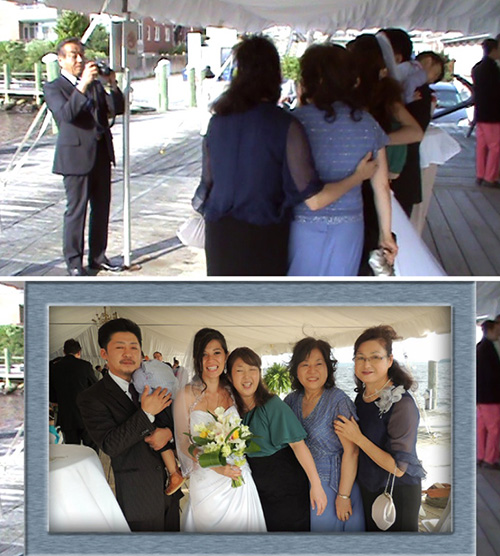
Using Stills. As the video captures the photographer posing a group (top), it cuts to the captured image.
With the other stills, we used a little pan and zoom -- or in Premiere a Motion effect. It's a little awkward doing this in Premiere, compared to Fotomagico but you get the hang of it quickly.
KEYFRAMES | Back to Contents
You get the hang of it when you learn how to use keyframes. Again a Jeff Sengstack video on Using Keyframes to Control Audio Volume came to the rescue.
But they're pretty simple.
A line represents the duration of the clip on the Timeline. You enable keyframes with a click that establishes the initial settings at the beginning of that line (which, it turns out, is a graph).
Move along the line until you want something to happen. Lower the audio or resize the image or move the image. It can be anything, really. It depends on the effect you're editing.

Keyframes. While they appear on the Timeline and in the Source panel, we preferred editing them in the Source panel (shown here).
Then click to add a point to the line (or graph) and either change the variables displayed (for pan and zoom you would change the location of the image and its percentage) or move the point up or down (for audio volume changes).
ENHANCING THE IMAGE | Back to Contents
It's fun to pull up a still in your favorite image editor and hit the Auto Levels control or apply an S-curve in Curves to it "to make the image pop," as those armchair image cowboys like to say. But we had little desire to do it to a video clip. Every frame? The newlyweds would have three children before we'd finish rendering the scene.
Not to worry. Premiere makes this pretty simple to do and very efficient. It's all under the Effects tab. Grab an effect and just drag it onto the clip in the Timeline. Then, in the Source pane, you can fiddle with the effects parameters.
We had two big image quality problems to deal with. One was exposure. The other white balance.
EXPOSURE | Back to Contents
The lighting during the ceremony. The other was the lighting in the reception room. Neither location was set up with any event lighting. The outdoor ceremony under a tent in the late afternoon was strongly backlit. The indoor reception seemed to be lit mainly be red Exit signs.
Gamma. A button on the Sony camcorder enabled a backlighting adjustment to exposure but, reviewing the clips of the ceremony in the tent with the bright afternoon sun glancing off the sparkling surface of the harbor, we felt out subjects were underexposed.
A slight Gamma adjustment was all that was required to lighten up the middle tones in those clips. Image Effects, Gamma Correction. It was set at 10 and we knocked it down to 8.
That maintained the blacks so we had a decent tonal range. And we just let the bright background go. Nobody would be looking at the boats.
In the dim lighting of the reception room, the light was not always favorable. This was especially true of the toasts, which were given in an open spot by a side door among the tables. There were overhead lights but no spot on the speaker.
We improved those captures using the Gamma adjustment, too.
WHITE BALANCE | Back to Contents
If you're using one camera, white balance is not going to be much of an issue. But we used two cameras. And while the outdoor shots matched, daylight being daylight, the indoor shots didn't. The Olympus was warmer and the Sony much cooler.
This was really one of the last edits we made to the movie, after everything else had been done. That's recommended workflow. Tweak the color at the end.
Looking at the footage, we found the Sony capture must less appealing. As a pro once told us, you'll never get fired for warming up a shot a bit. And in the case of a wedding reception, the warmer the better.
So we had to do a little color grading, as it's called.
With the Creative Suite, you can tap into the power of an application called SpeedGrade. With one click you can set the color lookup table of one clip to that of another clip so the color matches.
But, as we learned from Jeff Sengstack's Color Grade a Premiere Pro Sequence in SpeedGrade, the Lumetri color engine in SpeedGrade is also used in the Premiere Pro CC. Under Effects, there's the Lumetri Look section with a variety of lookup tables or LUTs, you can apply.
So we tried that, using the Warm Overall look. That did the job, replacing the cool blues with a warm yellow throughout the Sony scenes. It wasn't quite as warm as the Olympus LUT, but we weren't sure we wanted to go there for everything.
The Olympus clips were more intimate moments and we liked having them a little warmer. So Lumetri Looks did the job for us.
IMAGE STABILIZATION | Back to Contents
We had one camera on a tripod and used the other handheld. Sometimes (on the dance floor, say) the handheld shots added a little excitement to the scene. But sometimes (during the ceremony) they were a little disturbing.
You can, however, stabilize the shaky clips. You pay a little penalty with a tighter crop. As the image bounces around the frame, it's the common areas that have to be cropped to. But that wasn't a big issue for our shots.
A bigger problem was the length of the clips. Short clips are easily stabilized. Every frame is read before an analysis is done and the stabilization achieved. We had some very long clips for the toasts when, surprised they had begun, we were marooned at our table with a single camera. You don't want to stabilize a 10,000 frame clip.
There are a couple of ways to stabilize a clip in Premiere.
The first method we used was to send the clip to After Effects, stabilize it and swap it back in automatically with what Adobe calls dynamic linking. The clip that is swapped actually has a different color on the Timeline so you know it's an After Effects swap.
But the Warp Stabilizer from After Effects is now built into Premiere Pro CC. You can simply drag it onto the clip like any other effect. In the Source pane, you set the options you want to use and that's that.
We used the No Motion with Position method for the harpist. We tried them all and got some funny results (a warping harp was one).
MULTICAMERA EDITING | Back to Contents
With more than one camera tracking the same scene, editing gets interesting. If you put one clip on one video track and another on one above it, you obscure the first. So it can be tricky to see what you're doing.
Premiere Pro, however, has a Multicamera mode in which you can see more than one clip at a time. And use numbers or the mouse to switch between cameras. That can be a little rough, but you can easily fine-tune it later.
Select the clips you want to work on in the Project pane and right-click to select Create a Multicamera Source Sequence. You then tell Premiere how you want to sync the clips.
You have a few choices. You can us In Points (if all your clips start at exactly the same moment) or Timecode (if they all were shot with timecodes), for example. But the one we used (repeatedly) and with great success was audio. Because you've always got audio.
Then it was just a matter of picking which view we wanted when with the mouse of the numbers on the keyboard.
Jeff Sengstack to the rescue again with Using Multicam Mode
THREE-POINT EDITING | Back to Contents
But most of our clip editing was a simpler three-point edit in which we set an In and Out Point in the source and either Inserted it into the Timeline or Overwrote the Timeline for the duration of the edited clip.
Maxim Jago presents a good tutorial on that in Three-Point Edits.
Once things are on the Timeline, though, you can still edit them. And in fact, mostly we dispensed with setting In/Out Points in the source and just trimmed the clip on the Timeline with a nice, efficient ripple edit that closed any gap our cut had created on the Timeline.
AUDIO | Back to Contents
Audio quality seems to be generally underrated. It isn't as much fun to set up the audio as it is to play with the camera. And there's almost no feedback during recording unless you're using professional equipment.
You can cut in plenty of shots for scene, but you really can't fudge the audio.
But good audio separates the adults from the children. And in our case, with our digital recording of the vows the only capture of them (since they weren't broadcast with the officiant's mic), audio was the backbone of our production.
You can cut in plenty of shots for scene, but you really can't fudge the audio.
Audio appears under the Timeline in a layer of its own, even when associated with a video layer above the Timeline. And with Premiere CC, you can sync layers by their audio content. Which is worth the price of admission.
And you generally work with audio in Premiere much as you do with video. Keyframes make it easy to mix tracks, dropping the volume on one so you can hear another.
Our camera audio was pretty good. And our audio recorder did a great job, too. So we didn't have to polish the audio. That wind? Well, we used the digital audio recorder's capture (which was protected from the buffeting by a jacket pocket).
We did have to drop one track's volume but that was it. You can also mute whole tracks. But we wanted some of this track's audio, so we used keyframes to indicate when volume changes should occur and how much they should be.
Two good intros to audio in Premiere Pro are Abba Shapiro's Working With Audio and Jeff Sengstack's Understanding Audio Editing.
NESTING | Back to Contents
Nesting is an editing technique in which you put one sequence composed of a set of clips into another sequence. The original sequence can be treated like any other clip in the new sequence.
So you can apply an effect once that applies to all the clips in the sequence. It can also be easier to move more complex layers of video and audio at once. So there are some important advantages to nesting, making it an essential tool rather than an advanced technique.
Here are three tutorials we found useful for learning how and why to nest.
- Jeff Sengstack's Using Nested Sequences
- Maxim Jago's Nesting, Auto-Nesting, and Working with Nested Sequences shows the technique in CS5
- Maxim Jago Nesting A Sequence in Premiere Pro
This can get confusing fast, but it's also a powerful way to edit your work. If you edit the original clips, though, the sequence in which they appear will silently be updated as well.
Clip In and Out Points are handled differently from Timeline In and Our Points (which are not honored in a sequence). So be careful or you'll be surprised. You aren't freezing the component clips by nesting them into a sequence.
Even though a sequence bundles the clips into one video and audio clip (even if you don't have any audio in the video), you can still see the individual parts by double clicking on the sequence. And you can bring a sequence into the Timeline as a single clip or its component parts in Premiere CC.
We nested various scenes in our movie chapters and nested the chapters into one final movie sequence.
PRODUCTIVITY | Back to Contents
As our first full-length feature film <g>, we spent a lot more time on this than would be practical as a commercial activity. But we have to add that were we to do it again, it would go much, much quicker.
One reason is that we were learning as we plodded along. We tried multiple approaches to see what each offered. We screwed things up.
The other reason is that because this took so long, we had lapses in memory. We forgot from one weekend to the next how we did something and had to review the video tutorial again.
It's burned in our brain now.
We almost feel we could put together a rough cut that looked more like the final movie than our rough cut did in just about the same amount of time. Because we know what we're doing now.
So if you're thinking about offering video services, it's worth spending a few weekends putting a birthday party movie together to get the process burned into your head. Your first results will be excellent but the second time through you'll be a lot more productive.
NEXT | Back to Contents
Editing the clips into a movie was a lot of fun. But the real challenge for us still lay ahead. In a word: encoding.
(Editor's Note: This is the third of a five-part series on editing a wedding video. Links to the other stories are in the main table of contents at the top right of each story.)