Photo Corners headlinesarchivemikepasini.com
![]()
A S C R A P B O O K O F S O L U T I O N S F O R T H E P H O T O G R A P H E R
![]()
Enhancing the enjoyment of taking pictures with news that matters, features that entertain and images that delight. Published frequently.
Exposure X: Exporting, Conclusion


10 February 2016
In this fourth and final part of our review of Alien Skin's Exposure X, we look at its exporting feature before considering the application's place in any photographer's imaging ecosystem. The short view and the long view, you might say.
EXPORTING
We export almost every image we edit, so we're including a discussion of the Export options here, too.
Exporting itself is actually an indispensable function in a non-destructive stand-alone editor because it's the only way to see your edits outside the application itself. Which isn't true if you're using Exposure X as a plug-in where the host application takes over after you've finished your edits.
The process, like everything in Exposure X, is well thought out.
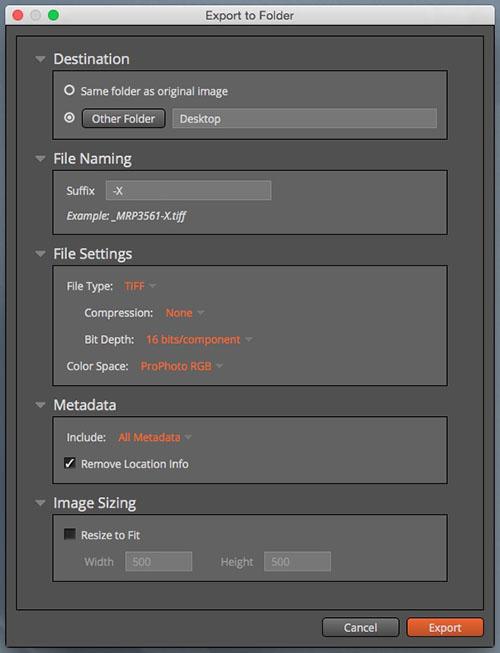
It begins in the Browser, where you can select the images you want to export. Then open the Export window (File>Export does it) where you can walk down the options:
- Destination: Select the output folder. It can be the same folder as your originals or any folder you designate by browsing to it.
- File Naming: Provides an optional suffix name. You can use anything. The default is
-Expbut our examples use-X.- File Settings: JPEG/TIFF/Original with various options and a Color Space option (sRGB for the Web, for example).
- Metadata: The Exif header contains quite a bit of information about an image. You can elect to include all of it or none of it. For security reasons, you may include all of it but check the Remove Location Info option so no GPS coordinates are retained.
- Image Sizing: Horizontal and vertical dimensions (but no enlargements; use zero to avoid constraining that dimension)
Click the Export button to start the export and look for any warnings. If there are none, a progress bar will appear but you can continue working in Exposure X during the export.
Here are a couple of typical Export dialogs, the first set up for high-quality TIFFs and the second for Web JPEGs:

TIFF Export. Bit depth and color space options for high quality.

JPEG Export. Compression and color space options for the Web.
The second Export example activates resizing. Exposure X won't enlarge but it won't constrain a dimension if you set it to zero. So if you're only worried about the width, you can set the height to zero. In this case we knew the width is larger than the height so we just made sure the height was as large a value as the width.
One ProblemWe only had one problem with the Export function in this version of Exposure X.
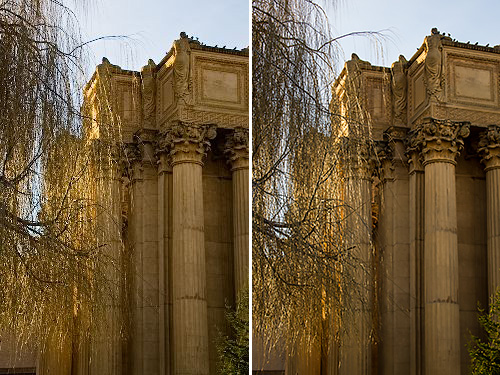
What cripples this handy option is the lack of any kind of output sharpening when exporting at a reduced size. Since all our exports are reduced for the Web, that means we can't use it at all for our production needs.
You can see the problem in the illustration below. The Exposure X version was downsized from full resolution to 500 pixels without any sharpening applied while the Photoshop version of the image was downsized to 500 pixels with Smsrt Sharpening applied.

Output Sharpening. Details are sharper in the Photoshop rendering (r).
You'll note the more delicate branches above the woman's head are so soft they're disappearing.
Smart Sharpening, of course, is interactive. We can set the values and evaluate the result before we save the smaller file.
Sharpening on Export, however, is trickier. Either the application has to be a lot smarter about the optimum amount and kind of sharpening to apply based on the output dimensions or, like Lightroom, it has to give the user a range of simple options.
The problem with the first approach is that it may not be clear from the output dimensions if the image is destined for screen display or to be printed. That makes a difference. Lightroom's Print module knows you aren't outputting for screen display, so it can make an intelligent sharpening adjustment. But it also matters if you're printing on matte or glossy paper.
Some things just can't be guessed.
In Lightroom's batch Export dialog, you select between Screen/Matte/Glossy and Low/Standard/High sharpening. The setting is applied to all the images you export.
Something like that would do the trick for Exposure X. Otherwise, the best approach is to send the image back at full resolution to Lightroom or Photoshop for resizing and output sharpening.
CONCLUSION
Image editing just won't sit still. As our hardware has become more powerful, it's gone way beyond basic tone and color adjustments. And even those aren't so basic when you have options to work in 16-bit or 32-bit channels.
We routinely tap into new tools from Adobe like the Healing Brush, Upright tool and Dehaze because they solve problems we no longer have to live with. They weren't part of the routine even just a few years ago but we can hardly live without them now.
And employing the new tools doesn't feel like more work to us. It feels like more fun.
We enjoy using them so much we almost always shoot in Raw to get the most out of them. The only JPEGs we capture are from our phone and we stomp our feet and cry when we edit those because they just don't let us do much.
Image editing is, at root, fun. Pity the snapshooters who don't bother. They don't know what they're missing.
Adobe's 26-year head start with Photoshop is a big lead on companies that want to build new image editing software from scratch. Not to mention the digital asset management and output options Lightroom brings to the table.
Alien Skin has taken a sober approach to the challenge. Building on its well-executed film emulation software, it has expanded its features with a quick browser and non-destructive editing tool that still functions as a plug-in as well as a standalone product.
At version 1.0, Exposure X's browser may be a little CPU-intensive on Raw-file thumbnail generation and the editor may be missing a few fancy new tools but we applaud the concept as well as its execution.
We look forward to the next version with more than a little enthusiasm.
(Editor's Note: This is the fourth and final part of a multi-part review of Alien Skin's Exposure X. Links to the other stories are in the main table of contents at the top right of each story.)